How To use special character on LCD
How to display special character on standard LCD or LCD I2C using Arduino? I want to display a special character or symbol (e.g. heart, angry bird)
Answer
The below solution works for both standard LCD and LCD I2C.
lcd.print() function supports only ASCII characters. If you want to display a special character or symbol (e.g. heart, angry bird), you need to use the below character generator.
LCD 16x2 can display 32 characters (2 rows and 16 columns). Each character is composed of 40 pixels (8 rows and 5 columns).
The character generator represents a character (40 pixels). You just need to do the following steps:
Click on each pixel to select/deselect
Copy below custom character code
Replace the customChar[8] in the below code
#include <LiquidCrystal.h>
// LCD pins <--> Arduino pins
const int RS = 11, EN = 12, D4 = 2, D5 = 3, D6 = 4, D7 = 5;
LiquidCrystal lcd(RS, EN, D4, D5, D6, D7);
byte customChar[8] = {
0b00000,
0b01010,
0b11111,
0b11111,
0b01110,
0b00100,
0b00000,
0b00000
};
void setup()
{
lcd.begin(16, 2); // set up number of columns and rows
lcd.createChar(0, customChar); // create a new custom character
lcd.setCursor(2, 0); // move cursor to (2, 0)
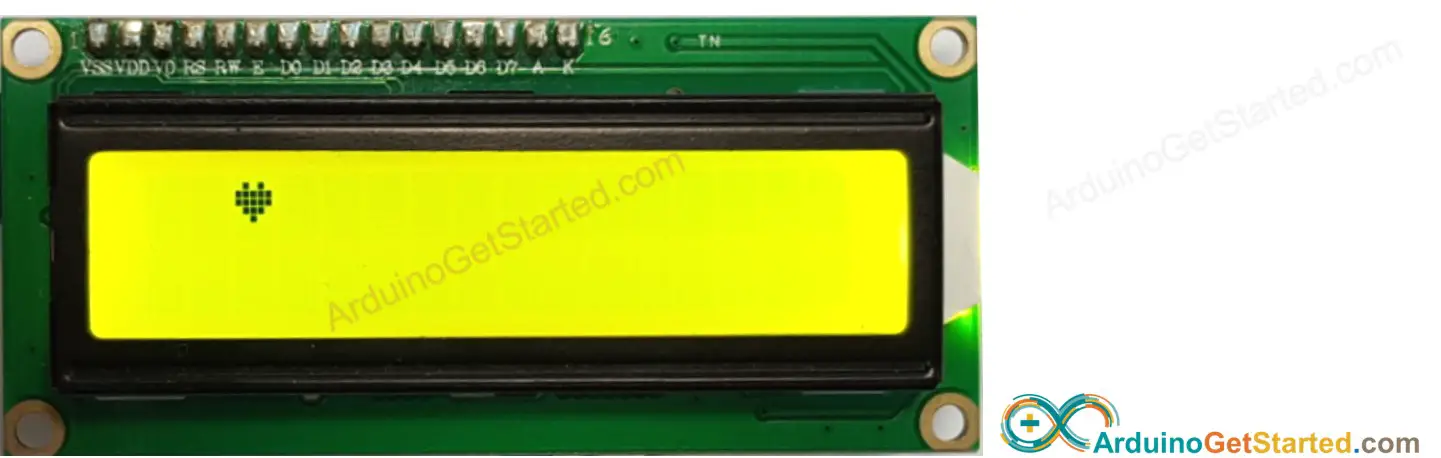
lcd.write((byte)0); // print the custom char at (2, 0)
}
void loop()
{
}
Result on LCD:
Multiple custom characters
We can create up to 8 custom characters (indexed 0 to 7). The below example creates and displays three characters.
#include <LiquidCrystal.h>
// LCD pins <--> Arduino pins
const int RS = 11, EN = 12, D4 = 2, D5 = 3, D6 = 4, D7 = 5;
LiquidCrystal lcd(RS, EN, D4, D5, D6, D7);
byte customChar0[8] = {
0b00000,
0b01010,
0b11111,
0b11111,
0b01110,
0b00100,
0b00000,
0b00000
};
byte customChar1[8] = {
0b00100,
0b01110,
0b11111,
0b00100,
0b00100,
0b00100,
0b00100,
0b00100
};
byte customChar2[8] = {
0b00100,
0b00100,
0b00100,
0b00100,
0b00100,
0b11111,
0b01110,
0b00100
};
void setup()
{
lcd.begin(16, 2); // set up number of columns and rows
lcd.createChar(0, customChar0); // create a new custom character (index 0)
lcd.createChar(1, customChar1); // create a new custom character (index 1)
lcd.createChar(2, customChar2); // create a new custom character (index 2)
lcd.setCursor(2, 0); // move cursor to (2, 0)
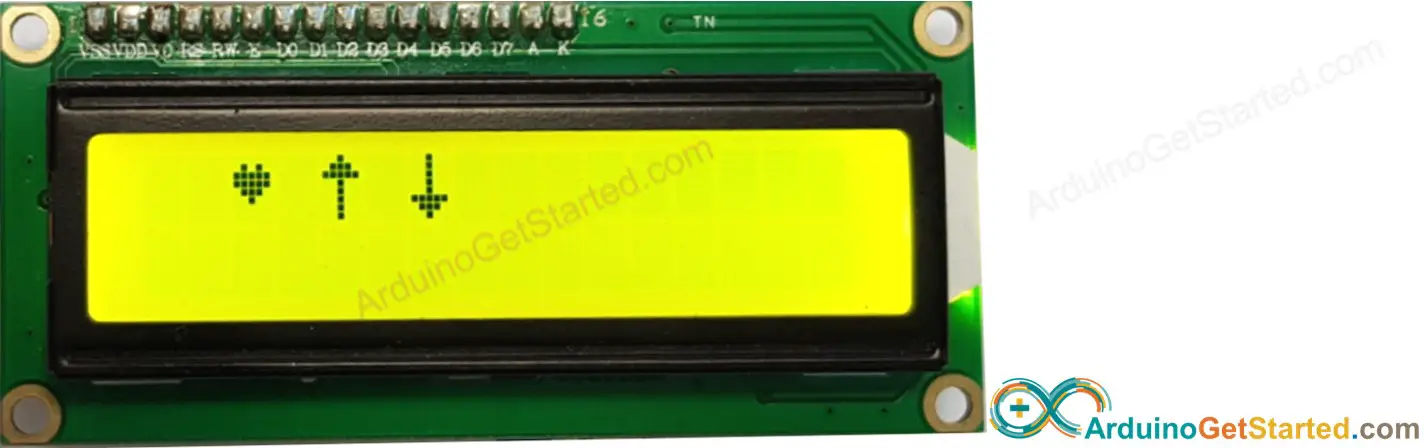
lcd.write((byte)0); // print the custom char 0 at (2, 0)
lcd.setCursor(4, 0); // move cursor to (4, 0)
lcd.write((byte)1); // print the custom char 1 at (4, 0)
lcd.setCursor(6, 0); // move cursor to (6, 0)
lcd.write((byte)2); // print the custom char 2 at (6, 0)
}
void loop()
{
}
Result on LCD:
Summary: how to use custom character on LCD
- Use the above character generator to create binary code for the custom character.
- Declare the binary code for the custom character (copy from above step)
byte customChar[8] = {
0b00000,
0b01010,
0b11111,
0b11111,
0b01110,
0b00100,
0b00000,
0b00000
};
- Create custom character and assign to an index value (from 0 to 7) in setup() function
lcd.createChar(index, customChar);
- Print the custom character in LCD anytime, anywhere (in setup() or loop() function)
lcd.setCursor(column, row); // move cursor to a desired position
lcd.write((byte)index); // print the custom char at the desired position
Buy Arduino and LCD
| 1 × Arduino UNO Buy on Amazon | |
| 1 × USB 2.0 cable type A/B Buy on Amazon | |
| 1 x LCD I2C Buy on Amazon | |
| 1 × Jumper Wires Buy on Amazon |
Disclosure: Some links in this section are Amazon affiliate links. If you make a purchase through these links, we may earn a commission at no extra cost to you.
Additionally, some links direct to products from our own brand, DIYables .
Additionally, some links direct to products from our own brand, DIYables .