How to input a multiple digits number using the keypad

Arduino keypad libary returns only a single key when reading. how can I read a multi digit input and put it into a numeric variable? How can read a number from keypad to set servo motor's angle, set temperature threshold... For example, if I press "120" keys on keypad, the value of an integer variable is 120. if I press "12" keys on keypad, the value of an integer variable is 12.

Answer

There are some ways to input the multiple digits number to a integer variable. The simplest way is described as follows:

When a key is pressed:

The advantages of this method are simple and able to get one-digit number, two-digit number, three-digit, four-digit number, or any-digit number WITHOUT pre-defineing the mumber of digit.

Arduino Code for Reading the Multiple Digit Number For Keypad 3x4

/* * Created by ArduinoGetStarted.com * * This example code is in the public domain * * Tutorial page: https://arduinogetstarted.com/faq/how-to-input-a-multiple-digits-number-using-the-keypad */ #include <Keypad.h> const int ROW_NUM = 4; //four rows const int COLUMN_NUM = 3; //three columns char keys[ROW_NUM][COLUMN_NUM] = { {'1', '2', '3'}, {'4', '5', '6'}, {'7', '8', '9'}, {'*', '0', '#'} }; byte pin_rows[ROW_NUM] = {9, 8, 7, 6}; //connect to the row pinouts of the keypad byte pin_column[COLUMN_NUM] = {5, 4, 3}; //connect to the column pinouts of the keypad Keypad keypad = Keypad( makeKeymap(keys), pin_rows, pin_column, ROW_NUM, COLUMN_NUM ); String inputString; long inputInt; void setup() { Serial.begin(9600); inputString.reserve(10); // maximum number of digit for a number is 10, change if needed } void loop() { char key = keypad.getKey(); if (key) { Serial.println(key); if (key >= '0' && key <= '9') { // only act on numeric keys inputString += key; // append new character to input string } else if (key == '#') { if (inputString.length() > 0) { inputInt = inputString.toInt(); // YOU GOT AN INTEGER NUMBER inputString = ""; // clear input // DO YOUR WORK HERE } } else if (key == '*') { inputString = ""; // clear input } } }

Arduino Code for Reading the Multiple Digit Number For Keypad 4x4

/* * Created by ArduinoGetStarted.com * * This example code is in the public domain * * Tutorial page: https://arduinogetstarted.com/faq/how-to-input-a-multiple-digits-number-using-the-keypad */ #include <Keypad.h> const int ROW_NUM = 4; //four rows const int COLUMN_NUM = 4; //four columns char keys[ROW_NUM][COLUMN_NUM] = { {'1','2','3', 'A'}, {'4','5','6', 'B'}, {'7','8','9', 'C'}, {'*','0','#', 'D'} }; byte pin_rows[ROW_NUM] = {9, 8, 7, 6}; //connect to the row pinouts of the keypad byte pin_column[COLUMN_NUM] = {5, 4, 3, 2}; //connect to the column pinouts of the keypad Keypad keypad = Keypad( makeKeymap(keys), pin_rows, pin_column, ROW_NUM, COLUMN_NUM ); String inputString; long inputInt; void setup() { Serial.begin(9600); inputString.reserve(10); // maximum number of digit for a number is 10, change if needed } void loop() { char key = keypad.getKey(); if (key) { Serial.println(key); if (key >= '0' && key <= '9') { // only act on numeric keys inputString += key; // append new character to input string } else if (key == '#') { if (inputString.length() > 0) { inputInt = inputString.toInt(); // YOU GOT AN INTEGER NUMBER inputString = ""; // clear input // DO YOUR WORK HERE } } else if (key == '*') { inputString = ""; // clear input } } }

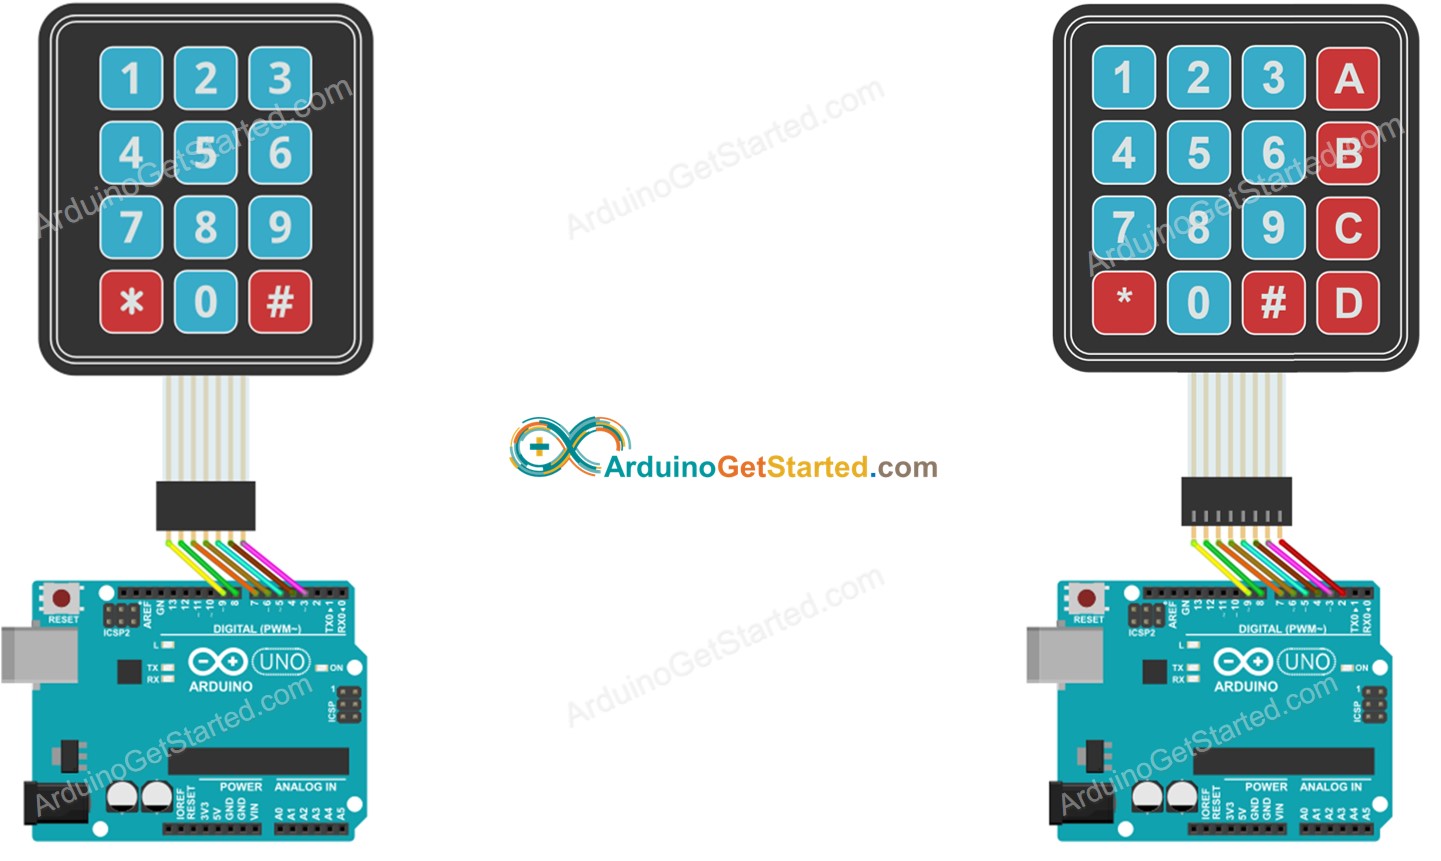
The wiring diagram for above code:

Arduino Keypad Wiring Diagram

This image is created using Fritzing. Click to enlarge image

※ NOTE THAT:

In the above code, inputString.reserve(10) is used to prevent the memory fragmentation issue on String library

To learn more about keypad, see Arduino - Keypad tutorial

Hardware for above code

1 × Arduino UNO Buy on Amazon
1 × USB 2.0 cable type A/B Buy on Amazon
1 × Keypad 3x4 Buy on Amazon
1 × Keypad 4x4 (optional) Buy on Amazon
Disclosure: Some links in this section are Amazon affiliate links. If you make a purchase through these links, we may earn a commission at no extra cost to you.
Additionally, some links direct to products from our own brand, DIYables.

The Best Arduino Starter Kit

※ OUR MESSAGES