Arduino Uno R4 WiFi Query String Web Server - Dynamic URL Parameters
WebServerQueryStrings Example - Dynamic Multi-Page Server
Overview
This example demonstrates how to create a dynamic multi-page web server that uses URL query parameters to provide interactive content and control functionality with seamless page navigation.
Features
- Multi-page navigation with dynamic content based on URL parameters
- Temperature unit conversion (Celsius/Fahrenheit) via query parameters
- LED control with query string parameters
- Dynamic content generation based on user input
- Professional multi-page layout with consistent navigation
- URL parameter parsing and validation
Hardware Required
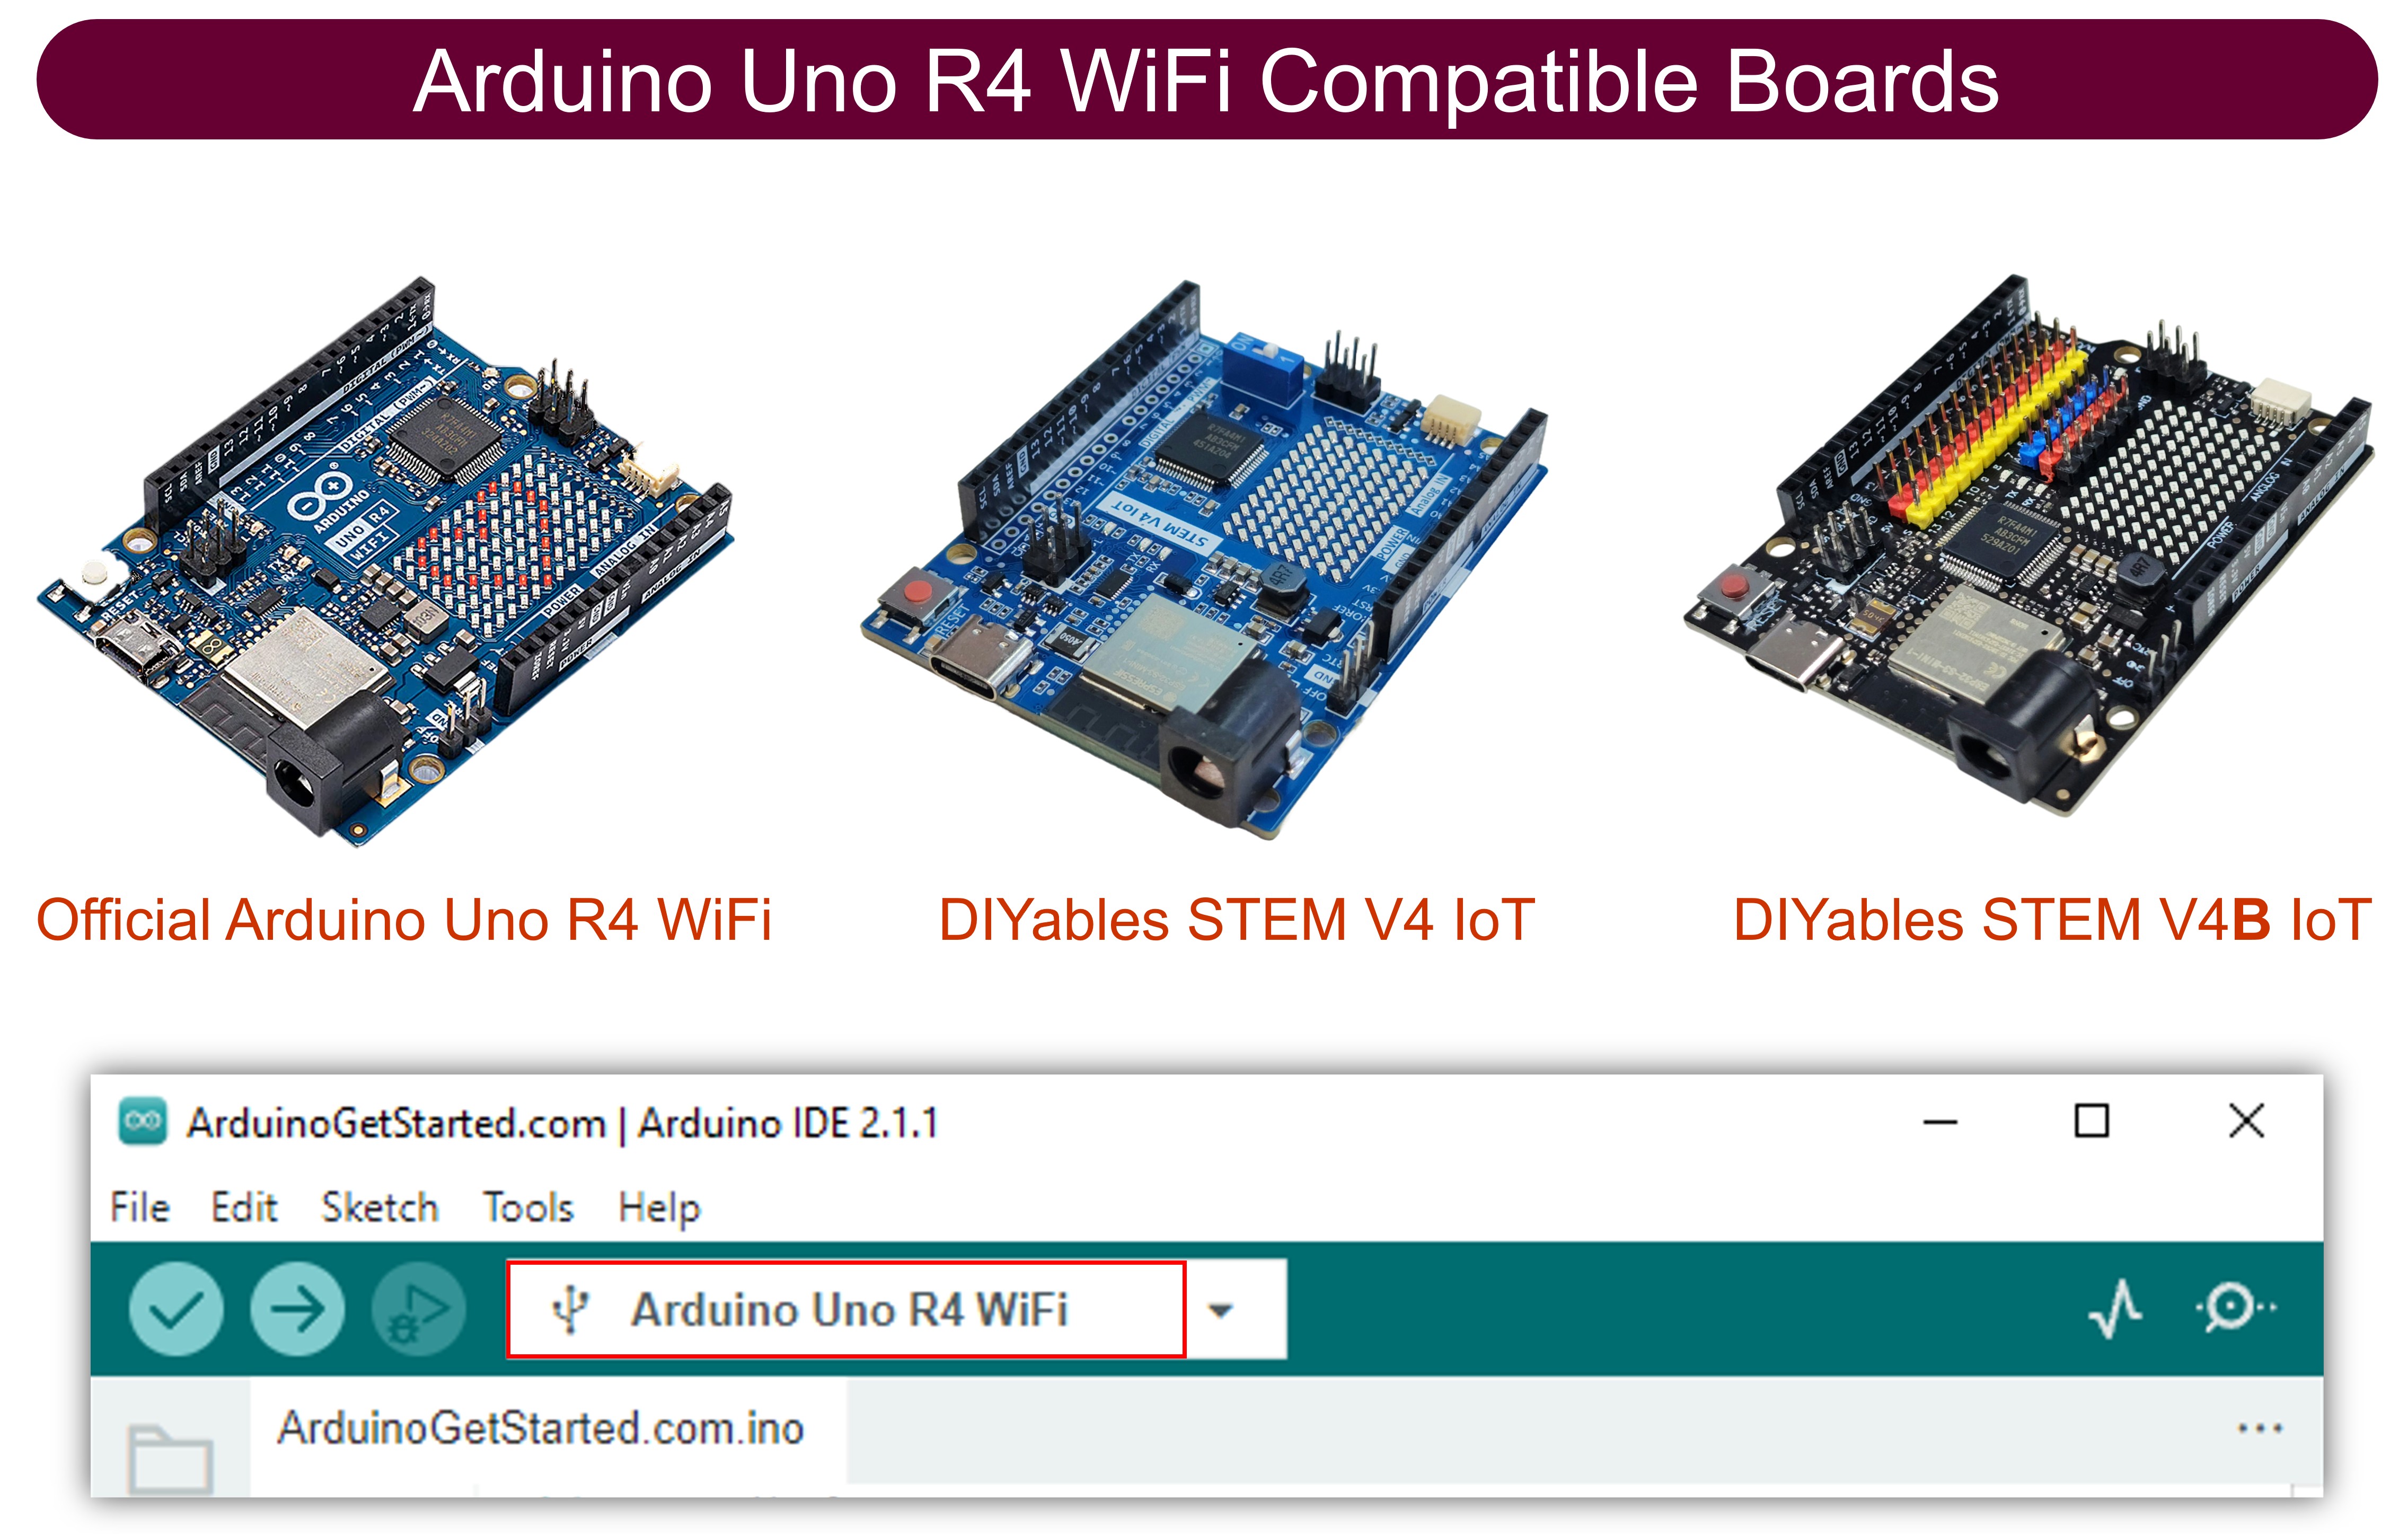
| 1 | × | Arduino UNO R4 WiFi | |
| 1 | × | Alternatively, DIYables STEM V4 IoT | |
| 1 | × | Alternatively, DIYables STEM V4B IoT | |
| 1 | × | USB Cable Type-C |
Additionally, some links direct to products from our own brand, DIYables .
Library Installation
Follow these instructions step by step:
- If this is your first time using the Arduino Uno R4 WiFi/Minima, refer to the tutorial on setting up the environment for Arduino Uno R4 WiFi/Minima in the Arduino IDE.
- Connect the Arduino Uno R4 board to your computer using a USB cable.
- Launch the Arduino IDE on your computer.
- Select the appropriate Arduino Uno R4 board (e.g., Arduino Uno R4 WiFi) and COM port.
- Open the Library Manager by clicking on the Library Manager icon on the left side of the Arduino IDE.
- Search for Web Server for Arduino Uno R4 WiFi and locate the mWebSockets by DIYables.
- Click on the Install button to add the mWebSockets library.

Web Server Query Strings Example
- On Arduino IDE, Go to File Examples Web Server for Arduino Uno R4 WiFi WebServerQueryStrings example to open the example code
Code Structure
- home.h: Home page HTML template
- temperature.h: Temperature monitoring page template
- led.h: LED control page template
- WebServerQueryStrings.ino: Main server logic
Circuit Connection
No external components required - this example uses the built-in LED on pin 13.
Query Parameter Features
Temperature Page Parameters
- unit=c or unit=celsius - Display temperature in Celsius
- unit=f or unit=fahrenheit - Display temperature in Fahrenheit
- No parameter - Defaults to Celsius
LED Control Parameters
- state=on - Turn LED on
- state=off - Turn LED off
Setup Instructions
1. Network Configuration
Edit the WiFi credentials directly in the WebServerQueryStrings.ino file:
2. Upload Code and Monitor Output
- Connect your Arduino Uno R4 WiFi to your computer
- Select the correct board and port in Arduino IDE
- Upload the WebServerQueryStrings.ino sketch
- Open Serial Monitor (9600 baud)
- Wait for WiFi connection
- Note the IP address displayed
- If you do not see IP address in Serial monitor, press the reset button on the Arduino Uno R4 WiFi or DIYables STEM V4 IoT board
Usage Examples
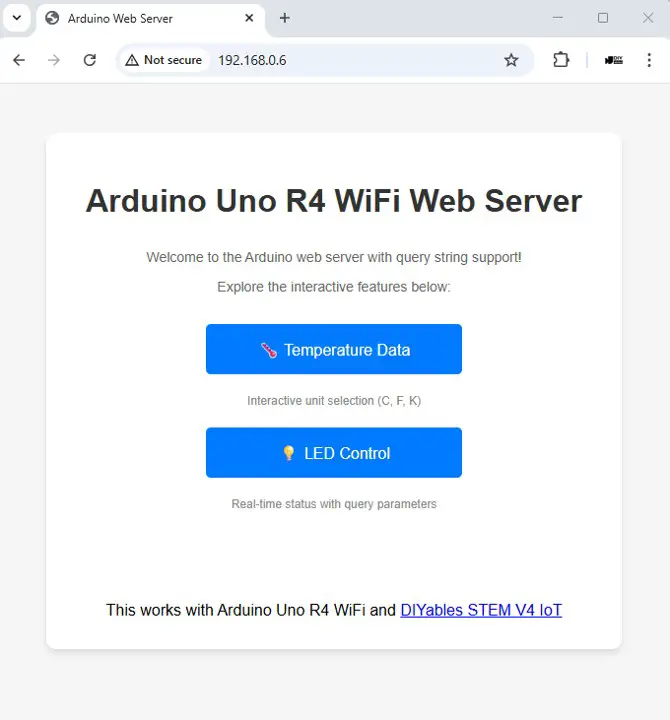
Open your web browser and enter the IP address displayed in the Serial Monitor to access the Arduino web server.
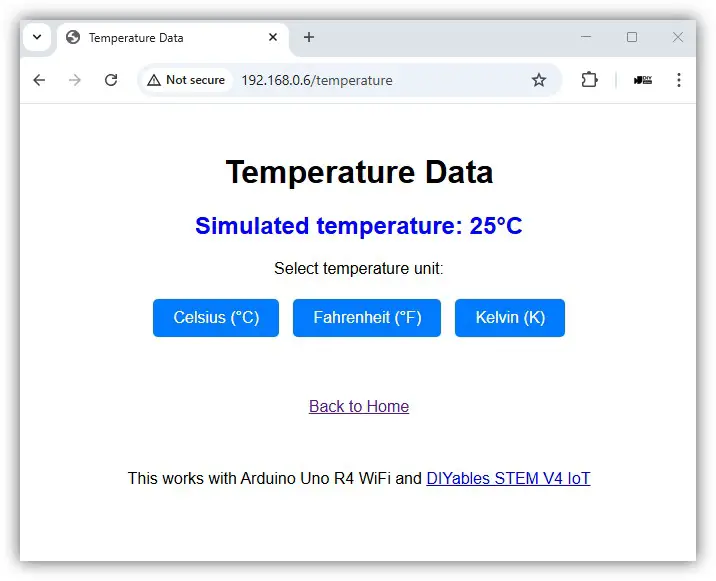
Test the Temperature Monitoring Function:
- Click on the "Temperature" menu.
- View the temperature display. Click each button to change the temperature unit
Test the LED Control Function:
- Click on the "LED Control" menu. You will see the web interface like the below:
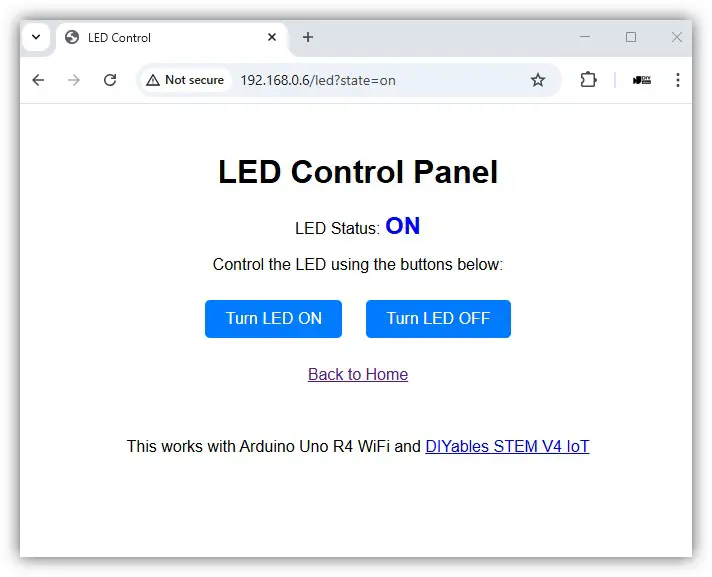
- Toggle the LED ON and OFF using the provided buttons.
- Observe the built-in LED status on the Arduino board update instantly.
Accessing Different Pages
Home Page
- URL: http://your-arduino-ip/
- Features: Welcome page with navigation menu
Temperature Page (Default - Celsius)
- URL: http://your-arduino-ip/temperature
- Display: Temperature in Celsius with unit selector
Temperature in Fahrenheit
- URL: http://your-arduino-ip/temperature?unit=f
- URL: http://your-arduino-ip/temperature?unit=fahrenheit
- Display: Temperature converted to Fahrenheit
LED Control
- Turn ON: http://your-arduino-ip/led?state=on
- Turn OFF: http://your-arduino-ip/led?state=off
Code Explanation
Query Parameter Processing
LED Control with Query Parameters
Parameter Validation
HTML Templates with Dynamic Content
Temperature Page Template
LED Control Template
Advanced Features
Route Configuration
Query Parameter Helper Functions
URL Building Helpers
Real Implementation Notes
Current Limitations
The actual implementation is simplified compared to a full-featured web server:
- Only supports single parameter extraction per handler
- Simple string-based temperature simulation (no unit conversion)
- Basic LED control with on/off states only
- Uses pin 9 instead of the standard pin 13
Troubleshooting
Common Issues
Parameters Not Working
- Check URL format: page?param=value
- Verify parameter names match exactly (case-sensitive)
- Current implementation uses state for LED, not action
LED Pin Issues
- This example uses pin 9, not pin 13
- Verify LED_PIN constant matches your hardware
Query Parameter Access
- Use QueryParams structure, not server.arg()
- Loop through params.params[i] to find specific parameters
Debug Output
Customization
Adding New Handler with Parameters
Template System Enhancement
The actual implementation uses simple placeholder replacement:
Next Steps
- Explore WebServerJson.ino for REST API development
- Try WebServerWithWebSocket.ino for real-time communication
- Implement form handling with POST parameters
Learning Resources
※ ARDUINO BUY RECOMMENDATION
| Arduino UNO R3 | |
| Arduino Starter Kit |