analogWrite()
Description
Writes an analog value (PWM wave) to a pin. Can be used to light a LED at varying brightnesses or drive a motor at various speeds. After a call to analogWrite(), the pin will generate a steady rectangular wave of the specified duty cycle until the next call to analogWrite() (or a call to digitalRead() or digitalWrite()) on the same pin.
| Board | PWM Pins | PWM Frequency |
|---|---|---|
| Uno, Nano, Mini | 3, 5, 6, 9, 10, 11 | 490 Hz (pins 5 and 6: 980 Hz) |
| Mega | 2 - 13, 44 - 46 | 490 Hz (pins 4 and 13: 980 Hz) |
| Leonardo, Micro, Yún | 3, 5, 6, 9, 10, 11, 13 | 490 Hz (pins 3 and 11: 980 Hz) |
| Uno WiFi Rev2, Nano Every | 3, 5, 6, 9, 10 | 976 Hz |
| MKR boards [1] | 0 - 8, 10, A3, A4 | 732 Hz |
| MKR1000 WiFi [1] | 0 - 8, 10, 11, A3, A4 | 732 Hz |
| Zero [1] | 3 - 13, A0, A1 | 732 Hz |
| Nano 33 IoT [1] | 2, 3, 5, 6, 9 - 12, A2, A3, A5 | 732 Hz |
| Nano 33 BLE/BLE Sense | 1 - 13, A0 - A7 | 500 Hz |
| Due [2] | 2-13 | 1000 Hz |
| 101 | 3, 5, 6, 9 | pins 3 and 9: 490 Hz, pins 5 and 6: 980 Hz |
- [1]: In addition to PWM capabilities on the pins noted above, the MKR, Nano 33 IoT, and Zero boards have true analog output when using analogWrite() on the DAC0 (A0) pin.
- [2]: In addition to PWM capabilities on the pins noted above, the Due has true analog output when using analogWrite() on pins DAC0 and DAC1.
You do not need to call pinMode() to set the pin as an output before calling analogWrite().
The analogWrite function has nothing to do with the analog pins or the analogRead function.
Syntax
analogWrite(pin, value)
Parameter Values
- pin: the Arduino pin to write to. Allowed data types: int.
- value: the duty cycle: between 0 (always off) and 255 (always on). Allowed data types: int.
Return Values
- Nothing
Example Code
Sets the brightness of LED proportional to the value read from the potentiometer.
Hardware Required
Additionally, some links direct to products from our own brand, DIYables .
Wiring Diagram
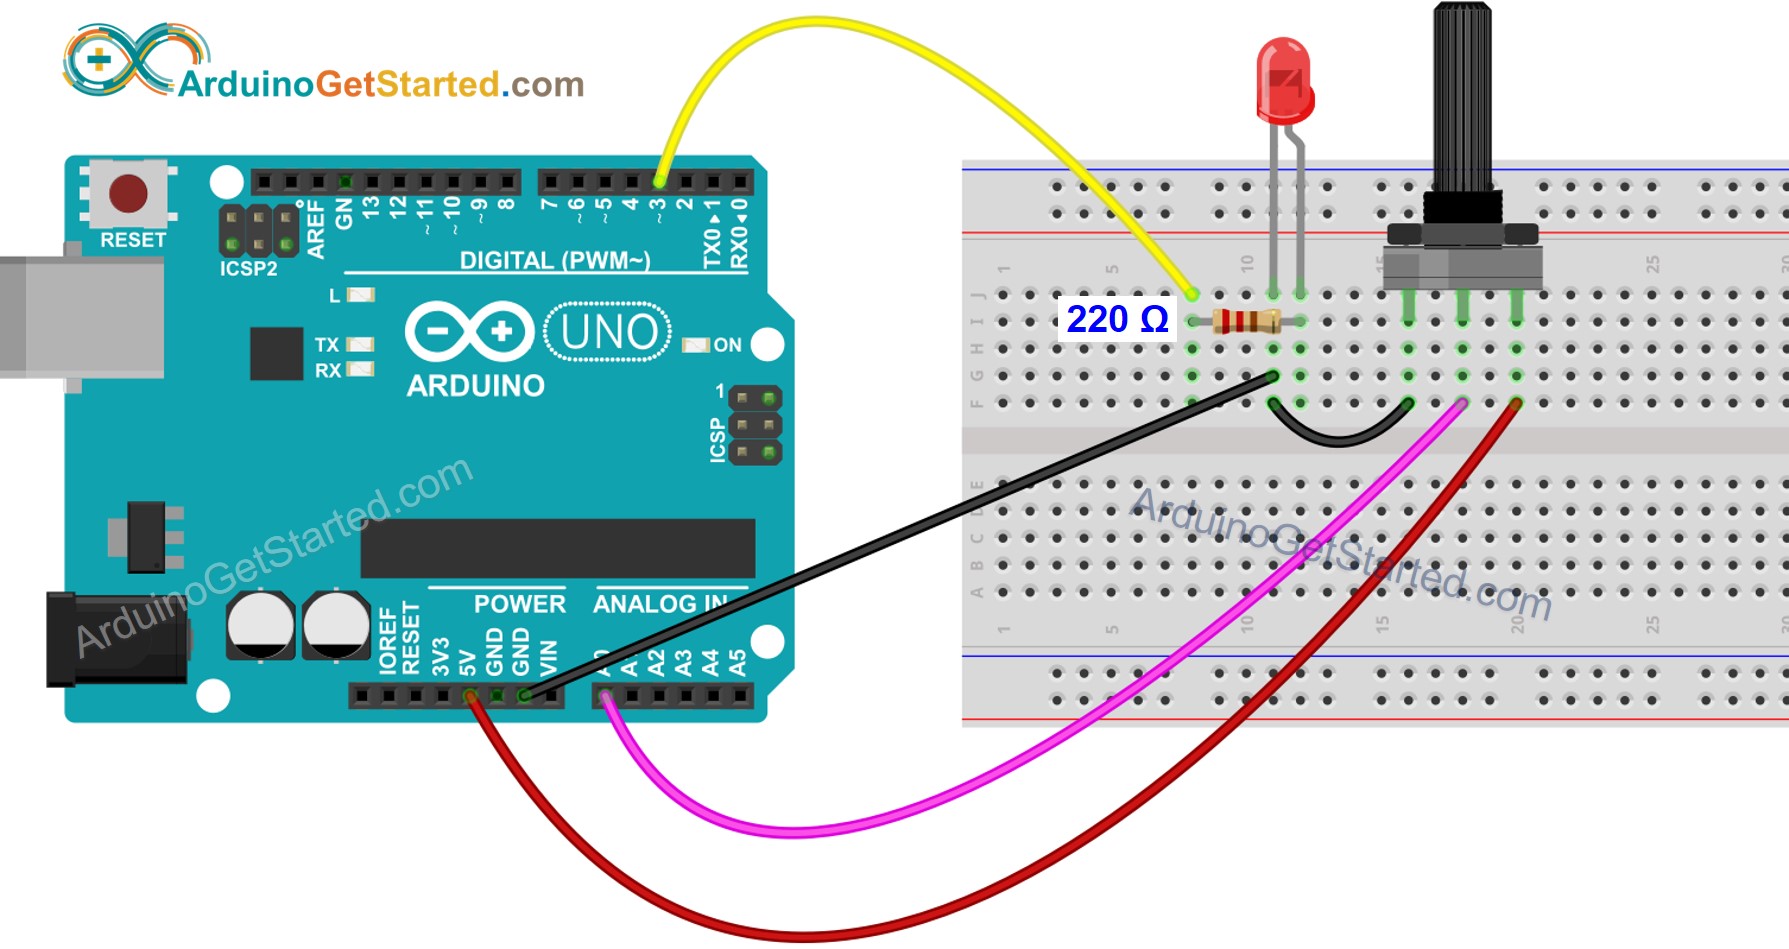
This image is created using Fritzing. Click to enlarge image
Arduino Code
For more detailed instruction, see Arduino - Potentiometer fade LED
※ NOTES AND WARNINGS:
- The PWM outputs generated on pins 5 and 6 will have higher-than-expected duty cycles. This is because of interactions with the millis() and delay() functions, which share the same internal timer used to generate those PWM outputs. This will be noticed mostly on low duty-cycle settings (e.g. 0 - 10) and may result in a value of 0 not fully turning off the output on pins 5 and 6.
- The analogRead() and analogWrite() functions do NOT read and write the same thing. analogRead() function reads the analog value which is converted from the voltage. analogWrite() function writes PWM signal. If you use the analogWrite() function first, and then use analogRead() function to read the value on the same pin, the read value is diferent from the wrote value. In other word, analogRead() function uses ADC (Analog to Digital) converter, but analogWrite() function does NOT use DAC (Digital to Analog) converter.
- The analog input pins can be used as digital pins, referred to as A0, A1, etc. The exception is the Arduino Nano, Pro Mini, and Mini's A6 and A7 pins, which can only be used as analog inputs.
See Also
- Language : analogRead()
- Language : analogReference()
- Language : analogWriteResolution()
- Example : Arduino - Fade LED
- Example : Arduino - Servo Motor
- Example : Blink
- Definition : PWM
※ ARDUINO BUY RECOMMENDATION
| Arduino UNO R3 | |
| Arduino Starter Kit |