Arduino - TM1637 4-Digit 7-Segment Display
This tutorial instructs you how to use a TM1637 4-digit 7-segment display module with Arduino. In detail, we will learn:
- How to connect the TM1637 display to Arduino.
- How to display integers and text on the 7-segment display.
- How to show temperature with a degree symbol.
- How to display time with a blinking colon separator.
- How to control individual digits and brightness.
Hardware Required
Or you can buy the following kits:
| 1 | × | DIYables STEM V3 Starter Kit (Arduino included) | |
| 1 | × | DIYables Sensor Kit (18 sensors/displays) |
Additionally, some links direct to products from our own brand, DIYables .
About the TM1637 4-Digit 7-Segment Display Module
The TM1637 is a driver IC for 7-segment LED displays. The module uses only two data pins (CLK and DIO) to communicate with the microcontroller, making wiring simple. It has built-in display memory, so once you write data to it, the display stays on without any refresh loop. The module also includes a colon separator between digit 1 and digit 2, which is useful for clock displays.
Key features of the module:
- 4 digits, each with 7 segments plus a decimal point
- Colon separator between the second and third digit
- 8 brightness levels (0-7)
- 2-wire interface (CLK + DIO)
- Built-in display memory - no refresh needed
- Operating voltage: 3.3V to 5V
Pin Mapping
| Function | Pin |
|---|---|
| CLK | Clock signal input |
| DIO | Data input/output |
| VCC | Power supply (3.3V or 5V) |
| GND | Ground |
The CLK and DIO pins can be connected to any digital pins on the Arduino.
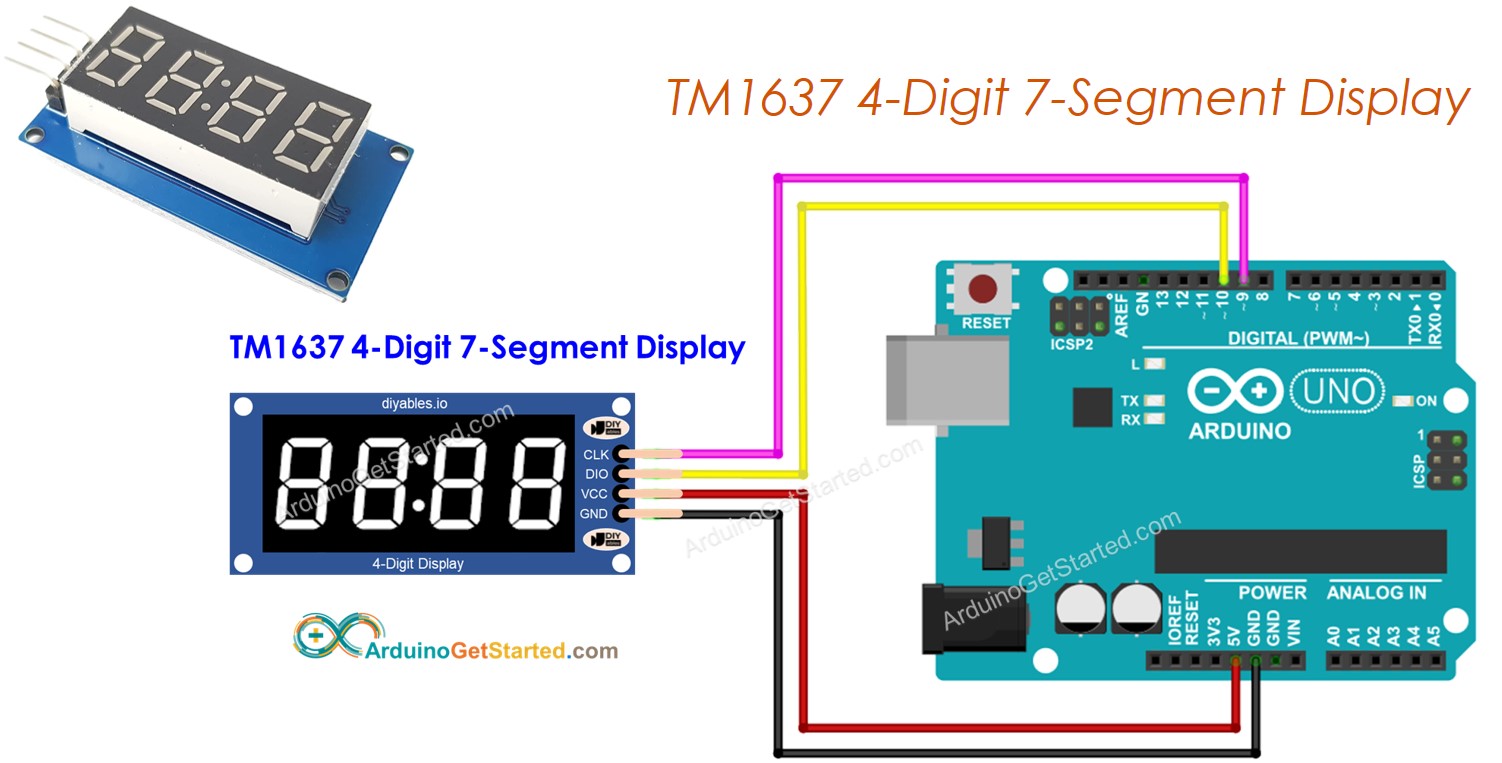
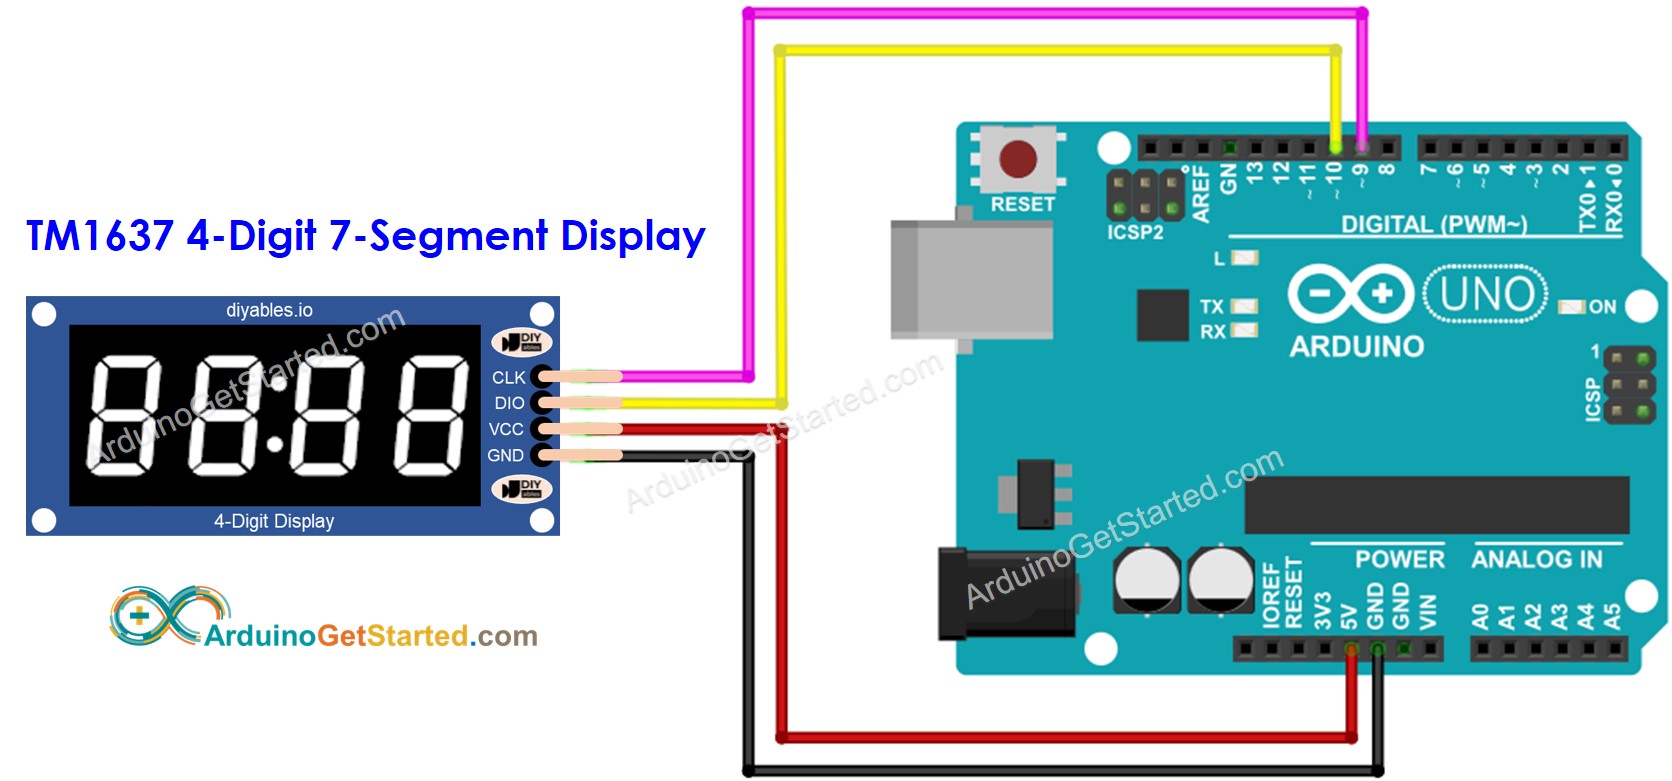
Wiring Diagram
Connect the TM1637 module to the Arduino as follows:
- CLK to Arduino pin 9
- DIO to Arduino pin 10
- VCC to 5V
- GND to GND
This image is created using Fritzing. Click to enlarge image
Library Installation
- Connect the Arduino board to your computer with a USB cable.
- Open Arduino IDE, select the right board and port.
- Navigate to the Libraries icon on the left bar of the Arduino IDE.
- Search "DIYables_4Digit7Segment_TM1637", then find the DIYables_4Digit7Segment_TM1637 library by DIYables.
- Click Install button to install the latest version of the library.
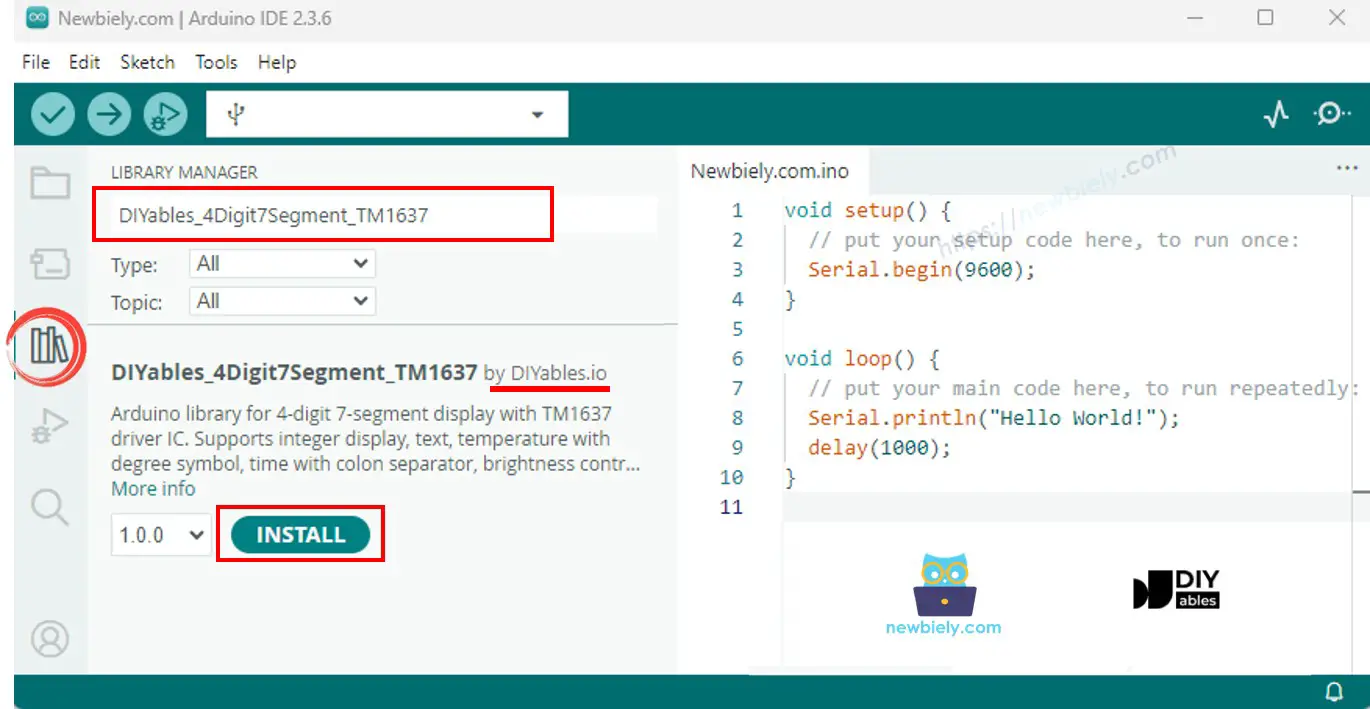
Note: This library is self-contained with no external dependencies.
Basic Structure
Every sketch using the DIYables_4Digit7Segment_TM1637 library follows this basic structure:
You create the display object with the CLK and DIO pin numbers, then call begin() in setup(). After that, use methods like print(), printTemperature(), or printTime() to show data on the display.
Arduino Code - Display Integer Numbers
This example shows how to display various integer values, including negative numbers and zero-padded output.
Quick Steps
- Wire the TM1637 module to your Arduino as shown in the wiring diagram above.
- Connect the Arduino board to your computer with a USB cable.
- Open Arduino IDE, select the right board and port.
- Copy the above code and paste it to the editor of Arduino IDE.
- Click Upload button on Arduino IDE to upload code to Arduino.
- Open the Serial Monitor to see the output.
The display will cycle through the numbers 0, 42, 1234, -5, -123, 9999, and then show 42 with zero-padding as "0042".
API Summary
| Method | Description | Example |
|---|---|---|
| print(int) | Display an integer (-999 to 9999) | display.print(1234) |
| print(int, true) | Display with leading zeros | display.print(42, true) |
| clear() | Clear the display | display.clear() |
Arduino Code - Display Text and Temperature
This example shows how to display text strings and temperature with the degree symbol.
Quick Steps
- Wire the TM1637 module to your Arduino as shown in the wiring diagram above.
- Copy the above code and paste it to the editor of Arduino IDE.
- Click Upload button on Arduino IDE to upload code to Arduino.
- Open the Serial Monitor.
The display will cycle through text strings "HELP", "Hi", "COOL", "done", then show temperatures "25°C" and "72°F".
API Summary
| Method | Description | Example |
|---|---|---|
| print(const char*) | Display a text string (up to 4 chars) | display.print("HELP") |
| printTemperature(int, char) | Display temperature with degree and unit | display.printTemperature(25, 'C') |
| DEGREE | Degree symbol constant for use in strings | display.DEGREE |
Arduino Code - Display Time with Blinking Colon
This example displays a clock-like time with a colon that blinks every 500 milliseconds.
Quick Steps
- Wire the TM1637 module to your Arduino as shown in the wiring diagram above.
- Copy the above code and paste it to the editor of Arduino IDE.
- Click Upload button on Arduino IDE to upload code to Arduino.
The display will show "12:30" with the colon blinking on and off every half second.
API Summary
| Method | Description | Example | |
|---|---|---|---|
| printTime(int, int) | Display time HH | MM with colon | display.printTime(12, 30) |
| printTime(int, int, bool) | Display time, control colon on/off | display.printTime(12, 30, false) |
Arduino Code - Blink the Display
This example blinks integer and text values using the off() and on() methods.
Quick Steps
- Wire the TM1637 module to your Arduino as shown in the wiring diagram above.
- Copy the above code and paste it to the editor of Arduino IDE.
- Click Upload button on Arduino IDE to upload code to Arduino.
- Open the Serial Monitor.
The display will blink "1234" five times, pause, then blink "HELP" five times, and repeat.
API Summary
| Method | Description | Example |
|---|---|---|
| off() | Turn off the display (data preserved) | display.off() |
| on() | Turn display back on | display.on() |
| setBrightness(int) | Set brightness 0-7 | display.setBrightness(4) |
Arduino Code - Individual Digit Control
This example shows how to set each digit separately using numbers, characters, and the colon.
Quick Steps
- Wire the TM1637 module to your Arduino as shown in the wiring diagram above.
- Copy the above code and paste it to the editor of Arduino IDE.
- Click Upload button on Arduino IDE to upload code to Arduino.
- Open the Serial Monitor.
The display will show various combinations of numbers and characters with colon control.
API Summary
| Method | Description | Example |
|---|---|---|
| setNumber(int, int) | Set a digit (0-9) at position 0-3 | display.setNumber(0, 1) |
| setChar(int, char) | Set a character at position 0-3 | display.setChar(0, 'H') |
| setColon(bool) | Turn colon on or off | display.setColon(true) |
| setSegments(int, uint8_t) | Set raw segments at position 0-3 | display.setSegments(0, 0x76) |
Troubleshoot
If the code is not working, there are some common issues you can troubleshoot:
- Display shows nothing: Check the wiring connections. Make sure CLK and DIO are connected to the correct Arduino pins. Verify the VCC is connected to 5V or 3.3V and GND to GND.
- Display shows wrong digits: Double-check that the CLK_PIN and DIO_PIN values in your code match the actual wiring. Swapping CLK and DIO is a common mistake.
- Display is too dim or too bright: Use setBrightness(level) with a value from 0 (dimmest) to 7 (brightest) to adjust.
- Compile error about missing library: Make sure you installed the DIYables_4Digit7Segment_TM1637 library through the Arduino Library Manager.
Platform Support
The library uses only Arduino standard APIs (pinMode, digitalWrite, digitalRead, delayMicroseconds) and supports all Arduino platforms (architectures=*).