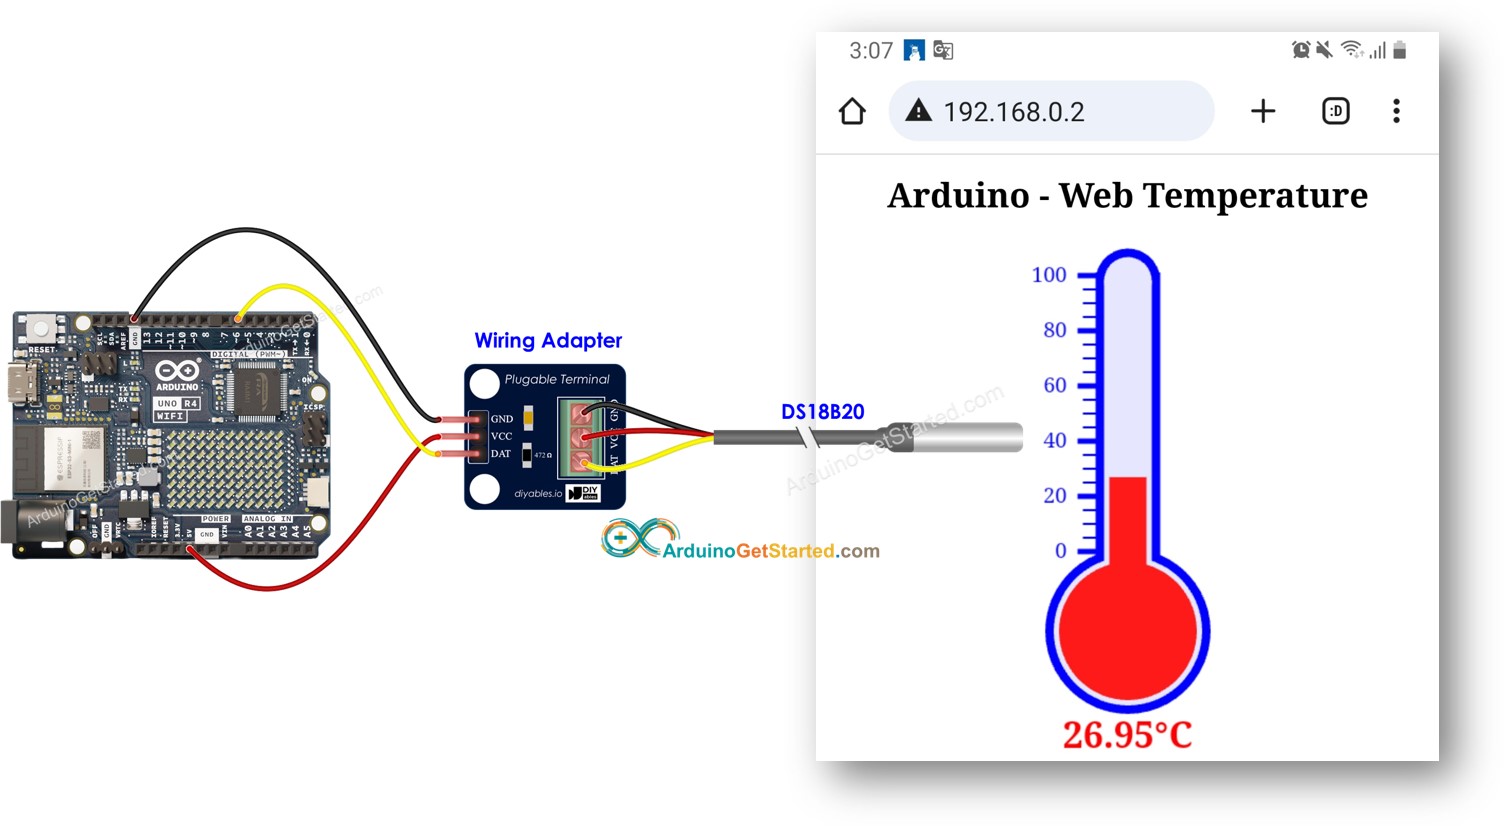
In this tutorial, we will learn how to program Arduino to become a web server that provides you with the temperature via the web. You can access the web page provided by Arduino to check the temperature from a DS18B20 temperature sensor. The below is how it works:
Arduino is programmed as a web server.
You type the IP address of Arduino in a web browser on your smartphone or PC.
Arduino responds to the request from the web browser with a web page that contains the temperature read from the DS18B20 sensor.
We will go through two example codes:
Arduino code that provides a very simple web page that shows the temperature from the DS18B20 sensor. This makes it easy for you to understand how it works.
Arduino code that provides a graphic web page that shows the temperature from the DS18B20 sensor.
Disclosure: Some links in this section are Amazon affiliate links. If you make a purchase through these links, we may earn a commission at no extra cost to you. Additionally, some links direct to products from our own brand, DIYables .
Buy Note: Many DS18B20 sensors on the market are low-quality. We highly recommend buying the sensor from the DIYables brand using the link above. We tested it, and it worked well.
About Arduino Uno R4 and DS18B20 Temperature Sensor
If you do not know about Arduino Uno R4 and DS18B20 temperature sensor (pinout, how it works, how to program ...), learn about them in the following tutorials:
Open the Library Manager by clicking on the Library Manager icon on the left side of the Arduino IDE.
Search for Web Server for Arduino Uno R4 WiFi and locate the Web Server library created by DIYables.
Click on the Install button to add the Web Server library.
Copy the above code and open with Arduino IDE
Change the wifi information (SSID and password) in the code to yours
Click Upload button on Arduino IDE to upload code to Arduino
Open the Serial Monitor
Check out the result on Serial Monitor.
Newbiely | Arduino IDE 2.3.8
──
☐
✕
File
Edit
Sketch
Tools
Help
Arduino Uno
Newbiely.ino
···
8Serial.println("Hello World!");
Output
Serial Monitor
Message (Enter to send message to 'Arduino Uno' on 'COM15')
New Line
9600 baud
Arduino Uno R4 WiFi - Temperature via Web
Connecting to YOUR_WIFI_SSID
connected!
IP address: 192.168.0.254
Starting web server on IP: 192.168.0.254
=== Web Server Ready! ===
Visit: http://192.168.0.254
Ln 11, Col 1
Arduino Uno on COM15
2
You will find an IP address. Type this IP address into the address bar of a web browser on your smartphone or PC.
You will see the following output on the Serial Monitor.
Newbiely | Arduino IDE 2.3.8
──
☐
✕
File
Edit
Sketch
Tools
Help
Arduino Uno
Newbiely.ino
···
8Serial.println("Hello World!");
Output
Serial Monitor
Message (Enter to send message to 'Arduino Uno' on 'COM15')
New Line
9600 baud
Arduino Uno R4 WiFi - Temperature via Web
Connecting to YOUR_WIFI_SSID
connected!
IP address: 192.168.0.254
Starting web server on IP: 192.168.0.254
=== Web Server Ready! ===
Visit: http://192.168.0.254
Method: GET
Requested path: /
Client disconnected
Ln 11, Col 1
Arduino Uno on COM15
2
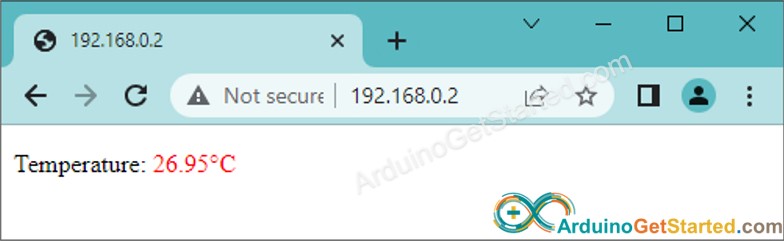
You will see a very simple web page of Arduino board on the web browser as below:
Arduino Code - Graphic Web Page
As a graphic web page contains a large amount of HTML content, embedding it into the Arduino code as before becomes inconvenient. To address this, we need to separate the Arduino code and the HTML code into different files:
The Arduino code will be placed in a .ino file.
The HTML code (including HTML, CSS, and Javascript) will be placed in a .h file.
Quick Steps
Open Arduino IDE and create new sketch, Give it a name, for example, ArduinoGetStarted.com.ino
Copy the below code and open with Arduino IDE
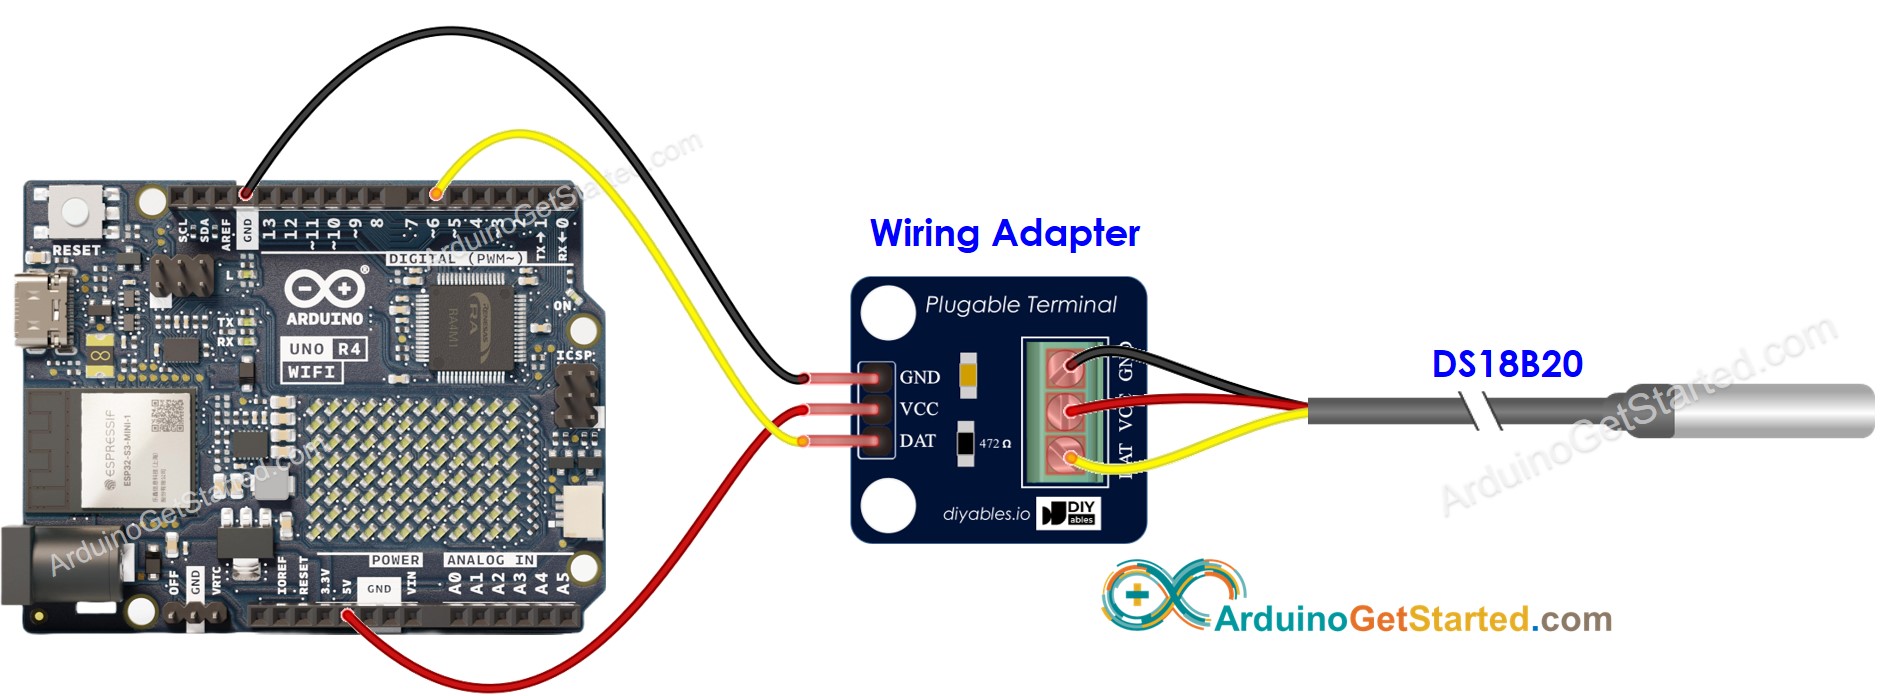
/* * Created by ArduinoGetStarted.com * * This example code is in the public domain * * Tutorial page: https://arduinogetstarted.com/tutorials/arduino-temperature-via-web */#include <UnoR4WiFi_WebServer.h>#include"index.h"#include <OneWire.h>#include <DallasTemperature.h>constchar WIFI_SSID[] = "YOUR_WIFI_SSID"; // change your network SSID (name)constchar WIFI_PASSWORD[] = "YOUR_WIFI_PASSWORD"; // change your network passwordconstint SENSOR_PIN = 6; // Arduino pin connected to DS18B20 sensor's DQ pinOneWire oneWire(SENSOR_PIN); // setup a oneWire instanceDallasTemperature tempSensor(&oneWire); // pass oneWire to DallasTemperature libraryUnoR4WiFi_WebServer server;floatgetTemperature() { tempSensor.requestTemperatures(); // send the command to get temperaturesfloat tempCelsius = tempSensor.getTempCByIndex(0); // read temperature in Celsiusreturn tempCelsius;}void handleHome(WiFiClient& client, constString& method, constString& request, const QueryParams& params, constString& jsonData) {float tempC = getTemperature();String response = HTML_CONTENT; response.replace("TEMPERATURE_MARKER", String(tempC, 1)); server.sendResponse(client, response.c_str());}voidsetup() {Serial.begin(9600);delay(1000); tempSensor.begin(); // initialize the temperature sensorSerial.println("Arduino Uno R4 WiFi - Temperature via Web");// Connect to WiFiSerial.print("Connecting to ");Serial.println(WIFI_SSID);WiFi.begin(WIFI_SSID, WIFI_PASSWORD);while (WiFi.status() != WL_CONNECTED) {delay(500);Serial.print("."); }Serial.println("connected!");Serial.print("IP address: ");Serial.println(WiFi.localIP());// Configure routes server.addRoute("/", handleHome);// Start server server.begin();Serial.println("\n=== Web Server Ready! ===");Serial.print("Visit: http://");Serial.println(WiFi.localIP());}voidloop() { server.handleClient();}
Change the WiFi information (SSID and password) in the code to yours
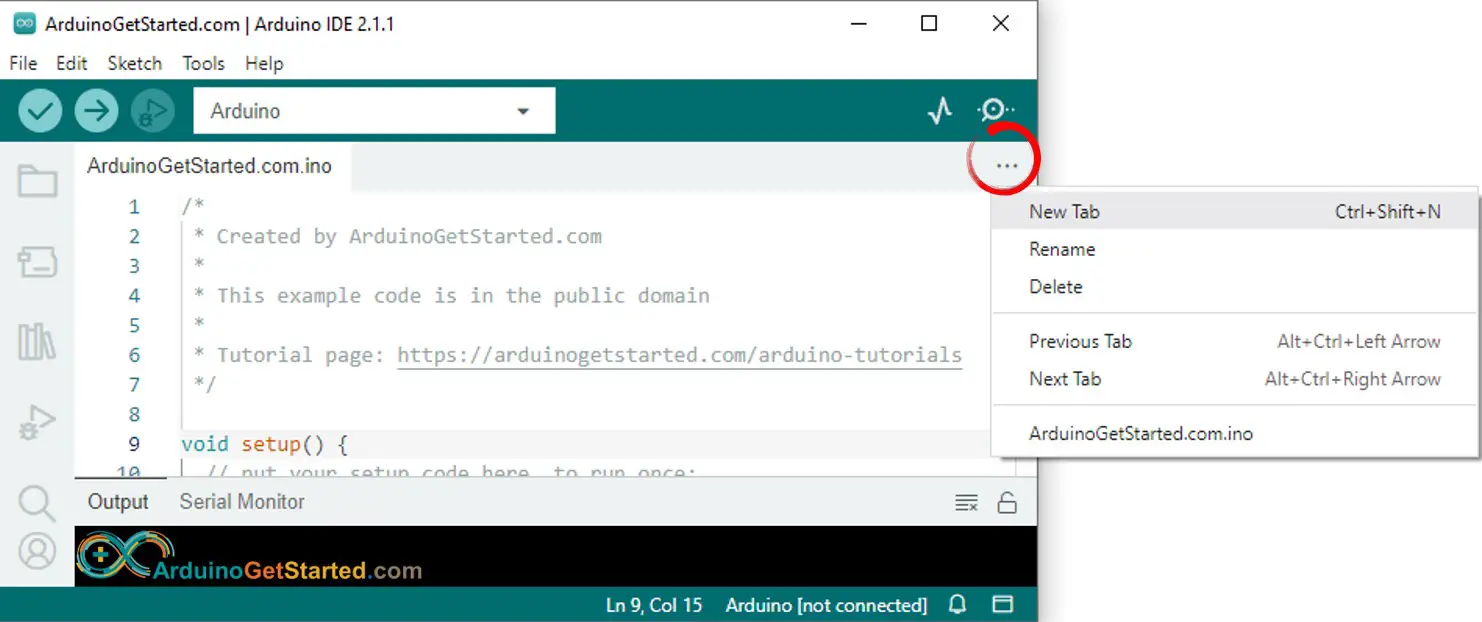
Create the index.h file On Arduino IDE by:
Either click on the button just below the serial monitor icon and choose New Tab, or use Ctrl+Shift+N keys.
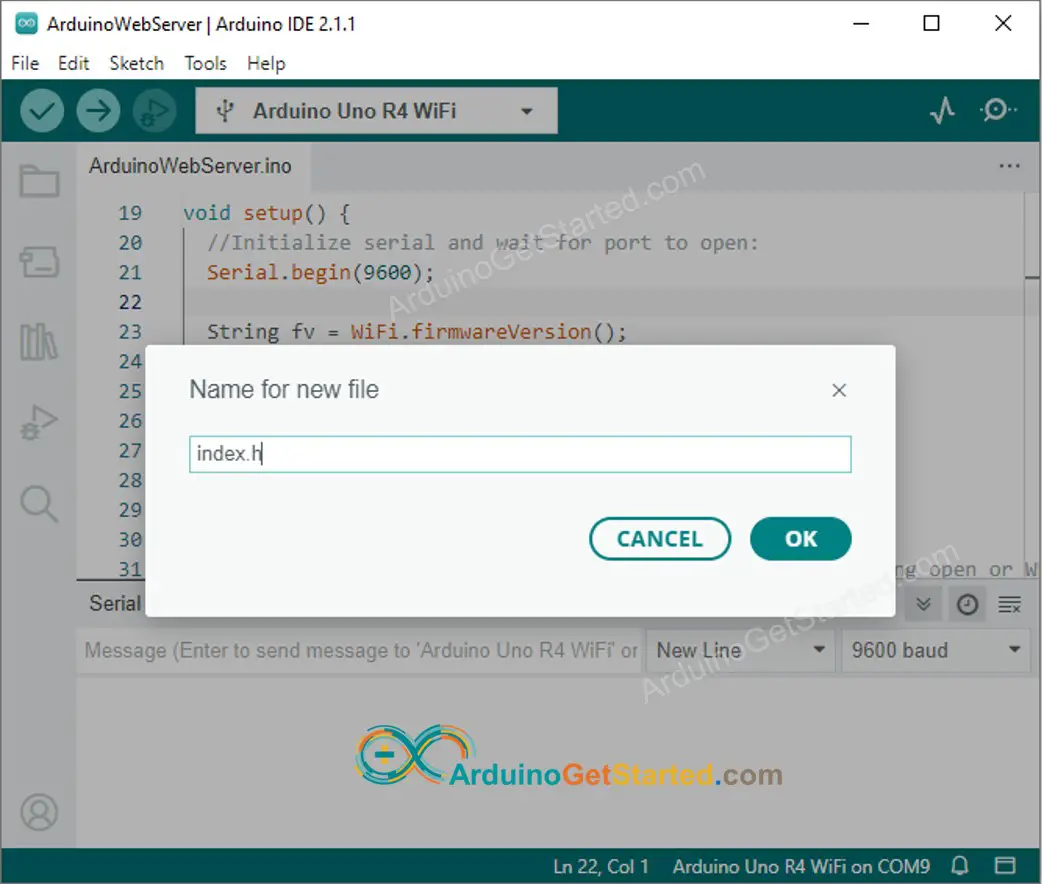
Give the file's name index.h and click OK button
Copy the below code and paste it to the index.h.
/* * Created by ArduinoGetStarted.com * * This example code is in the public domain * * Tutorial page: https://arduinogetstarted.com/tutorials/arduino-temperature-via-web */constchar *HTML_CONTENT = R""""(<!DOCTYPE html><html><head><title>Arduino - Web Temperature</title><meta name="viewport" content="width=device-width, initial-scale=0.7, maximum-scale=0.7"><meta charset="utf-8"><link rel="icon" href="https://diyables.io/images/page/diyables.svg"><style>body { font-family: "Georgia"; text-align: center; font-size: width/2pt;}h1 { font-weight: bold; font-size: width/2pt;}h2 { font-weight: bold; font-size: width/2pt;}button { font-weight: bold; font-size: width/2pt;}</style><script>var cvs_width = 200, cvs_height = 450;function init() { var canvas = document.getElementById("cvs"); canvas.width = cvs_width; canvas.height = cvs_height + 50; var ctx = canvas.getContext("2d"); ctx.translate(cvs_width/2, cvs_height - 80); update_view(TEMPERATURE_MARKER);}function update_view(temp) { var canvas = document.getElementById("cvs"); var ctx = canvas.getContext("2d"); var radius = 70; var offset = 5; var width = 45; var height = 330; ctx.clearRect(-cvs_width/2, -350, cvs_width, cvs_height); ctx.strokeStyle="blue"; ctx.fillStyle="blue";//5-step Degree var x = -width/2; ctx.lineWidth=2;for (var i = 0; i <= 100; i+=5) { var y = -(height - radius)*i/100 - radius - 5; ctx.beginPath(); ctx.lineTo(x, y); ctx.lineTo(x - 20, y); ctx.stroke(); }//20-step Degree ctx.lineWidth=5;for (var i = 0; i <= 100; i+=20) { var y = -(height - radius)*i/100 - radius - 5; ctx.beginPath(); ctx.lineTo(x, y); ctx.lineTo(x - 25, y); ctx.stroke(); ctx.font="20px Georgia"; ctx.textBaseline="middle"; ctx.textAlign="right"; ctx.fillText(i.toString(), x - 35, y); }// shape ctx.lineWidth=16; ctx.beginPath(); ctx.arc(0, 0, radius, 0, 2 * Math.PI); ctx.stroke(); ctx.beginPath(); ctx.rect(-width/2, -height, width, height); ctx.stroke(); ctx.beginPath(); ctx.arc(0, -height, width/2, 0, 2 * Math.PI); ctx.stroke(); ctx.fillStyle="#e6e6ff"; ctx.beginPath(); ctx.arc(0, 0, radius, 0, 2 * Math.PI); ctx.fill(); ctx.beginPath(); ctx.rect(-width/2, -height, width, height); ctx.fill(); ctx.beginPath(); ctx.arc(0, -height, width/2, 0, 2 * Math.PI); ctx.fill(); ctx.fillStyle="#ff1a1a"; ctx.beginPath(); ctx.arc(0, 0, radius - offset, 0, 2 * Math.PI); ctx.fill(); temp = Math.round(temp * 100) / 100; var y = (height - radius)*temp/100.0 + radius + 5; ctx.beginPath(); ctx.rect(-width/2 + offset, -y, width - 2*offset, y); ctx.fill(); ctx.fillStyle="red"; ctx.font="bold 34px Georgia"; ctx.textBaseline="middle"; ctx.textAlign="center"; ctx.fillText(temp.toString() + "°C", 0, 100);}window.onload = init;</script></head><body><h1>Arduino - Web Temperature</h1><canvas id="cvs"></canvas></body></html>)"""";
Now you have the code in two files: ArduinoGetStarted.com.ino and index.h
Click Upload button on Arduino IDE to upload code to Arduino
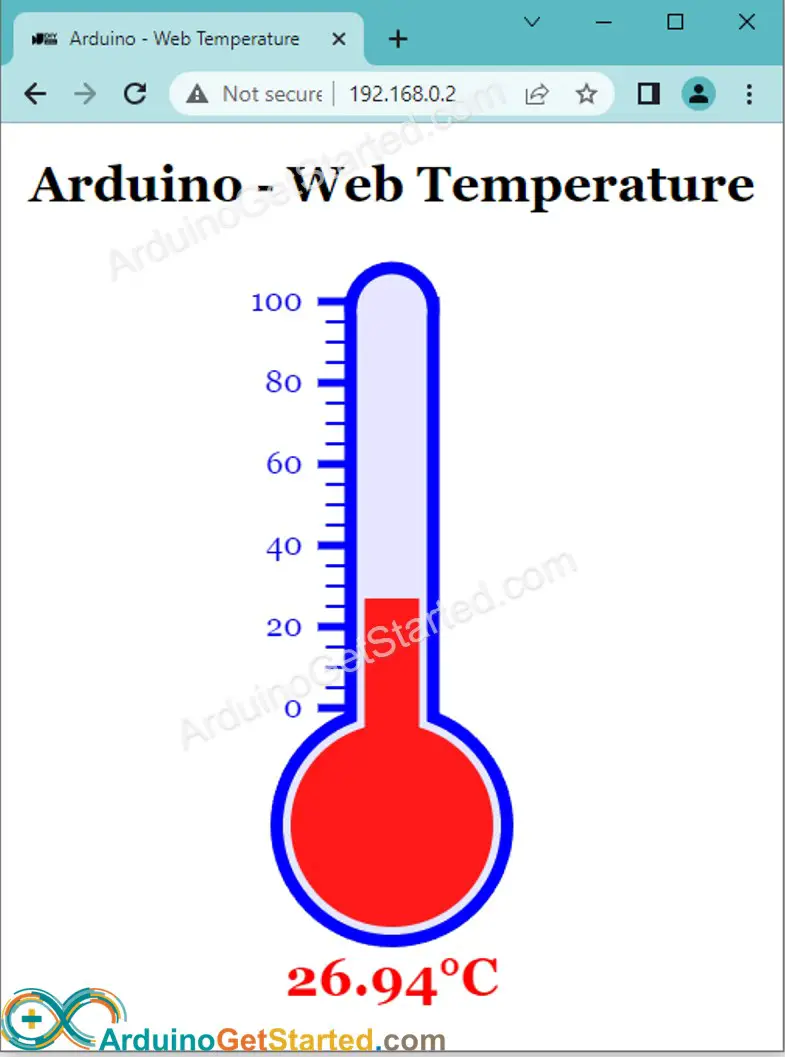
Access the web page of Arduino board via web browser as before. You will see it as below:
※ NOTE THAT:
If you make changes to the HTML content within the index.h file but don't modify anything in the ArduinoGetStarted.com.ino file, the Arduino IDE won't refresh or update the HTML content when you compile and upload the code to the ESP32.
To force the Arduino IDE to update the HTML content in this situation, you need to make a modification in the ArduinoGetStarted.com.ino file. For example, you can add an empty line or insert a comment. This action triggers the IDE to recognize that there have been changes in the project, ensuring that your updated HTML content gets included in the upload.
You can share the link of this tutorial anywhere. Howerver, please do not copy the content to share on other websites. We took a lot of time and effort to create the content of this tutorial, please respect our work!