In this tutorial, we are going to learn how to get GPS coordinates (longitude, latitude, altitude), GPS speed (km/h), and date time from NEO-6M GPS module. We also learn how to calculate the distance from current GPS position to a predefined GPS coordinates (ex. coordinates of London)
Disclosure: Some links in this section are Amazon affiliate links. If you make a purchase through these links, we may earn a commission at no extra cost to you. Additionally, some links direct to products from our own brand, DIYables .
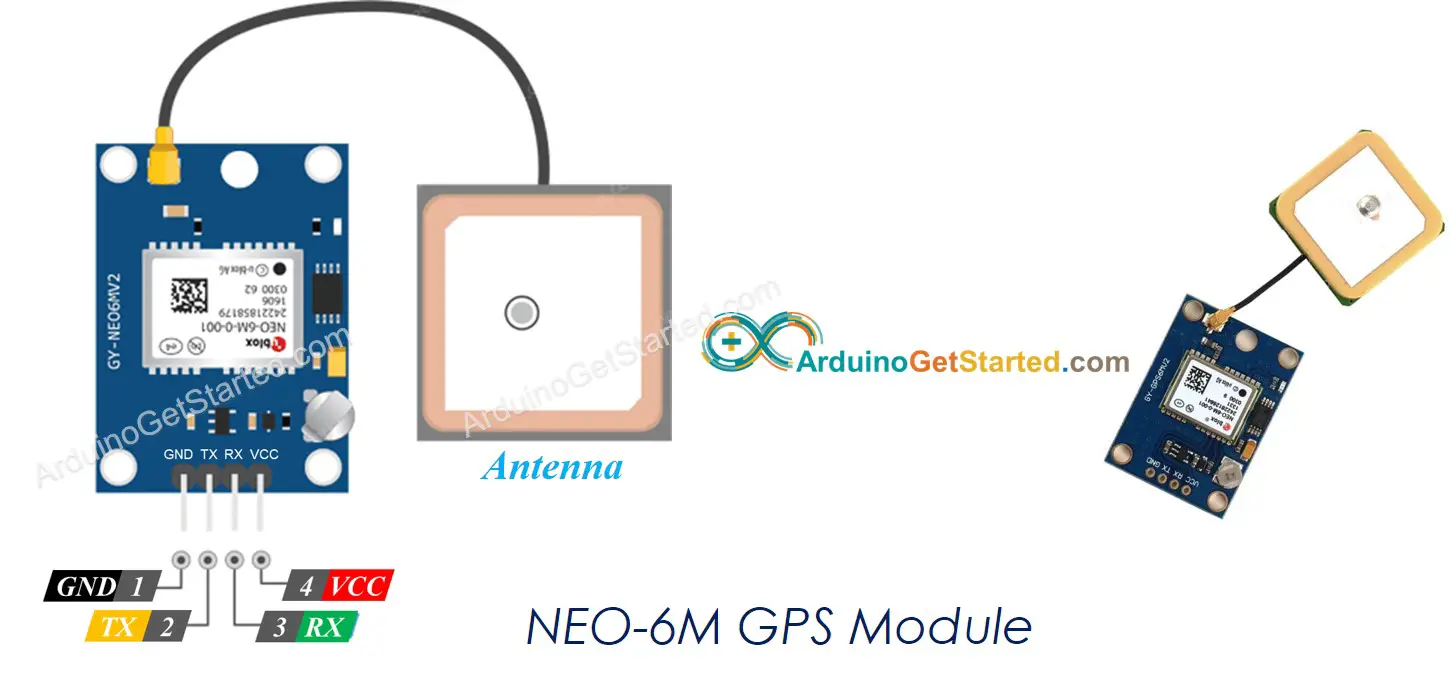
About NEO-6M GPS module
Pinout
The NEO-6M GPS module includes 4 pins:
VCC pin: needs to be connected to VCC (5V)
GND pin: needs to be connected to GND (0V)
TX pin: is used for serial communication, needs to be connect to Serial (or SoftwareSerial) RX pin on Arduino.
RX pin: is used for serial communication, needs to be connect to Serial (or SoftwareSerial) TX pin on Arduino.
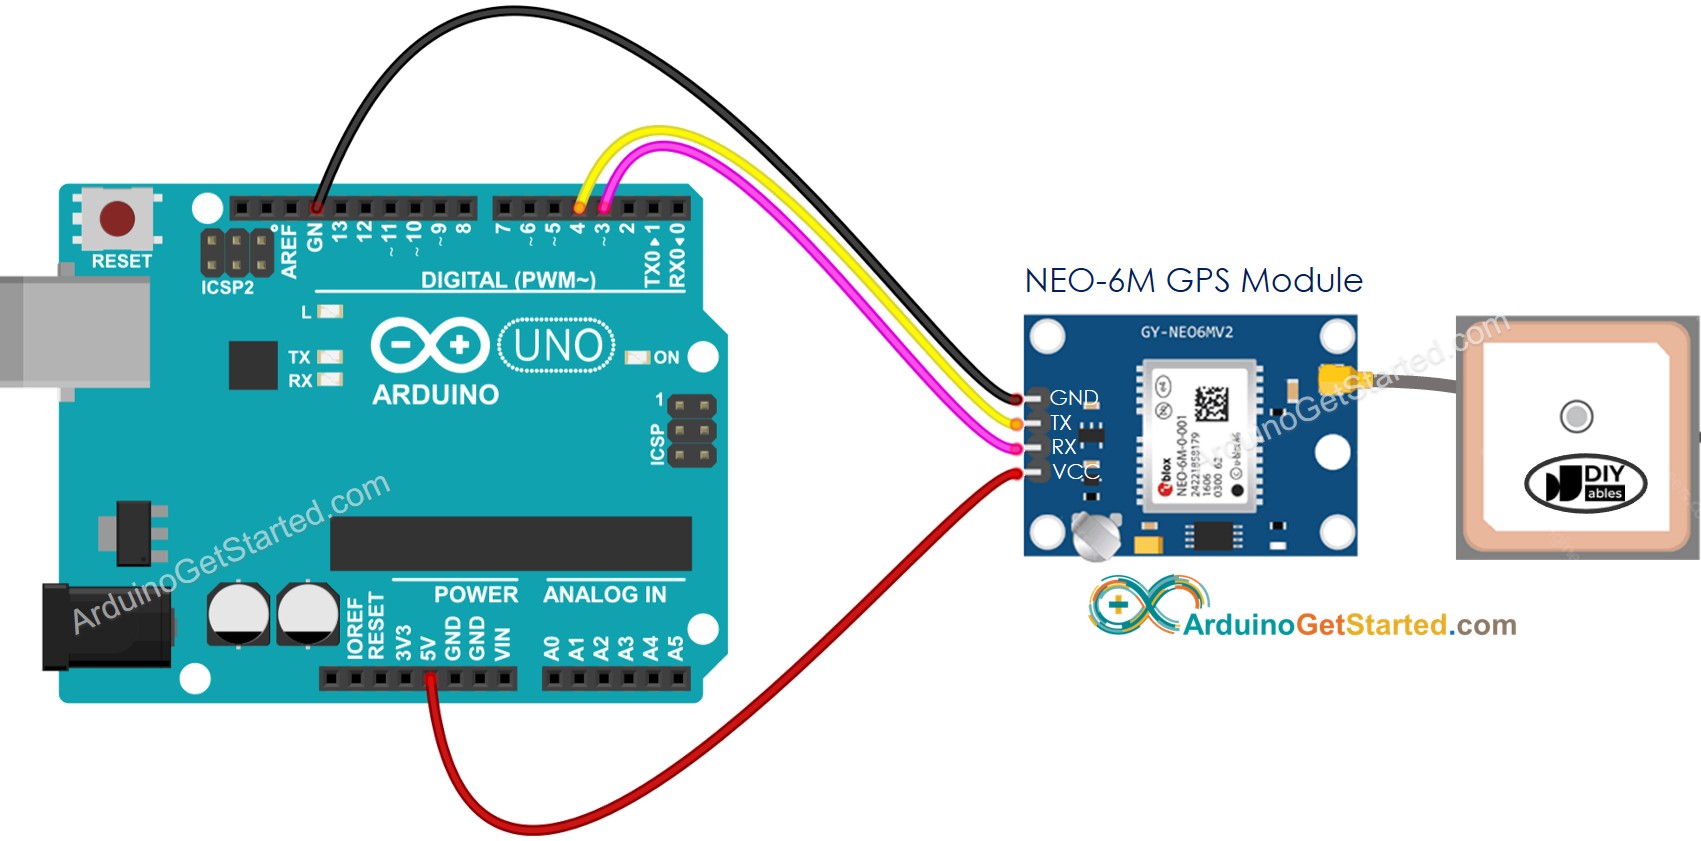
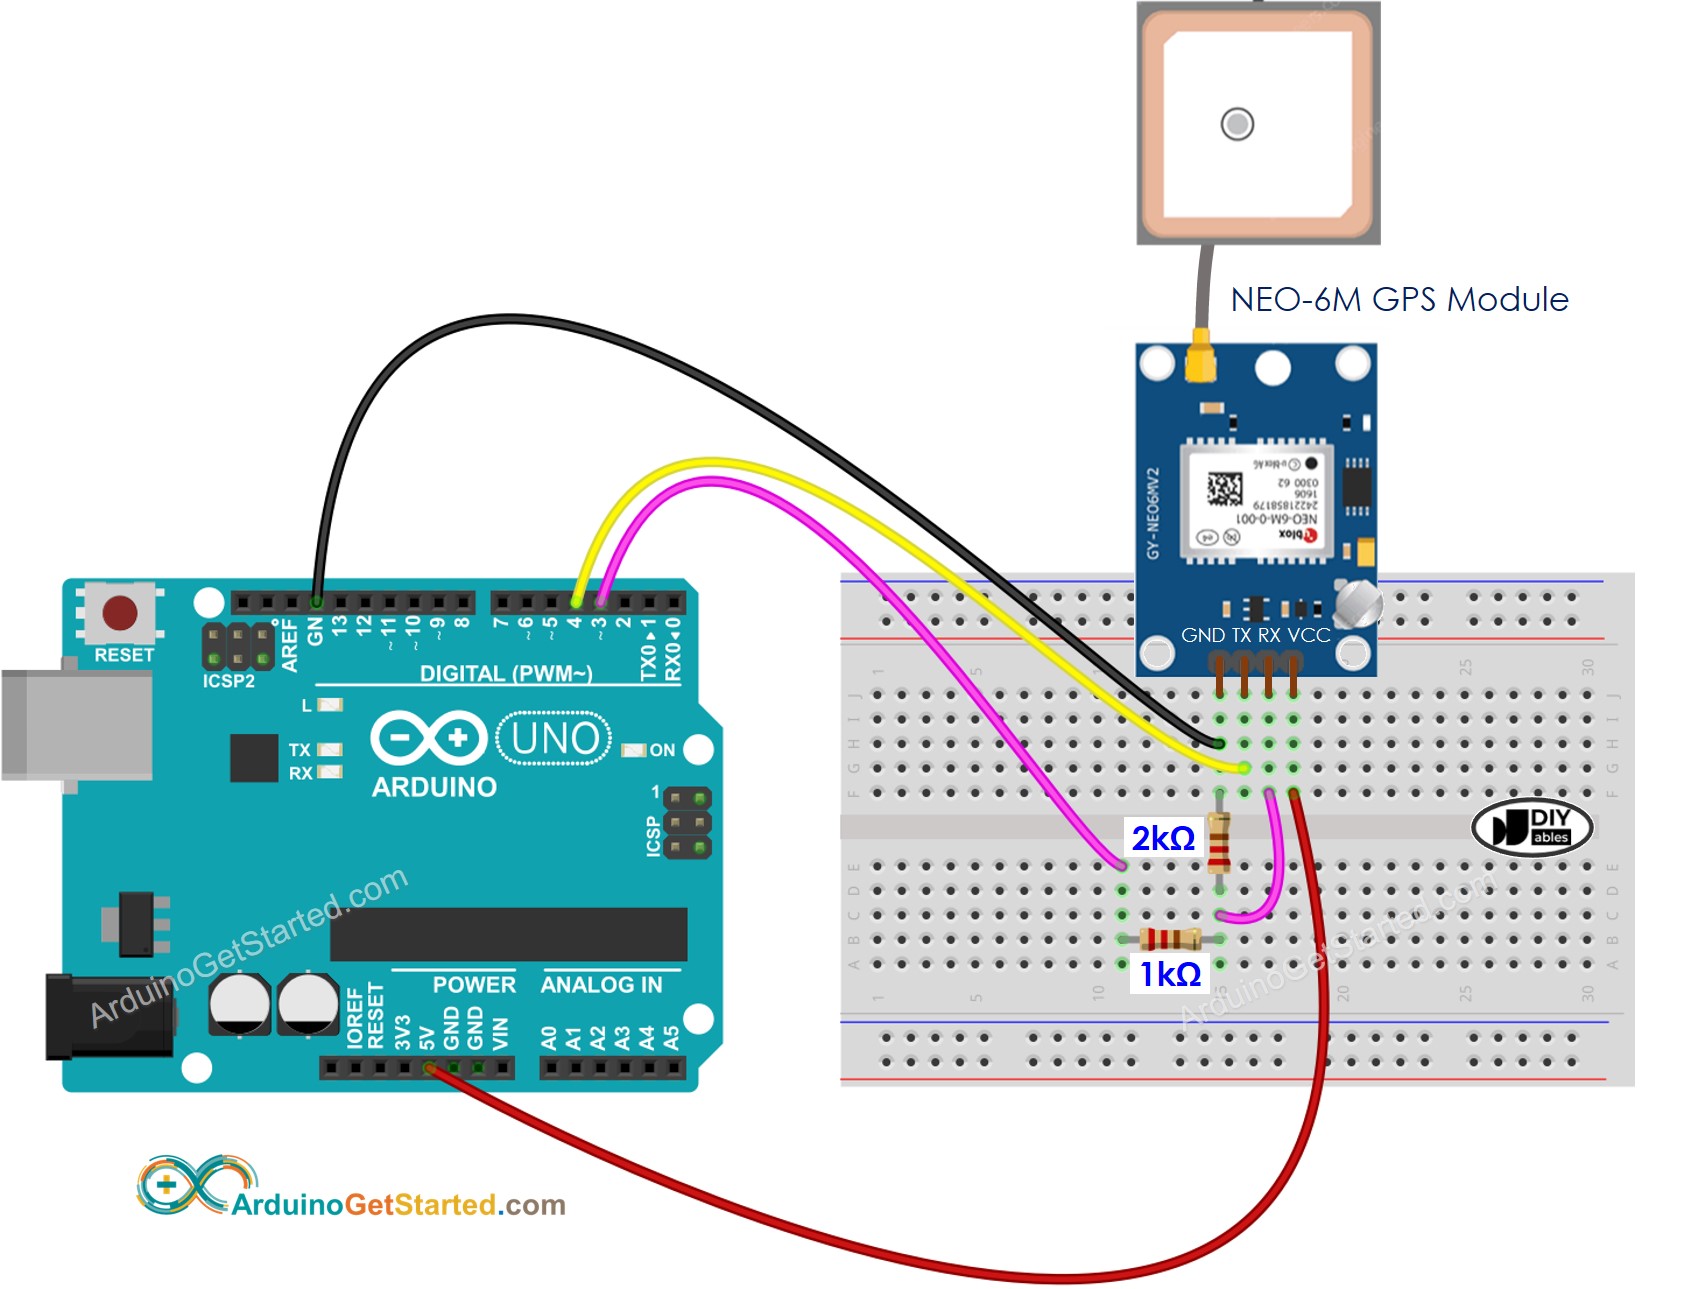
Wiring Diagram
This image is created using Fritzing. Click to enlarge image
Please be aware that while the wiring diagram provided above might work, it is not advisable. The Arduino's TX pin outputs at 5V, but the GPS module's RX pin can only accept 3.3V. To ensure safety, it is recommended to use a voltage divider between the Arduino's TX pin and the RX pin of the GPS module, as shown in the diagram below.
This image is created using Fritzing. Click to enlarge image
Arduino Code
Reading GPS coordinates, speed (km/h), and date time
/* * Created by ArduinoGetStarted.com * * This example code is in the public domain * * Tutorial page: https://arduinogetstarted.com/tutorials/arduino-gps */#include <TinyGPS++.h>#include <SoftwareSerial.h>#define RX_PIN 4 // Arduino Pin connected to the TX of the GPS module#define TX_PIN 3 // Arduino Pin connected to the RX of the GPS moduleTinyGPSPlus gps; // the TinyGPS++ objectSoftwareSerial gpsSerial(RX_PIN, TX_PIN); // the serial interface to the GPS modulevoidsetup() {Serial.begin(9600); gpsSerial.begin(9600); // Default baud of NEO-6M GPS module is 9600Serial.println(F("Arduino - GPS module"));}voidloop() {if (gpsSerial.available() > 0) {if (gps.encode(gpsSerial.read())) {if (gps.location.isValid()) {Serial.print(F("- latitude: "));Serial.println(gps.location.lat());Serial.print(F("- longitude: "));Serial.println(gps.location.lng());Serial.print(F("- altitude: "));if (gps.altitude.isValid())Serial.println(gps.altitude.meters());elseSerial.println(F("INVALID")); } else {Serial.println(F("- location: INVALID")); }Serial.print(F("- speed: "));if (gps.speed.isValid()) {Serial.print(gps.speed.kmph());Serial.println(F(" km/h")); } else {Serial.println(F("INVALID")); }Serial.print(F("- GPS date&time: "));if (gps.date.isValid() && gps.time.isValid()) {Serial.print(gps.date.year());Serial.print(F("-"));Serial.print(gps.date.month());Serial.print(F("-"));Serial.print(gps.date.day());Serial.print(F(" "));Serial.print(gps.time.hour());Serial.print(F(":"));Serial.print(gps.time.minute());Serial.print(F(":"));Serial.println(gps.time.second()); } else {Serial.println(F("INVALID")); }Serial.println(); } }if (millis() > 5000 && gps.charsProcessed() < 10)Serial.println(F("No GPS data received: check wiring"));}
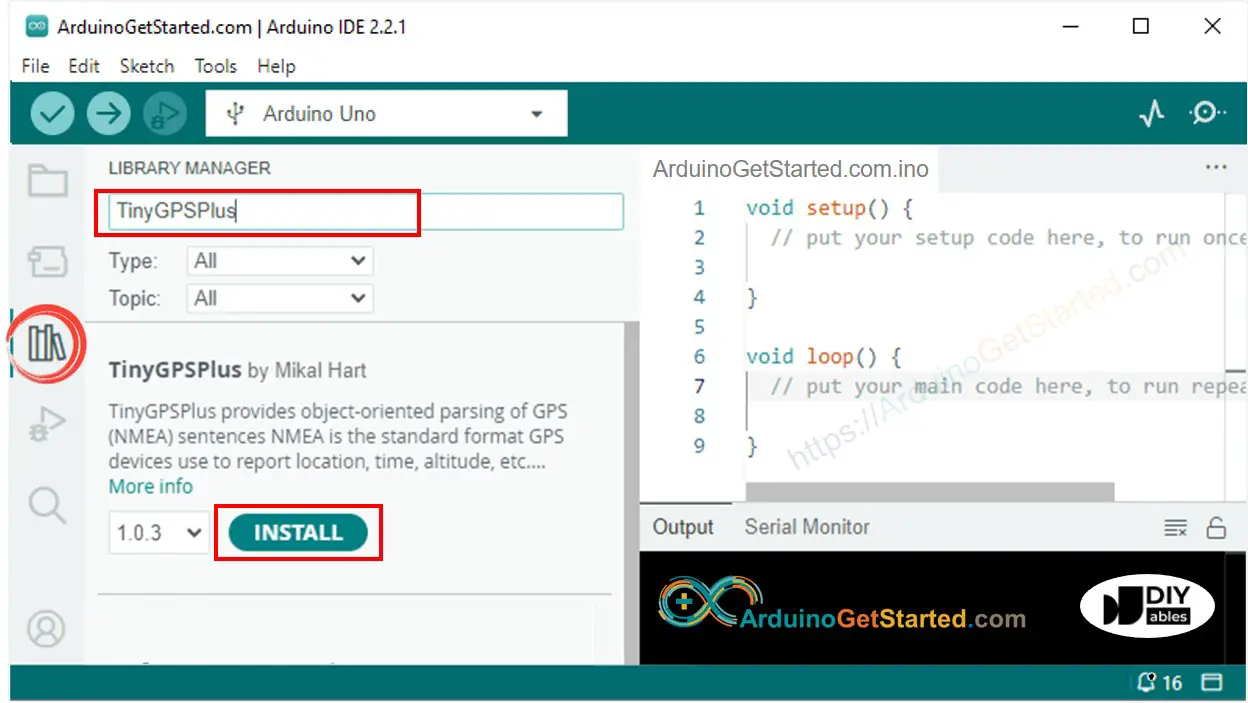
Quick Steps
Open Arduino IDE
Navigate to the Libraries icon on the left bar of the Arduino IDE.
Search “TinyGPSPlus”, then find the TinyGPSPlus library by Mikal Hart
Click Install button to install TinyGPSPlus library.
Copy the above code and open with Arduino IDE
Click Upload button on Arduino IDE to upload code to Arduino
See the result on Serial Monitor:
Newbiely | Arduino IDE 2.3.8
──
☐
✕
File
Edit
Sketch
Tools
Help
Arduino Uno
Newbiely.ino
···
8Serial.println("Hello World!");
Output
Serial Monitor
Message (Enter to send message to 'Arduino Uno' on 'COM15')
New Line
9600 baud
Ln 11, Col 1
Arduino Uno on COM15
2
Calculating the distance from current location to a predefined location
The below code calculates the distance between the current location and London (lat:51.508131 , long: -0.128002)
/* * Created by ArduinoGetStarted.com * * This example code is in the public domain * * Tutorial page: https://arduinogetstarted.com/tutorials/arduino-gps */#include <TinyGPS++.h>#include <SoftwareSerial.h>#define RX_PIN 4 // Arduino Pin connected to the TX of the GPS module#define TX_PIN 3 // Arduino Pin connected to the RX of the GPS moduleTinyGPSPlus gps; // the TinyGPS++ objectSoftwareSerial gpsSerial(RX_PIN, TX_PIN); // the serial interface to the GPS moduleconstdouble LONDON_LAT = 51.508131;constdouble LONDON_LON = -0.128002;voidsetup() {Serial.begin(9600); gpsSerial.begin(9600); // Default baud of NEO-6M GPS module is 9600Serial.println(F("Arduino - GPS module"));}voidloop() {if (gpsSerial.available() > 0) {if (gps.encode(gpsSerial.read())) {if (gps.location.isValid()) {double latitude = gps.location.lat();double longitude = gps.location.lng();unsignedlong distanceKm = TinyGPSPlus::distanceBetween(latitude, longitude, LONDON_LAT, LONDON_LON) / 1000;Serial.print(F("- latitude: "));Serial.println(latitude);Serial.print(F("- longitude: "));Serial.println(longitude);Serial.print(F("- distance to London: "));Serial.println(distanceKm); } else {Serial.println(F("- location: INVALID")); }Serial.println(); } }if (millis() > 5000 && gps.charsProcessed() < 10)Serial.println(F("No GPS data received: check wiring"));}
Quick Steps
Copy the above code and open with Arduino IDE
Click Upload button on Arduino IDE to upload code to Arduino
See the result on Serial Monitor:
Newbiely | Arduino IDE 2.3.8
──
☐
✕
File
Edit
Sketch
Tools
Help
Arduino Uno
Newbiely.ino
···
8Serial.println("Hello World!");
Output
Serial Monitor
Message (Enter to send message to 'Arduino Uno' on 'COM15')
New Line
9600 baud
Ln 11, Col 1
Arduino Uno on COM15
2
Video Tutorial
We are considering to make the video tutorials. If you think the video tutorials are essential, please subscribe to our YouTube channel to give us motivation for making the videos.
WARNING
Note that this tutorial is incomplete. We will post on our Facebook Page when the tutorial is complete. Like it to get updated.
You can share the link of this tutorial anywhere. Howerver, please do not copy the content to share on other websites. We took a lot of time and effort to create the content of this tutorial, please respect our work!