Arduino - LED - Blink Without Delay

Let's imagine that Arduino has to do two tasks: blinking LED and checking the button state, which can be pressed anytime. If we use the delay() function (described in a previous tutorial), Arduino may miss some of the pressing events. In other words, Arduino cannot fully do the second task.

In this tutorial, we will learn how Arduino blinks LED and checks the button's state without missing any pressing event.

We will run though three below examples and compare the difference between them.

※ NOTE THAT:

  • This method is not just only for blinking LED and checking the button's state. Generally, this method lets Arduino do several tasks at the same time without blocking each other.
  • This tutorial provides in-depth knowledge that helps you understand the working principle. To make it easy, you can use Arduino - LED library.

Hardware Required

1×Arduino UNO or Genuino UNO
1×USB 2.0 cable type A/B
1×LED
1×220 ohm resistor
1×Push Button
1×(Optional) Panel-mount Push Button
1×Breadboard
1×Jumper Wires
1×(Optional) 9V Power Adapter for Arduino
1×(Recommended) Screw Terminal Block Shield for Arduino Uno
1×(Optional) Transparent Acrylic Enclosure For Arduino Uno

Or you can buy the following sensor kit:

1×DIYables Sensor Kit 30 types, 69 units
Please note: These are Amazon affiliate links. If you buy the components through these links, We will get a commission at no extra cost to you. We appreciate it.

About LED and Button

If you do not know about LED and button (pinout, how it works, how to program ...), learn about them in the following tutorials:

Wiring Diagram

Arduino LED Wiring Diagram

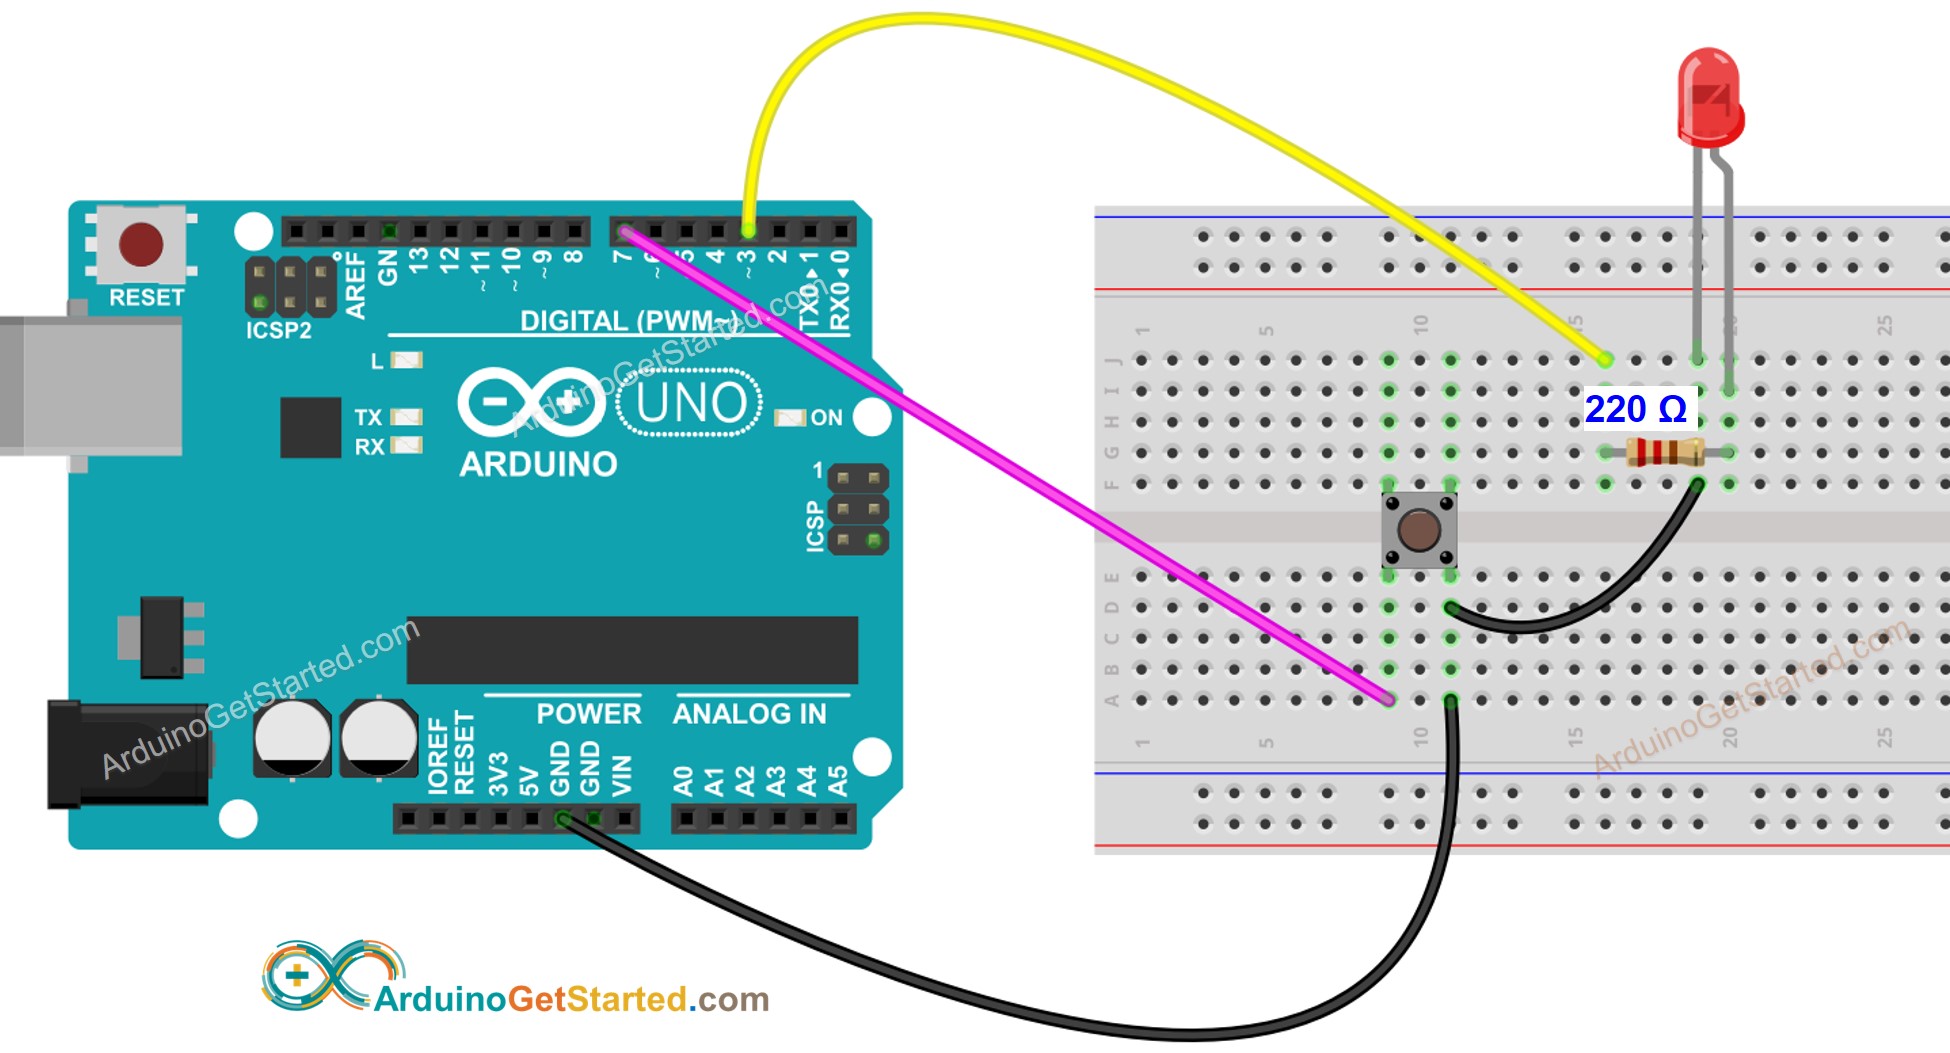
This image is created using Fritzing. Click to enlarge image

Arduino Code - With Delay

/* * Created by ArduinoGetStarted.com * * This example code is in the public domain * * Tutorial page: https://arduinogetstarted.com/tutorials/arduino-led-blink-without-delay */ // constants won't change: const int LED_PIN = 3; // the number of the LED pin const int BUTTON_PIN = 7; // the number of the button pin const long BLINK_INTERVAL = 1000; // interval at which to blink LED (milliseconds) // Variables will change: int ledState = LOW; // ledState used to set the LED int previousButtonState = LOW; // will store last time button was updated void setup() { Serial.begin(9600); // set the digital pin as output: pinMode(LED_PIN, OUTPUT); // set the digital pin as an input: pinMode(BUTTON_PIN, INPUT); } void loop() { // if the LED is off turn it on and vice-versa: ledState = (ledState == LOW) ? HIGH : LOW; // set the LED with the ledState of the variable: digitalWrite(LED_PIN, ledState); delay(BLINK_INTERVAL); // If button is pressed during this time, Arduino CANNOT detect int currentButtonState = digitalRead(BUTTON_PIN); if(currentButtonState != previousButtonState) { // print out the state of the button: Serial.println(currentButtonState); // save the last state of button previousButtonState = currentButtonState; } // DO OTHER WORKS HERE }

Quick Steps

  • Connect Arduino to PC via USB cable
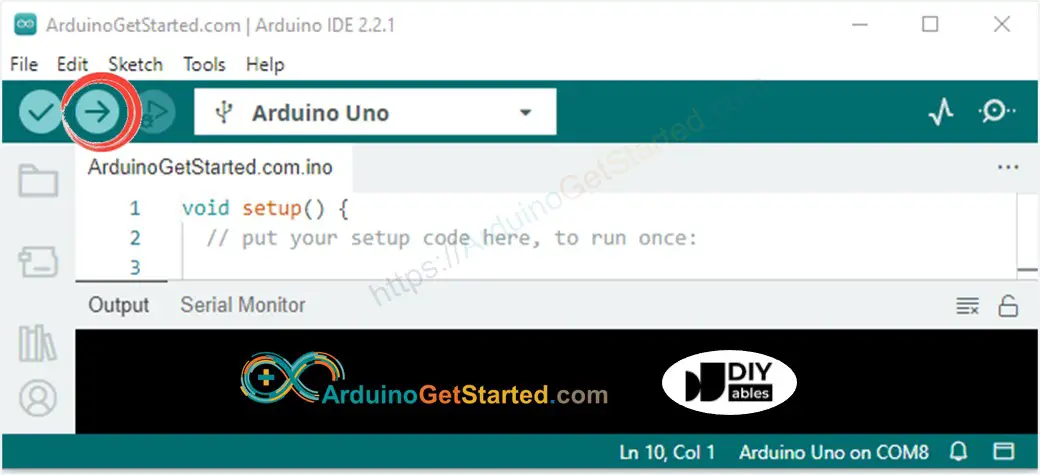
  • Open Arduino IDE, select the right board and port
  • Copy the above code and open with Arduino IDE
  • Click Upload button on Arduino IDE to upload code to Arduino
Arduino IDE - How to Upload Code
  • Open Serial Monitor
  • Press the button 4 times
  • See the LED: The LED toggles between ON/OFF periodically every second
  • See the output in Serial Monitor
COM6
Send
1 0
Autoscroll Show timestamp
Clear output
9600 baud  
Newline  
  • On Serial Monitor, some pressing times were missed. That is because, during delay time, Arduino CANNOT do anything. Therefore, it is unable to detect the pressing event.

Arduino Code - Without Delay

/* * Created by ArduinoGetStarted.com * * This example code is in the public domain * * Tutorial page: https://arduinogetstarted.com/tutorials/arduino-led-blink-without-delay */ // constants won't change: const int LED_PIN = 3; // the number of the LED pin const int BUTTON_PIN = 7; // the number of the button pin const long BLINK_INTERVAL = 1000; // interval at which to blink LED (milliseconds) // Variables will change: int ledState = LOW; // ledState used to set the LED int previousButtonState = LOW; // will store last time button was updated unsigned long previousMillis = 0; // will store last time LED was updated void setup() { Serial.begin(9600); // set the digital pin as output: pinMode(LED_PIN, OUTPUT); // set the digital pin as an input: pinMode(BUTTON_PIN, INPUT); } void loop() { // check to see if it's time to blink the LED; that is, if the difference // between the current time and last time you blinked the LED is bigger than // the interval at which you want to blink the LED. unsigned long currentMillis = millis(); if (currentMillis - previousMillis >= BLINK_INTERVAL) { // if the LED is off turn it on and vice-versa: ledState = (ledState == LOW) ? HIGH : LOW; // set the LED with the ledState of the variable: digitalWrite(LED_PIN, ledState); // save the last time you blinked the LED previousMillis = currentMillis; } // check button state's change int currentButtonState = digitalRead(BUTTON_PIN); if(currentButtonState != previousButtonState) { // print out the state of the button: Serial.println(currentButtonState); // save the last state of button previousButtonState = currentButtonState; } // DO OTHER WORKS HERE }

Quick Steps

  • Run the above code and press the button 4 times
  • See the LED: The LED toggles between ON/OFF periodically every second
  • See the output in Serial Monitor
COM6
Send
1 0 1 0 1 0 1 0
Autoscroll Show timestamp
Clear output
9600 baud  
Newline  
  • All pressing events were detected.

Code Explanation

Read the line-by-line explanation in comment lines of code!

Adding More Tasks

The below code blinks two LEDs with different intervals and checks the state of the button.

/* * Created by ArduinoGetStarted.com * * This example code is in the public domain * * Tutorial page: https://arduinogetstarted.com/tutorials/arduino-led-blink-without-delay */ // constants won't change: const int LED_PIN_1 = 3; // the number of the LED 1 pin const int LED_PIN_2 = LED_BUILTIN; // the number of the LED 2 pin const int BUTTON_PIN = 7; // the number of the button pin const long BLINK_INTERVAL_1 = 1000; // interval at which to blink LED 1 (milliseconds) const long BLINK_INTERVAL_2 = 500; // interval at which to blink LED 2 (milliseconds) // Variables will change: int ledState_1 = LOW; // ledState used to set the LED 1 int ledState_2 = LOW; // ledState used to set the LED 2 int previousButtonState = LOW; // will store last time button was updated unsigned long previousMillis_1 = 0; // will store last time LED 1 was updated unsigned long previousMillis_2 = 0; // will store last time LED 2 was updated void setup() { Serial.begin(9600); // set the digital pin as output: pinMode(LED_PIN_1, OUTPUT); pinMode(LED_PIN_2, OUTPUT); // set the digital pin as an input: pinMode(BUTTON_PIN, INPUT); } void loop() { unsigned long currentMillis = millis(); // check to see if it's time to blink the LED 1 if (currentMillis - previousMillis_1 >= BLINK_INTERVAL_1) { // if the LED is off turn it on and vice-versa: ledState_1 = (ledState_1 == LOW) ? HIGH : LOW; // set the LED with the ledState of the variable: digitalWrite(LED_PIN_1, ledState_1); // save the last time you blinked the LED previousMillis_1 = currentMillis; } // check to see if it's time to blink the LED 2 if (currentMillis - previousMillis_2 >= BLINK_INTERVAL_2) { // if the LED is off turn it on and vice-versa: ledState_2 = (ledState_2 == LOW) ? HIGH : LOW; // set the LED with the ledState of the variable: digitalWrite(LED_PIN_2, ledState_2); // save the last time you blinked the LED previousMillis_2 = currentMillis; } // check button state's change int currentButtonState = digitalRead(BUTTON_PIN); if(currentButtonState != previousButtonState) { // print out the state of the button: Serial.println(currentButtonState); // save the last state of button previousButtonState = currentButtonState; } // DO OTHER WORKS HERE }

Video Tutorial

We are considering to make the video tutorials. If you think the video tutorials are essential, please subscribe to our YouTube channel to give us motivation for making the videos.

Extendability

This method can be used to let Arduino do several tasks at the same time without blocking each other. For example, sending a request to the Internet and waiting for the response, while waiting for the response, blink some LED indicators and check the cancel button.

LED on Commercial Products

Small LEDs usually are used to indicate the status of devices. For examples:

Big LEDs usually are used for lighting. They can be combined into groups. For examples:

The Best Arduino Starter Kit

※ OUR MESSAGES