Arduino - Micro SD Card

In this tutorial, we are going to learn how to use the Micro SD Card with Arduino. In detail, we will learn:

Arduino Micro SD Card

Hardware Required

1×Arduino UNO or Genuino UNO
1×USB 2.0 cable type A/B
1×Micro SD Card
1×Micro SD Card Module
1×Jumper Wires
1×USB 3.0 SD Card Reader
1×(Optional) 9V Power Adapter for Arduino
1×(Recommended) Screw Terminal Block Shield for Arduino Uno
1×(Optional) Transparent Acrylic Enclosure For Arduino Uno

Or you can buy the following sensor kits:

1×DIYables Sensor Kit (30 sensors/displays)
1×DIYables Sensor Kit (18 sensors/displays)
Please note: These are Amazon affiliate links. If you buy the components through these links, We will get a commission at no extra cost to you. We appreciate it.

About Micro SD Card Module

The Micro SD Card Module can interface with Arduino and it can carry a Micro SD Card. In another word, the Micro SD Card Module is a bridge between Arduino and Micro SD Card

Pinout

Micro SD Card Module Pinout

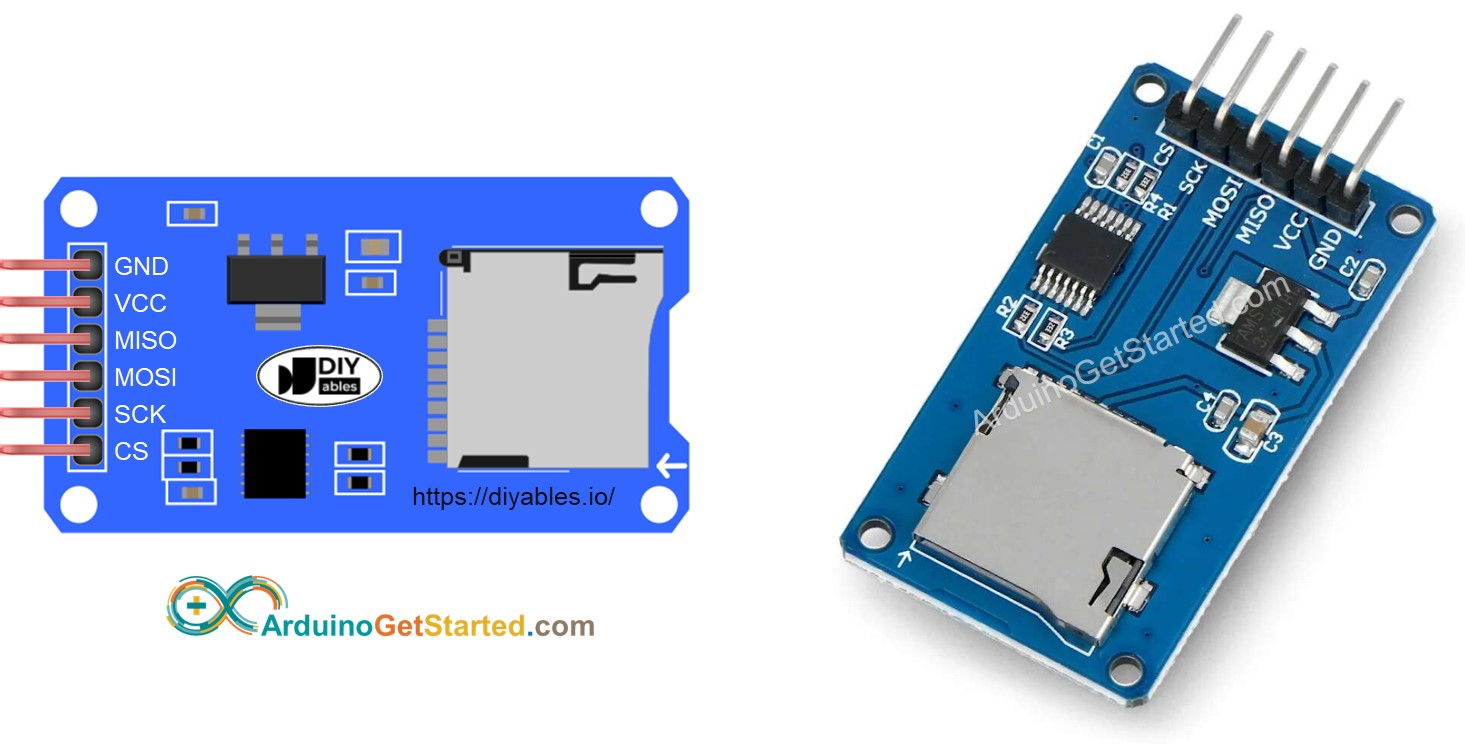
Micro SD Card Module includes 6 pins:

  • VCC pin: connect to the Arduino's 5V pin.
  • GND pin: connect this pin to the Arduino's GND.
  • MISO pin: (Master In Slave Out) connect this pin to the Arduino's MOSI pin.
  • MOSI pin: (Master Out Slave In) connect this pin to the Arduino's MISO pin.
  • SCK pin: connect this pin to the Arduino's SCK pin.
  • SS pin: (Slave Select) connect this pin to the pin specified in Arduino code as a SS pin.

Preparation

  • Connect the Micro SD Card to the PC via USB 3.0 SD Card Reader
  • Make sure that the Micro SD Card is formatted FAT16 or FAT32 (Google for it)
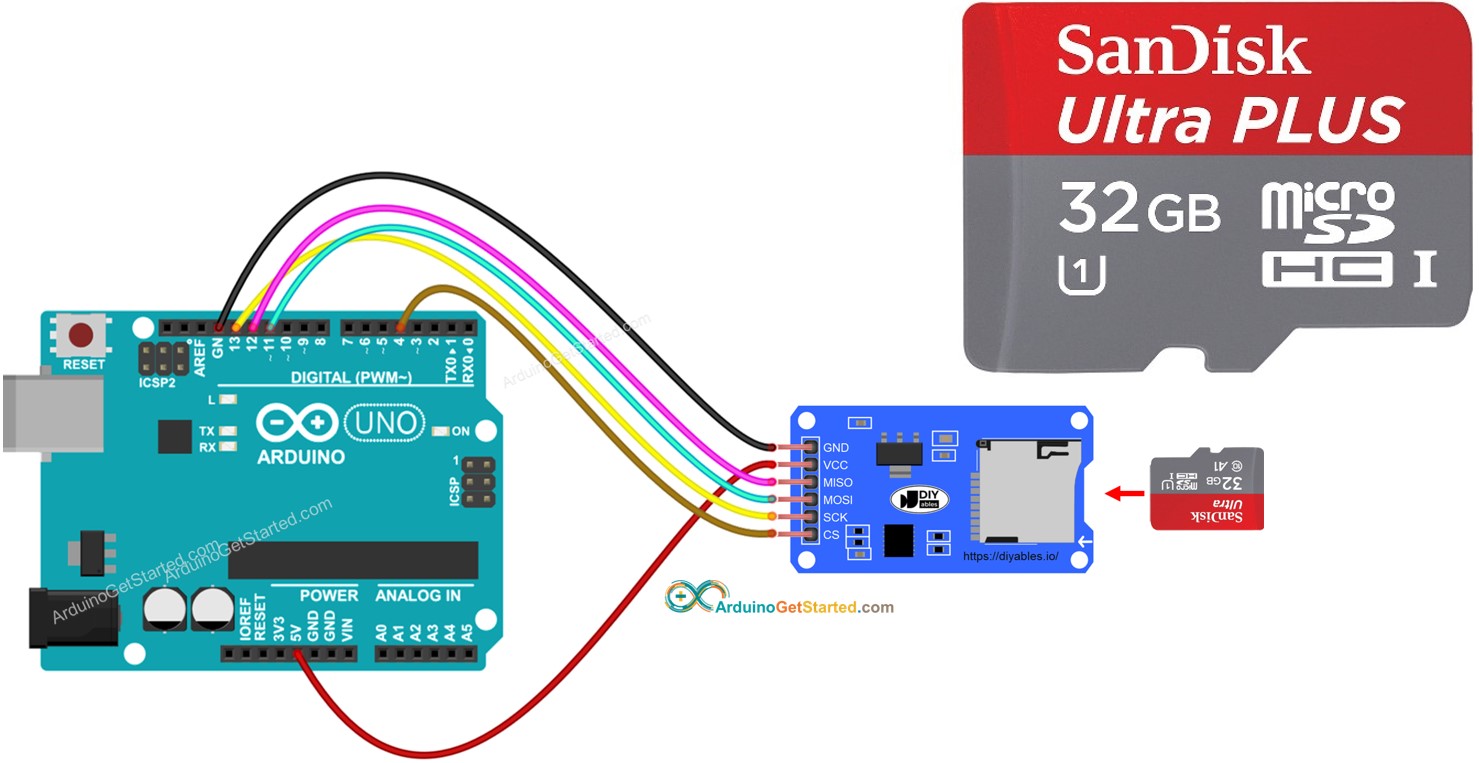
Wiring Diagram

Arduino Micro SD Card Module Wiring Diagram

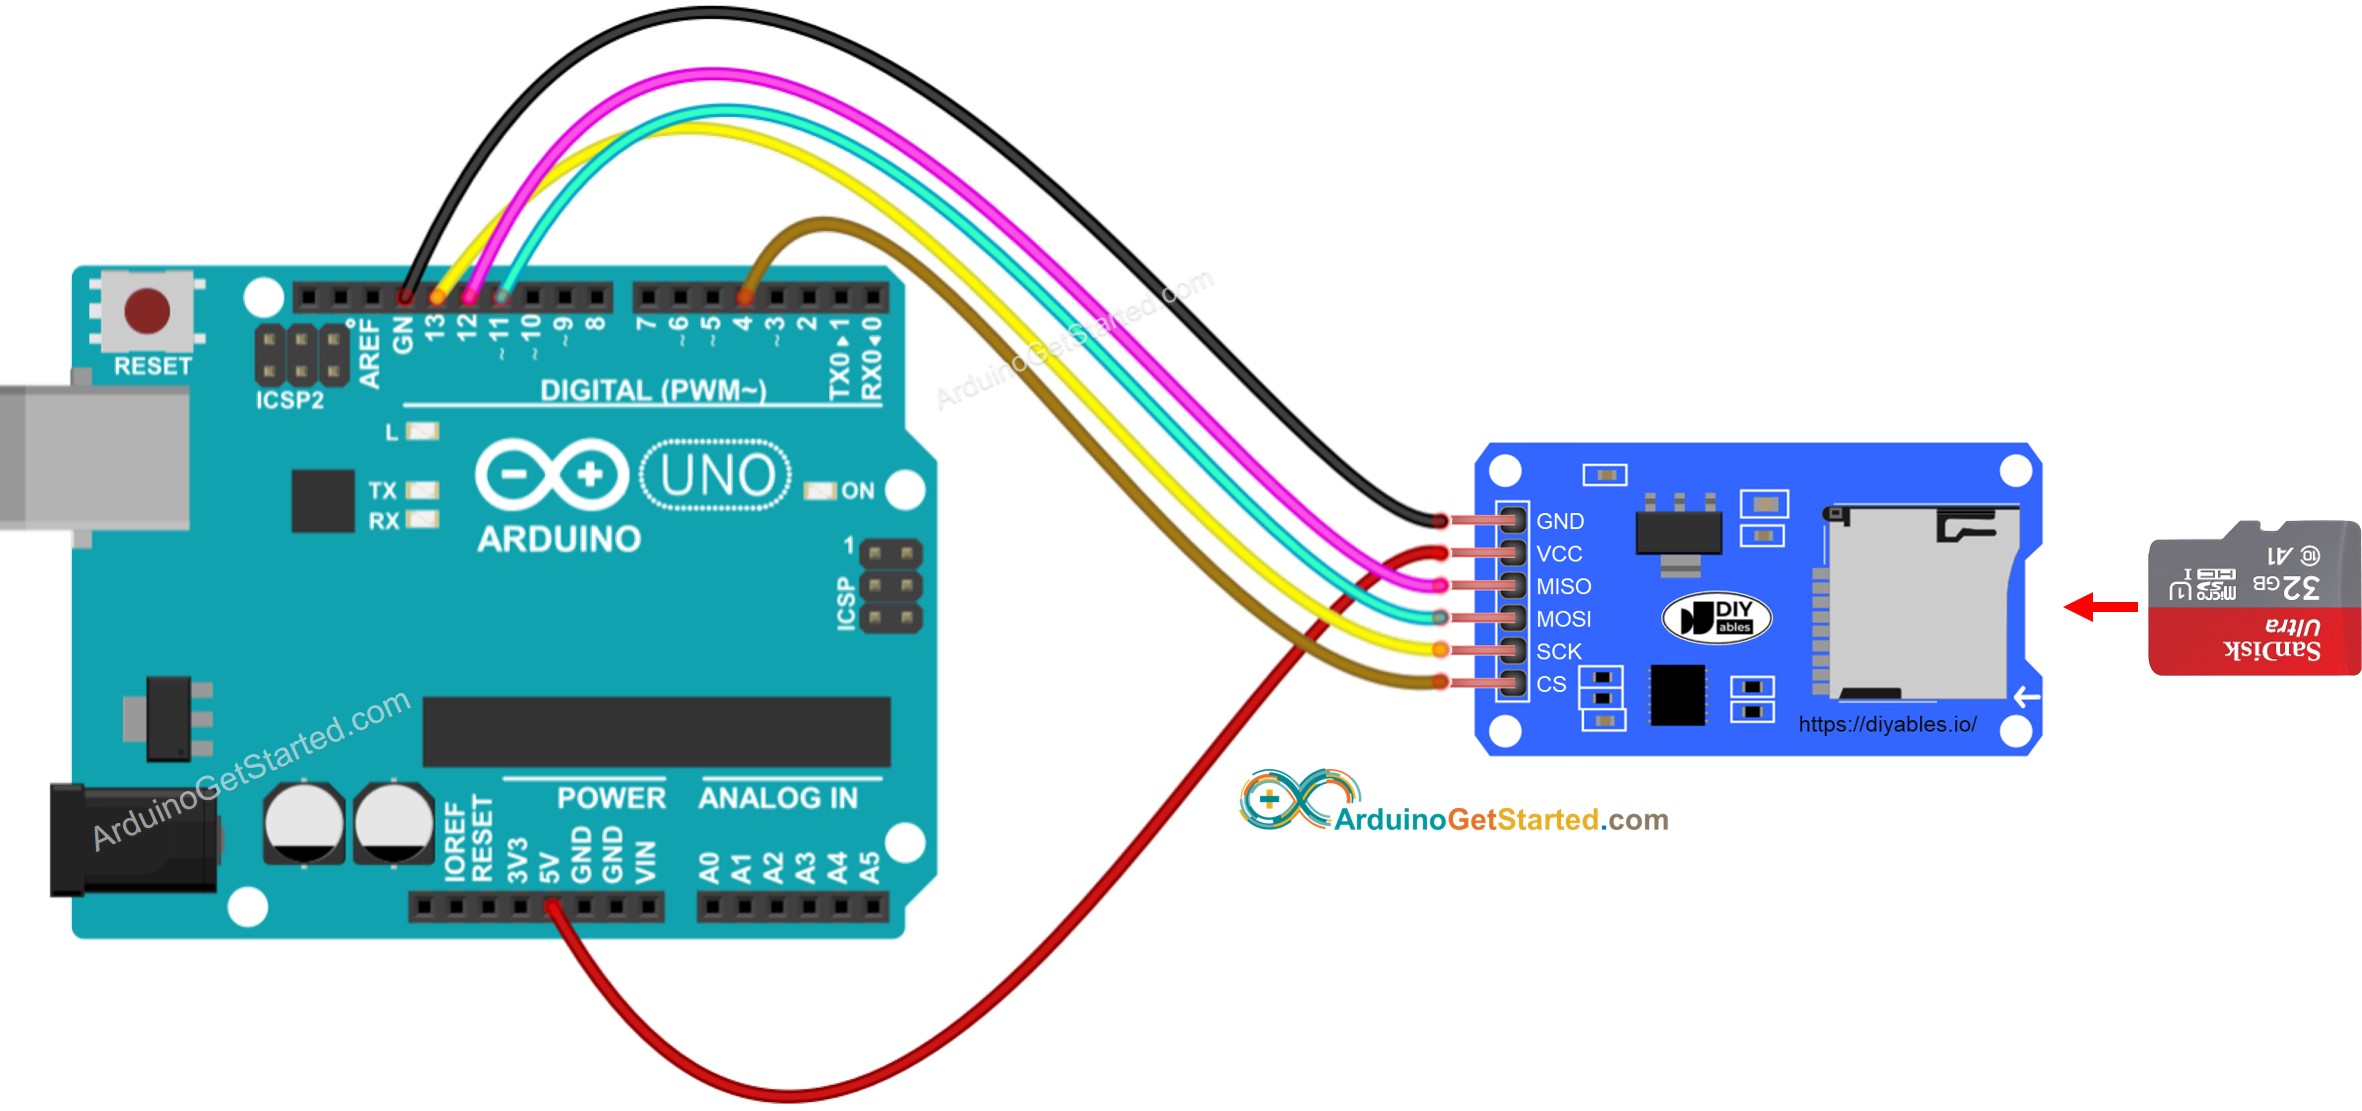
This image is created using Fritzing. Click to enlarge image

※ NOTE THAT:

If you use an Ethernet shield or any shield that has a Micro SD Card Holder, you do not need to use the Micro SD Card Module. You just need to insert the Micro SD Card to the Micro SD Card Holder on the shield.

Arduino - How to open a file on Micro SD Card and create if not existed

Arduino Code

Quick Steps

  • Insert the Micro SD Card to the Micro SD Card module
  • Do the wiring between the Micro SD Card module and Arduino as the above wiring diagram
  • Connect Arduino to PC via USB cable
  • Open Arduino IDE, select the right board and port
  • Open Serial On Arduino IDE
  • Copy the below code and paste it to Arduino IDE
/* * Created by ArduinoGetStarted.com * * This example code is in the public domain * * Tutorial page: https://arduinogetstarted.com/tutorials/arduino-micro-sd-card */ #include <SD.h> #define PIN_SPI_CS 4 File myFile; void setup() { Serial.begin(9600); if (!SD.begin(PIN_SPI_CS)) { Serial.println(F("SD CARD FAILED, OR NOT PRESENT!")); while (1); // don't do anything more: } Serial.println(F("SD CARD INITIALIZED.")); if (!SD.exists("arduino.txt")) { Serial.println(F("arduino.txt doesn't exist. Creating arduino.txt file...")); // create a new file by opening a new file and immediately close it myFile = SD.open("arduino.txt", FILE_WRITE); myFile.close(); } // recheck if file is created or not if (SD.exists("arduino.txt")) Serial.println(F("arduino.txt exists on SD Card.")); else Serial.println(F("arduino.txt doesn't exist on SD Card.")); } void loop() { }
  • Click Upload button on Arduino IDE to upload code to Arduino
  • The result on Serial Monitor for the first run
COM6
Send
SD CARD INITIALIZED. arduino.txt doesn't exist. Creating arduino.txt file... arduino.txt exists on SD Card.
Autoscroll Show timestamp
Clear output
9600 baud  
Newline  
  • The result on Serial Monitor for the next runs
COM6
Send
SD CARD INITIALIZED. arduino.txt exists on SD Card.
Autoscroll Show timestamp
Clear output
9600 baud  
Newline  

※ NOTE THAT:

You may NOT see the output on Serial Monitor for the first run of your first upload is done before opening Serial Monitor.

  • Detach the Micro SD Card from the module
  • Insert the Micro SD Card to an USB SD Card reader
  • Connect the USB SD Card reader to the PC
  • Check if the file exists or not

Arduino - How to write/read data to/from a file on Micro SD Card

The below code does:

  • Write data to a file
  • Read the content of the a file character-by-character and print it to Serial Monitor
/* * Created by ArduinoGetStarted.com * * This example code is in the public domain * * Tutorial page: https://arduinogetstarted.com/tutorials/arduino-micro-sd-card */ #include <SD.h> #define PIN_SPI_CS 4 File myFile; void setup() { Serial.begin(9600); if (!SD.begin(PIN_SPI_CS)) { Serial.println(F("SD CARD FAILED, OR NOT PRESENT!")); while (1); // don't do anything more: } Serial.println(F("SD CARD INITIALIZED.")); // open file for writing myFile = SD.open("arduino.txt", FILE_WRITE); if (myFile) { myFile.println("Created by ArduinoGetStarted.com"); // write a line to Arduino myFile.println("Learn Arduino and SD Card"); // write another line to Arduino myFile.close(); } else { Serial.print(F("SD Card: error on opening file arduino.txt")); } // open file for reading myFile = SD.open("arduino.txt", FILE_READ); if (myFile) { while (myFile.available()) { char ch = myFile.read(); // read characters one by one from Micro SD Card Serial.print(ch); // print the character to Serial Monitor } myFile.close(); } else { Serial.print(F("SD Card: error on opening file arduino.txt")); } } void loop() { }
  • The Serial Monitor shown the content of the file
COM6
Send
Created by ArduinoGetStarted.com Learn Arduino and SD Card
Autoscroll Show timestamp
Clear output
9600 baud  
Newline  

※ NOTE THAT:

The data will be appended to the end of file by default. If you reboot Arduino with above code, the text will be appended to the file again ⇒ the Serial Monitor will shows more lines as below:

COM6
Send
Created by ArduinoGetStarted.com Learn Arduino and SD Card Created by ArduinoGetStarted.com Learn Arduino and SD Card
Autoscroll Show timestamp
Clear output
9600 baud  
Newline  

You can also detach the Micro SD Card from the module, and open it on your PC to check the content (USB SD Card reader is needed)

Arduino - How to read a file on Micro SD Card line-by-line

/* * Created by ArduinoGetStarted.com * * This example code is in the public domain * * Tutorial page: https://arduinogetstarted.com/tutorials/arduino-micro-sd-card */ #include <SD.h> #define PIN_SPI_CS 4 File myFile; void setup() { Serial.begin(9600); if (!SD.begin(PIN_SPI_CS)) { Serial.println(F("SD CARD FAILED, OR NOT PRESENT!")); while (1); // don't do anything more: } Serial.println(F("SD CARD INITIALIZED.")); // open file for writing myFile = SD.open("arduino.txt", FILE_WRITE); if (myFile) { myFile.println("Created by ArduinoGetStarted.com"); // write a line to Arduino myFile.println("Learn Arduino and SD Card"); // write another line to Arduino myFile.close(); } else { Serial.print(F("SD Card: error on opening file arduino.txt")); } // open file for reading myFile = SD.open("arduino.txt", FILE_READ); if (myFile) { int line_count = 0; while (myFile.available()) { char line[100]; // maximum is 100 characters, change it if needed int line_length = myFile.readBytesUntil('\n', line, 100); // read line-by-line from Micro SD Card line_count++; Serial.print(F("Line ")); Serial.print(line_count); Serial.print(F(": ")); Serial.write(line, line_length); // print the character to Serial Monitor // \n character is escaped by readBytesUntil function Serial.write('\n'); // print a new line charactor } myFile.close(); } else { Serial.print(F("SD Card: error on opening file arduino.txt")); } } void loop() { }
  • The result on Serial Monitor
COM6
Send
SD CARD INITIALIZED. Line 1: Created by ArduinoGetStarted.com Line 2: Learn Arduino and SD Card
Autoscroll Show timestamp
Clear output
9600 baud  
Newline  

※ NOTE THAT:

You may see more lines on Serial Monitor if the content of the file is not deleted before.

Arduino - How to overwrite a file on Micro SD Card

By default, the content will append to the end of the file. The simplest way to overwrite a file is: delete the exsiting file and create new one with the same name

/* * Created by ArduinoGetStarted.com * * This example code is in the public domain * * Tutorial page: https://arduinogetstarted.com/tutorials/arduino-micro-sd-card */ #include <SD.h> #define PIN_SPI_CS 4 File myFile; void setup() { Serial.begin(9600); if (!SD.begin(PIN_SPI_CS)) { Serial.println(F("SD CARD FAILED, OR NOT PRESENT!")); while (1); // don't do anything more: } Serial.println(F("SD CARD INITIALIZED.")); SD.remove("arduino.txt"); // delete the file if existed // create new file by opening file for writing myFile = SD.open("arduino.txt", FILE_WRITE); if (myFile) { myFile.println("Created by ArduinoGetStarted.com"); // write a line to Arduino myFile.println("Learn Arduino and SD Card"); // write another line to Arduino myFile.close(); } else { Serial.print(F("SD Card: error on opening file arduino.txt")); } // open file for reading myFile = SD.open("arduino.txt", FILE_READ); if (myFile) { while (myFile.available()) { char ch = myFile.read(); // read characters one by one from Micro SD Card Serial.print(ch); // print the character to Serial Monitor } myFile.close(); } else { Serial.print(F("SD Card: error on opening file arduino.txt")); } } void loop() { }
  • The result on Serial Monitor
COM6
Send
SD CARD INITIALIZED. Created by ArduinoGetStarted.com Learn Arduino and SD Card
Autoscroll Show timestamp
Clear output
9600 baud  
Newline  
  • Reboot Arduino
  • Check if the content of the file on Serial Monitor is appended or not.

You can also detach the Micro SD Card from the module, and open it on your PC to check the content (USB SD Card reader is needed)

Video Tutorial

We are considering to make the video tutorials. If you think the video tutorials are essential, please subscribe to our YouTube channel to give us motivation for making the videos.

The Best Arduino Starter Kit

※ OUR MESSAGES