Disclosure: Some links in this section are Amazon affiliate links. If you make a purchase through these links, we may earn a commission at no extra cost to you. Additionally, some links direct to products from our own brand, DIYables .
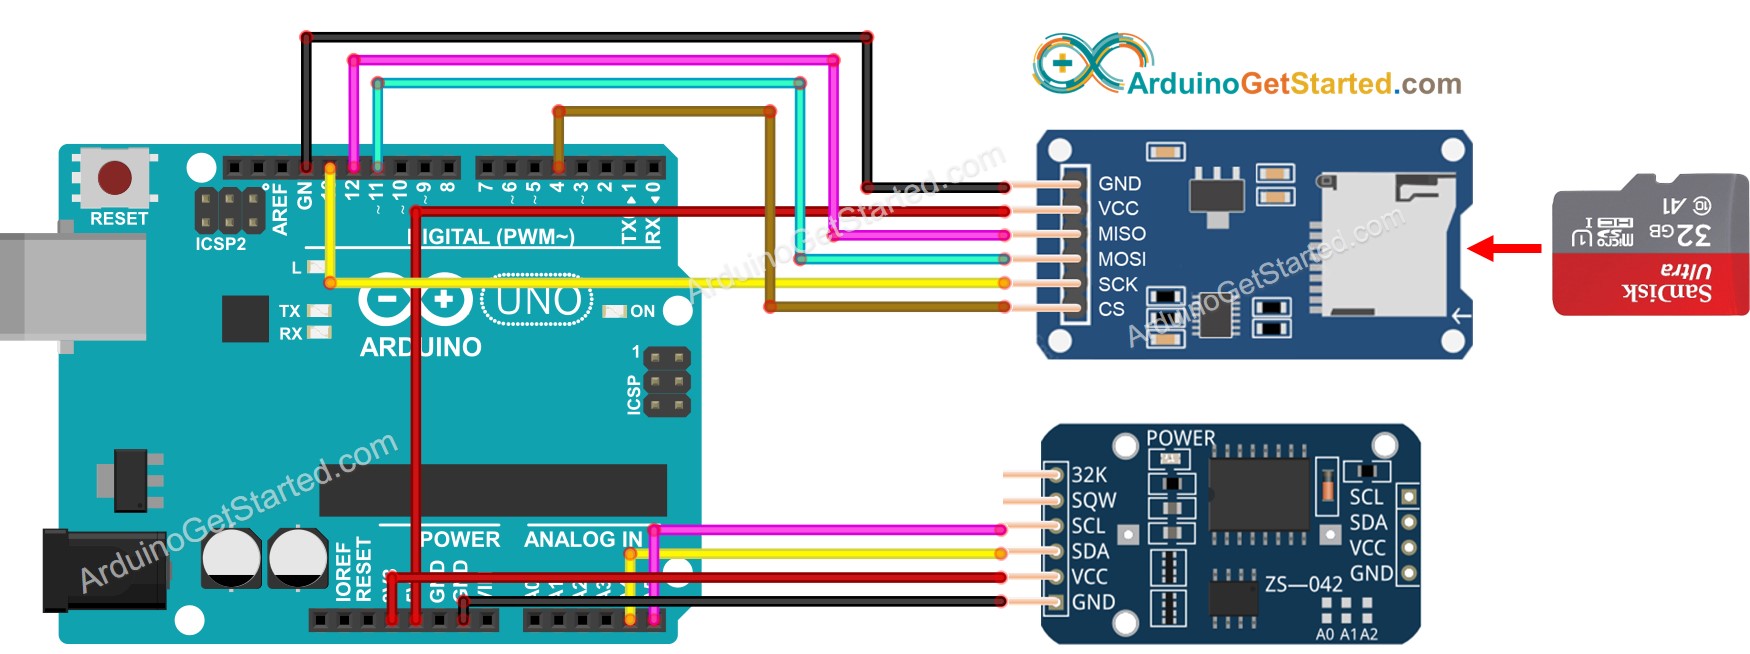
About Micro SD Card Module and RTC Module
If you do not know about Micro SD Card Module and RTC module (pinout, how it works, how to program ...), learn about them in the following tutorials:
This image is created using Fritzing. Click to enlarge image
※ NOTE THAT:
If you use an Ethernet shield or any shield that has a Micro SD Card Holder, you do not need to use the Micro SD Card Module. You just need to insert the Micro SD Card to the Micro SD Card Holder on the shield.
Arduino - Log Data with Timestamp to Micro SD Card
/* * Created by ArduinoGetStarted.com * * This example code is in the public domain * * Tutorial page: https://arduinogetstarted.com/tutorials/arduino-log-data-with-timestamp-to-sd-card */#include <SD.h>#include <RTClib.h>#define PIN_SPI_CS 4#define FILE_NAME "log.txt"RTC_DS3231 rtc;File myFile;voidsetup() {Serial.begin(9600);// SETUP RTC MODULEif (!rtc.begin()) {Serial.println(F("Couldn't find RTC"));while (1); }if (!SD.begin(PIN_SPI_CS)) {Serial.println(F("SD CARD FAILED, OR NOT PRESENT!"));while (1); // don't do anything more: }Serial.println(F("SD CARD INITIALIZED."));Serial.println(F("--------------------"));}voidloop() {// open file for writing myFile = SD.open(FILE_NAME, FILE_WRITE);if (myFile) {Serial.println(F("Writing log to SD Card"));// write timestampDateTimenow = rtc.now(); myFile.print(now.year(), DEC); myFile.print('-'); myFile.print(now.month(), DEC); myFile.print('-'); myFile.print(now.day(), DEC); myFile.print(' '); myFile.print(now.hour(), DEC); myFile.print(':'); myFile.print(now.minute(), DEC); myFile.print(':'); myFile.print(now.second(), DEC); myFile.print(" "); // delimiter between timestamp and data// read dataint analog_1 = analogRead(A0);int analog_2 = analogRead(A1);// write data myFile.print("analog_1 = "); myFile.print(analog_1); myFile.print(", "); // delimiter between data myFile.print("analog_2 = "); myFile.print(analog_2); myFile.write("\n"); // new line myFile.close(); } else {Serial.print(F("SD Card: error on opening file "));Serial.println(FILE_NAME); }delay(2000); // delay 2 seconds}
Quick Steps
Make sure that the Micro SD Card is formatted FAT16 or FAT32 (Google for it)
Copy the above code and open with Arduino IDE
Click Upload button on Arduino IDE to upload code to Arduino
See the result on Serial Monitor.
Newbiely | Arduino IDE 2.3.8
──
☐
✕
File
Edit
Sketch
Tools
Help
Arduino Uno
Newbiely.ino
···
8Serial.println("Hello World!");
Output
Serial Monitor
Message (Enter to send message to 'Arduino Uno' on 'COM15')
New Line
9600 baud
SD CARD INITIALIZED.
--------------------
Writing log to SD Card
Writing log to SD Card
Writing log to SD Card
Writing log to SD Card
Writing log to SD Card
Writing log to SD Card
Writing log to SD Card
Ln 11, Col 1
Arduino Uno on COM15
2
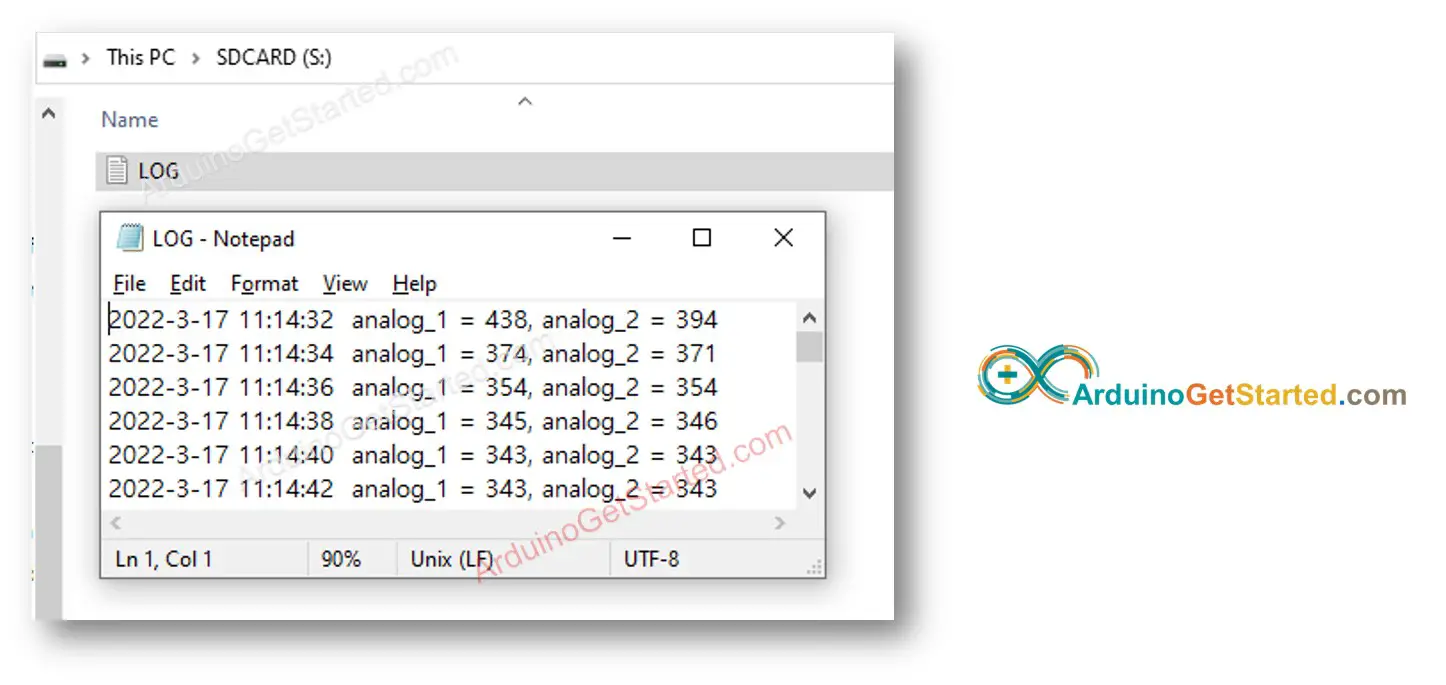
Detach the Micro SD Card from the Micro SD Card module
Insert the Micro SD Card to an USB SD Card reader
Connect the USB SD Card reader to the PC
Open the log.txt file on your PC, it looks like below
If you do not have an USB SD Card reader, you can check the content of log file by running the below Arduino Code.
/* * Created by ArduinoGetStarted.com * * This example code is in the public domain * * Tutorial page: https://arduinogetstarted.com/tutorials/arduino-log-data-with-timestamp-to-sd-card */#include <SD.h>#define PIN_SPI_CS 4#define FILE_NAME "log.txt"File myFile;voidsetup() {Serial.begin(9600);if (!SD.begin(PIN_SPI_CS)) {Serial.println(F("SD CARD FAILED, OR NOT PRESENT!"));while (1); // don't do anything more: }Serial.println(F("SD CARD INITIALIZED."));// open file for reading myFile = SD.open(FILE_NAME, FILE_READ);if (myFile) {while (myFile.available()) {char ch = myFile.read(); // read characters one by one from Micro SD CardSerial.print(ch); // print the character to Serial Monitor } myFile.close(); } else {Serial.print(F("SD Card: error on opening file "));Serial.println(FILE_NAME); }}voidloop() {}
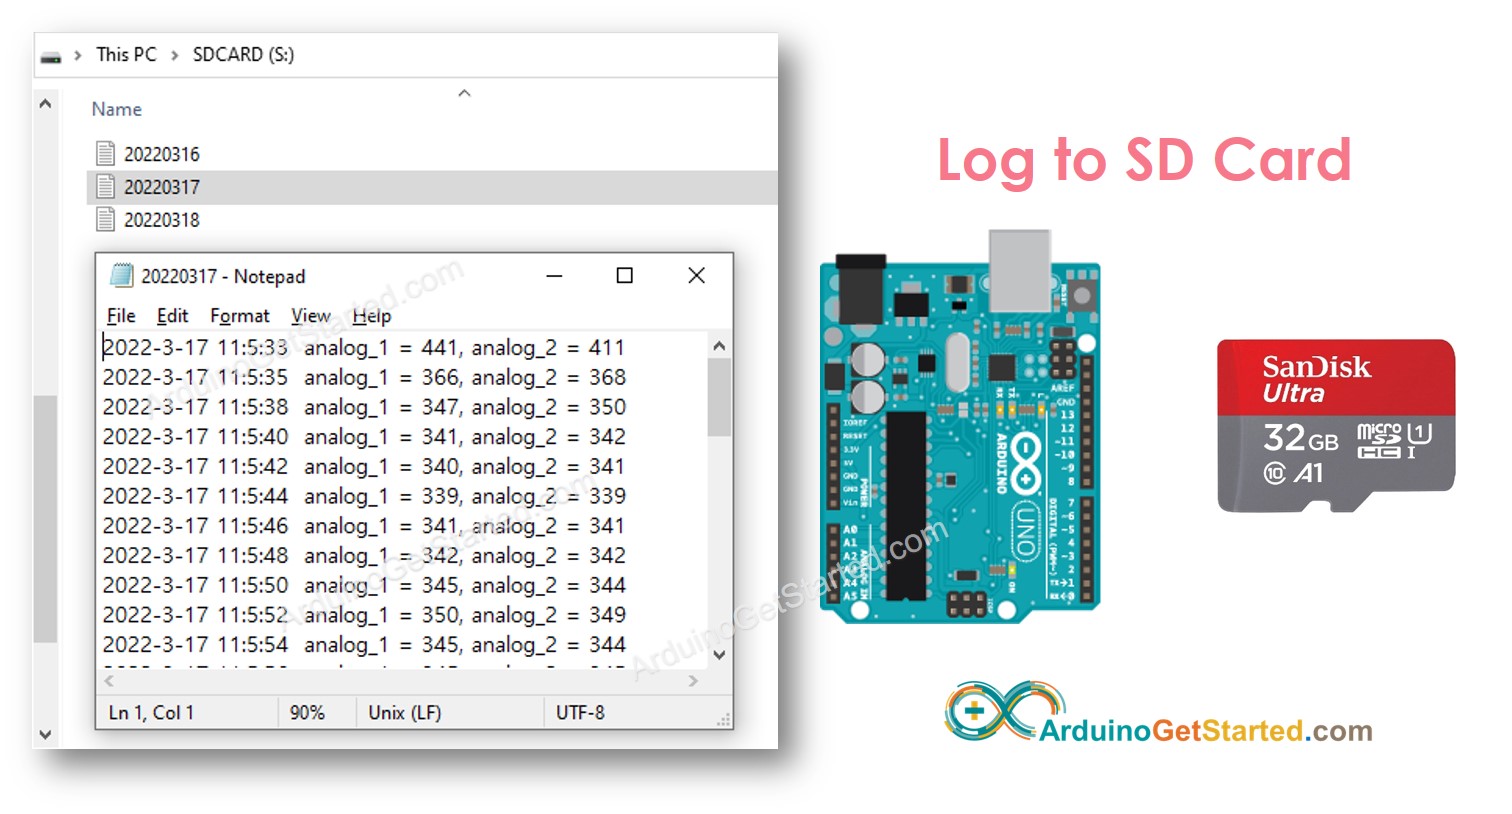
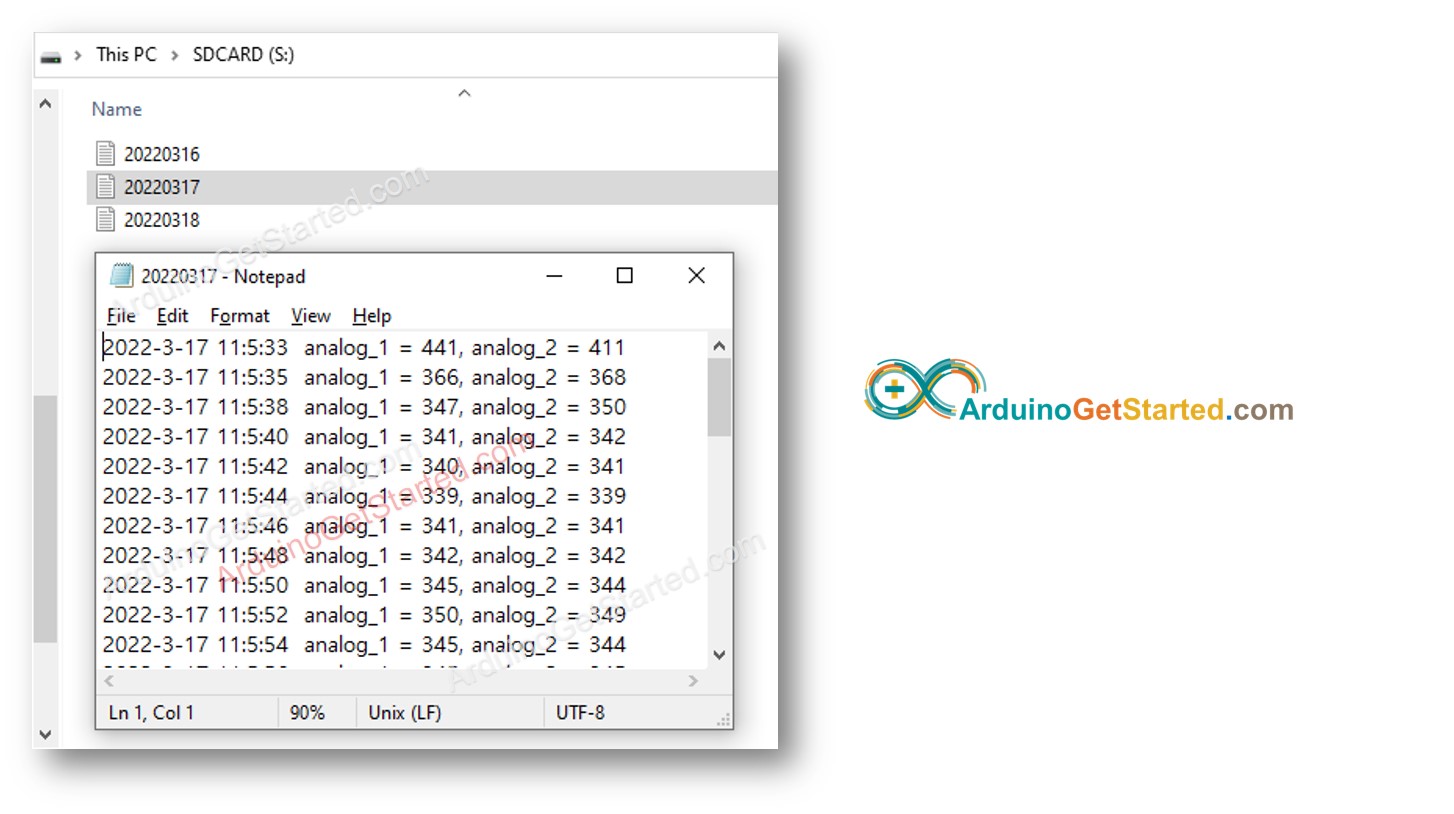
Arduino - Log Data in multiple files
Writing log to a single file results in a big file size overtime and makes it difficult to check. The below code will write log file in multiple:
One file per day
The filename is the date informationL YYYYMMDD.txt
/* * Created by ArduinoGetStarted.com * * This example code is in the public domain * * Tutorial page: https://arduinogetstarted.com/tutorials/arduino-log-data-with-timestamp-to-sd-card */#include <SD.h>#include <RTClib.h>#define PIN_SPI_CS 4RTC_DS3231 rtc;File myFile;char filename[] = "yyyymmdd.txt"; // filename (without extension) should not exceed 8 charsvoidsetup() {Serial.begin(9600);// SETUP RTC MODULEif (!rtc.begin()) {Serial.println(F("Couldn't find RTC"));while (1); }if (!SD.begin(PIN_SPI_CS)) {Serial.println(F("SD CARD FAILED, OR NOT PRESENT!"));while (1); // don't do anything more: }Serial.println(F("SD CARD INITIALIZED."));Serial.println(F("--------------------"));}voidloop() {DateTimenow = rtc.now();intyear = now.year();intmonth = now.month();intday = now.day();// update filename filename[0] = (year / 1000) + '0'; filename[1] = ((year % 1000) / 100) + '0'; filename[2] = ((year % 100) / 10) + '0'; filename[3] = (year % 10) + '0'; filename[4] = (month / 10) + '0'; filename[5] = (month % 10) + '0'; filename[6] = (day / 10) + '0'; filename[7] = (day % 10) + '0';// open file for writing myFile = SD.open(filename, FILE_WRITE);if (myFile) {Serial.println(F("Writing log to SD Card"));// write timestamp myFile.print(now.year(), DEC); myFile.print('-'); myFile.print(now.month(), DEC); myFile.print('-'); myFile.print(now.day(), DEC); myFile.print(' '); myFile.print(now.hour(), DEC); myFile.print(':'); myFile.print(now.minute(), DEC); myFile.print(':'); myFile.print(now.second(), DEC); myFile.print(" "); // delimiter between timestamp and data// read dataint analog_1 = analogRead(A0);int analog_2 = analogRead(A1);// write data myFile.print("analog_1 = "); myFile.print(analog_1); myFile.print(", "); // delimiter between data myFile.print("analog_2 = "); myFile.print(analog_2); myFile.write("\n"); // new line myFile.close(); } else {Serial.print(F("SD Card: error on opening file "));Serial.println(filename); }delay(2000); // delay 2 seconds}
After a long run, If you:
Detach the Micro SD Card from the Micro SD Card module
Insert the Micro SD Card to an USB SD Card reader
Connect the USB SD Card reader to the PC
You will see the files as follows:
Video Tutorial
We are considering to make the video tutorials. If you think the video tutorials are essential, please subscribe to our YouTube channel to give us motivation for making the videos.
You can share the link of this tutorial anywhere. Howerver, please do not copy the content to share on other websites. We took a lot of time and effort to create the content of this tutorial, please respect our work!