Arduino - 74HC595 4-Digit 7-Segment Display

A standard 4-digit 7-segment display is needed for clock, timer and counter projects, but it usually requires 12 connections. The 74HC595 module makes it easier by only requiring 5 connections: 2 for power and 3 for controlling the segments.

This tutorial will not overload you by deep driving into hardware. Instead, We will learn how to connect the 4-digit 7-segment display to Arduino, how to program it do display what we want.
Arduino 74HC595 4-digit 7-segment display

This tutorial are going to use the 4-dot 4-digit 7-segment display module that is able to displayed the float values. If you want to display a colon separator, please use the TM1637 4-digit 7-segment Display Module

Hardware Required

1×Arduino UNO or Genuino UNO
1×USB 2.0 cable type A/B (for USB-A PC)
1×USB 2.0 cable type C/B (for USB-C PC)
1×74HC595 4-digit 7-segment Display
1×Jumper Wires
1×(Recommended) Screw Terminal Block Shield for Arduino Uno
1×(Recommended) Breadboard Shield For Arduino Uno
1×(Recommended) Enclosure For Arduino Uno

Or you can buy the following sensor kits:

1×DIYables Sensor Kit (30 sensors/displays)
1×DIYables Sensor Kit (18 sensors/displays)
Disclosure: Some links in this section are Amazon affiliate links. If you make a purchase through these links, we may earn a commission at no extra cost to you.
Additionally, some links direct to products from our own brand, DIYables.

About 74HC595 4-digit 7-segment Display

A 74HC595 4-digit 7-segment display module typically consists of 4 7-segment LEDs, 4 dot-shaped LEDs, and a 74HC595 driver for each digit: It is ideal for displaying the temperature or any decimal value.

Pinout

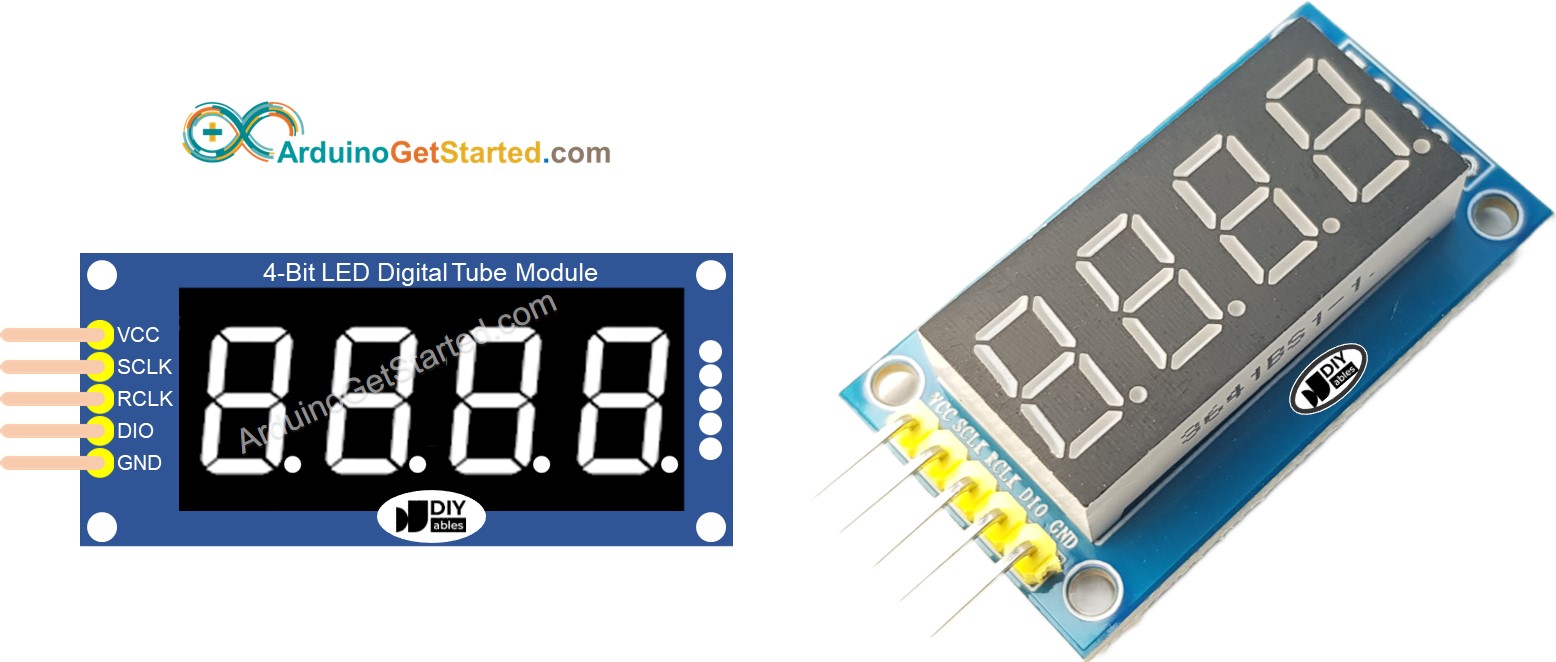
The 74HC595 4-digit 7-segment display module includes 5 pins:

  • SCLK pin: is a clock input pin. Connect to any digital pin on Arduino.
  • RCLK pin: is a clock input pin. Connect to any digital pin on Arduino.
  • DIO pin: is a Data I/O pin. Connect to any digital pin on Arduino.
  • VCC pin: supplies power to the module. Connect it to the 3.3V to 5V power supply.
  • GND pin: is a ground pin.
74HC595 module pinout

Wiring Diagram

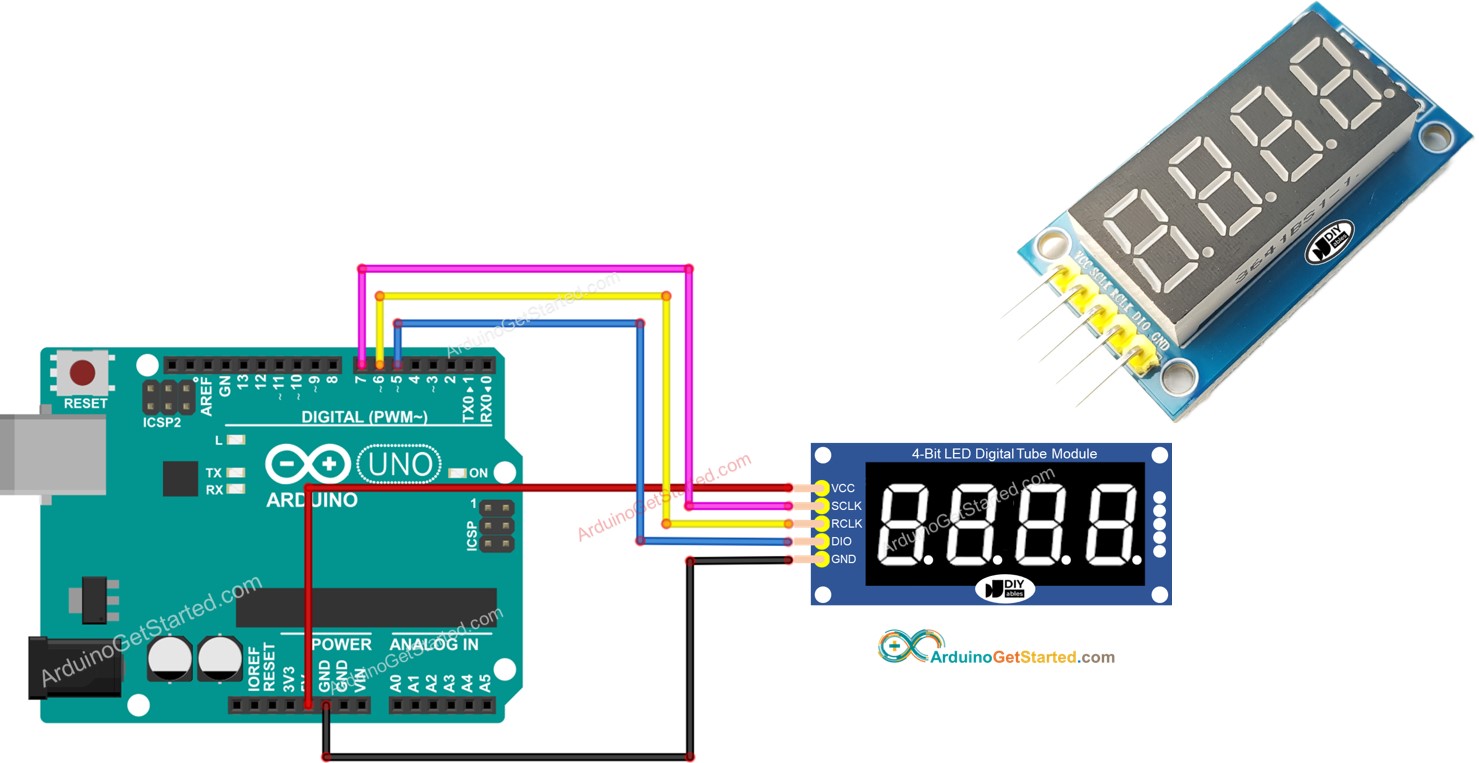
The table below shown the wiring between Arduino pins and a 74HC595 4-digit 7-segment display pins:

Arduino 74HC595 7-segment display
5V5V
7SCLK
6RCLK
5DIO

The pin numbers in the code should be changed if different pins are used.
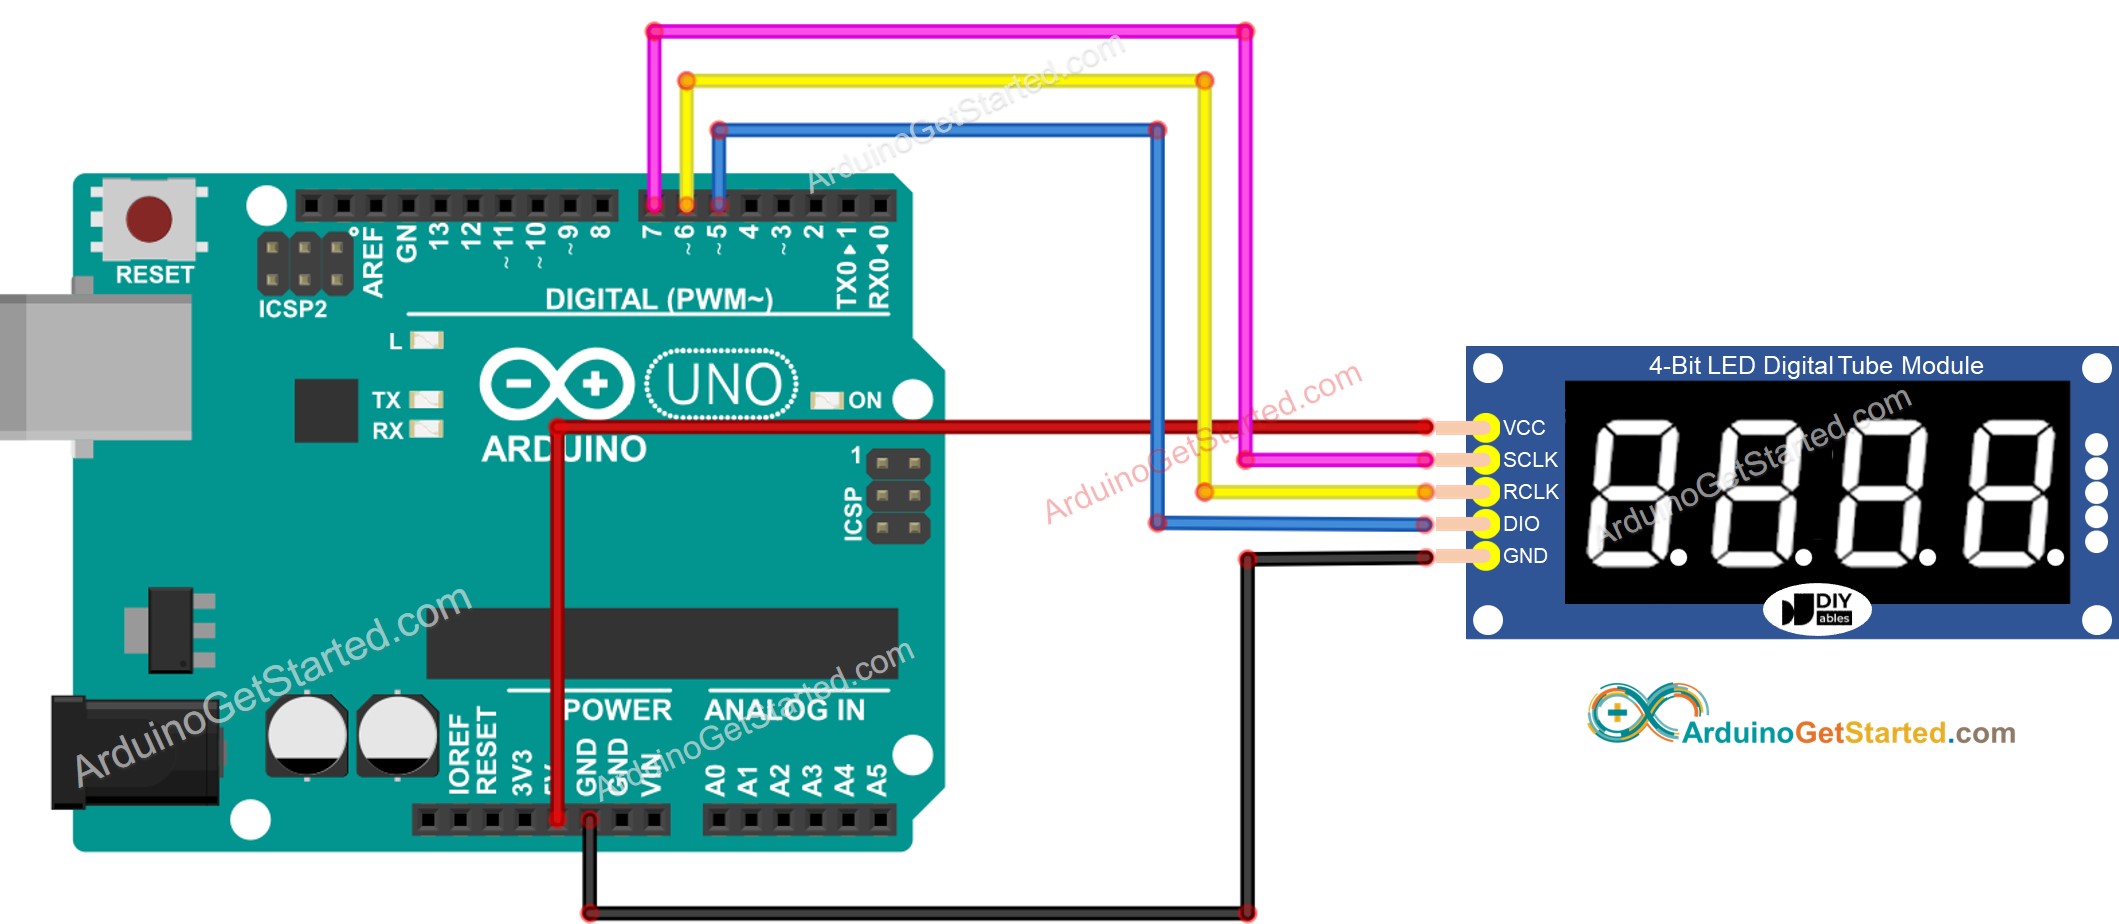
Arduino 74HC595 Module Wiring Diagram

This image is created using Fritzing. Click to enlarge image

Library Installation

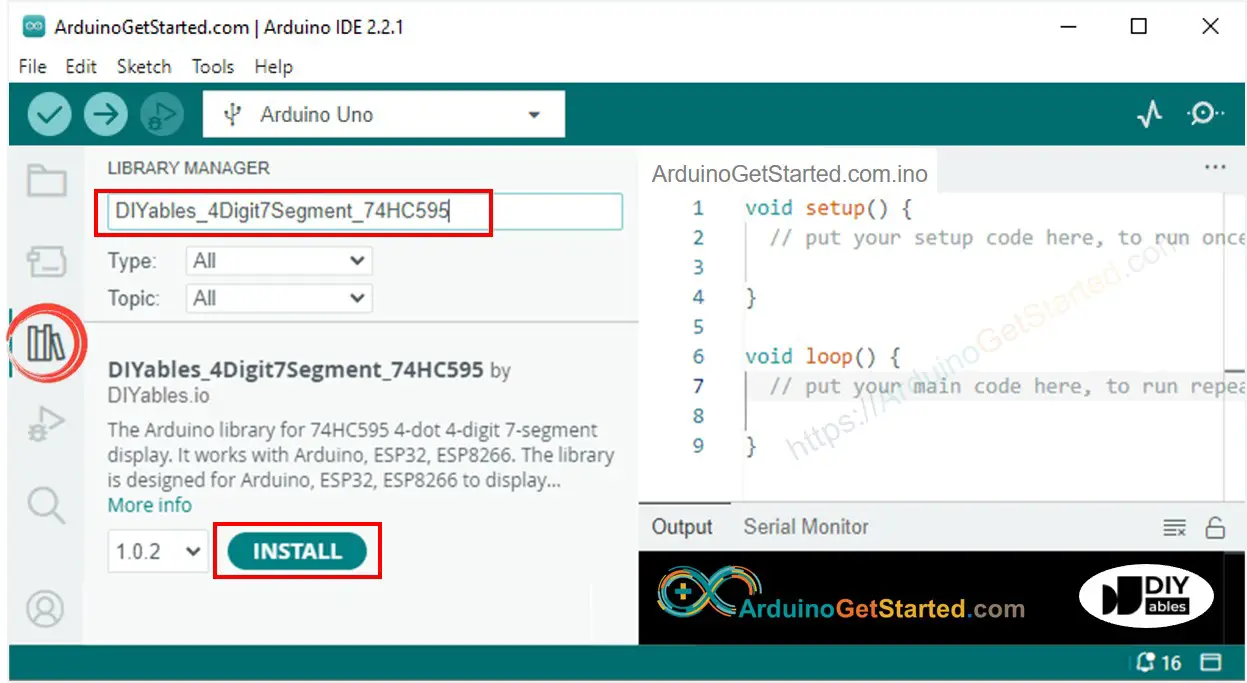
To program easily for 74HC595 4-digit 7-segment Display, we need to install DIYables_4Digit7Segment_74HC595 library by DIYables.io. Follow the below steps to install the library:

  • Navigate to the Libraries icon on the left bar of the Arduino IDE.
  • Search “DIYables_4Digit7Segment_74HC595”, then find the DIYables_4Digit7Segment_74HC595 library by DIYables.io
  • Click Install button.
Arduino 74HC595 4-digit 7-segment display library

You can also see this library on Github

How To Program For 74HC595 4-digit 7-segment using Arduino

  • Include the library
#include <DIYables_4Digit7Segment_74HC595.h>
  • Define Arduino's pins that connects to SCLK, RCLK and DIO of the display module. For example, pin D7, D6 and D5
#define SCLK 7 // The Arduino pin connected to SCLK #define RCLK 6 // The Arduino pin connected to RCLK #define DIO 5 // The Arduino pin connected to DIO
  • Create a display object of type DIYables_4Digit7Segment_74HC595
DIYables_4Digit7Segment_74HC595 display = DIYables_4Digit7Segment_74HC595(CLK, DIO);
  • Then you can display the integer numbers with the zero-padding option, supporting the negative number:
display.printInt(-13, false); // you can display a value from -999 to 9999
  • You can display the float numbers with the decimal place, zero-padding options, supporting the negative number:
display.printFloat(-9.2, 1, false);
  • You can also display number, decimal point, character digit-by-digit by using lower-level functions:
// display 9.3°C display.clear(); display.setNumber(1, 9); // set 9 at the 1st digit display.setDot(1); // set . at the 1st digit display.setNumber(2, 3); // set 3 at the 2nd digit display.setChar(3, SegChars::DEGREE); // set ° at the 3rd digit display.setChar(4, SegChars::C); // set C at the 3rd digit display.show(); // show on the display
  • Because the 74HC595 4-digit 7-segment module uses the multiplexing technique to control individual segments and LEDs, Arduino code MUST:
    • Call display.show() function in the main loop
    • Not use delay() function in the main loop

    You can see more detail in the the library reference

Arduino Code - Display Integer

/* Created by DIYables This example code is in the public domain Product page: https://diyables.io/products/4-digit-7-segment-display-led-74hc595-driver-with-4-dots */ #include <DIYables_4Digit7Segment_74HC595.h> // DIYables_4Digit7Segment_74HC595 library #define SCLK 7 // The Arduino pin connected to SCLK #define RCLK 6 // The Arduino pin connected to RCLK #define DIO 5 // The Arduino pin connected to DIO DIYables_4Digit7Segment_74HC595 display(SCLK, RCLK, DIO); void setup() { Serial.begin(9600); display.printInt(-13, false); // you can display a value from -999 to 9999 //display.printInt(-132, false); //display.printInt(9132, false); //display.printInt(132, false); //display.printInt(32, false); //display.printInt(2, false); //display.printInt(2, true); } void loop() { display.loop(); // MUST call the display.loop() function in loop() // DO SOMETHING HERE // NOTE: do NOT use the delay() function in loop because it affects to the multiplexing }

Quick Steps

  • Copy the above code and open with Arduino IDE
  • Click Upload button on Arduino IDE to upload code to Arduino
  • See the states of the 7-segment display

Arduino Code - Display Float

/* Created by DIYables This example code is in the public domain Product page: https://diyables.io/products/4-digit-7-segment-display-led-74hc595-driver-with-4-dots */ #include <DIYables_4Digit7Segment_74HC595.h> // DIYables_4Digit7Segment_74HC595 library #define SCLK 7 // The Arduino pin connected to SCLK #define RCLK 6 // The Arduino pin connected to RCLK #define DIO 5 // The Arduino pin connected to DIO DIYables_4Digit7Segment_74HC595 display(SCLK, RCLK, DIO); void setup() { Serial.begin(9600); display.printFloat(-9.2, 1, false); //display.printFloat(-92.4, 1, false); //display.printFloat(-9.24, 2, false); //display.printFloat(192.4, 1, false); //display.printFloat(19.24, 2, false); //display.printFloat(1.924, 3, false); } void loop() { display.loop(); // MUST call the display.loop() function in loop() // DO SOMETHING HERE // NOTE: do NOT use the delay() function in loop because it affects to the multiplexing }

Arduino Code - Display Temperature

/* Created by DIYables This example code is in the public domain Product page: https://diyables.io/products/4-digit-7-segment-display-led-74hc595-driver-with-4-dots */ #include <DIYables_4Digit7Segment_74HC595.h> // DIYables_4Digit7Segment_74HC595 library #define SCLK 7 // The Arduino pin connected to SCLK #define RCLK 6 // The Arduino pin connected to RCLK #define DIO 5 // The Arduino pin connected to DIO DIYables_4Digit7Segment_74HC595 display(SCLK, RCLK, DIO); void setup() { Serial.begin(9600); // display 9.3°C by controlling digit by digit display.clear(); display.setNumber(1, 9); // set 9 at the 1st digit display.setDot(1); // set . at the 1st digit display.setNumber(2, 3); // set 3 at the 2nd digit display.setChar(3, SegChars::DEGREE); // set ° at the 3rd digit display.setChar(4, SegChars::C); // set C at the 3rd digit display.show(); // show on the display } void loop() { display.loop(); // MUST call the display.loop() function in loop() // DO SOMETHING HERE // NOTE: do NOT use the delay() function in loop because it affects to the multiplexing }

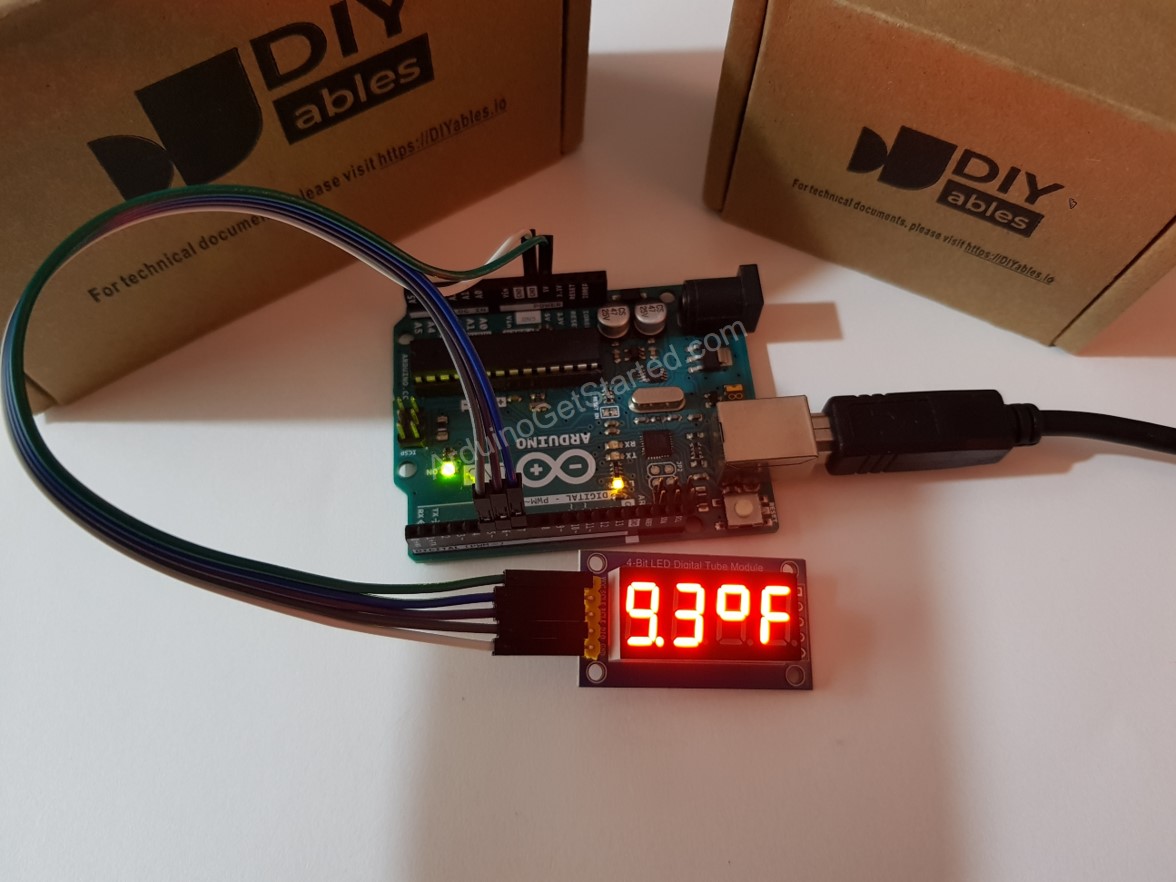
The result is as the below image:

Arduino 74HC595 module displays temperature

Video Tutorial

We are considering to make the video tutorials. If you think the video tutorials are essential, please subscribe to our YouTube channel to give us motivation for making the videos.

The Best Arduino Starter Kit

※ OUR MESSAGES