Arduino - Ultrasonic Sensor
In this tutorial, we are going to learn:
- How ultrasonic sensor works
- How to connect the ultrasonic sensor to Arduino
- How to program Arduino to read the state from the ultrasonic sensor
- How to use Arduino and ultrasonic sensor HC-SR04 to measure the distance to an object
- How to filter noise from distance measurements of ultrasonic sensor in Arduino code
Hardware Required
Or you can buy the following kits:
| 1 | × | DIYables STEM V3 Starter Kit (Arduino included) | |
| 1 | × | DIYables Sensor Kit (18 sensors/displays) |
Additionally, some links direct to products from our own brand, DIYables .
About Ultrasonic Sensor
Ultrasonic sensor HC-SR04 is used to measure the distance to an object by using ultrasonic waves.
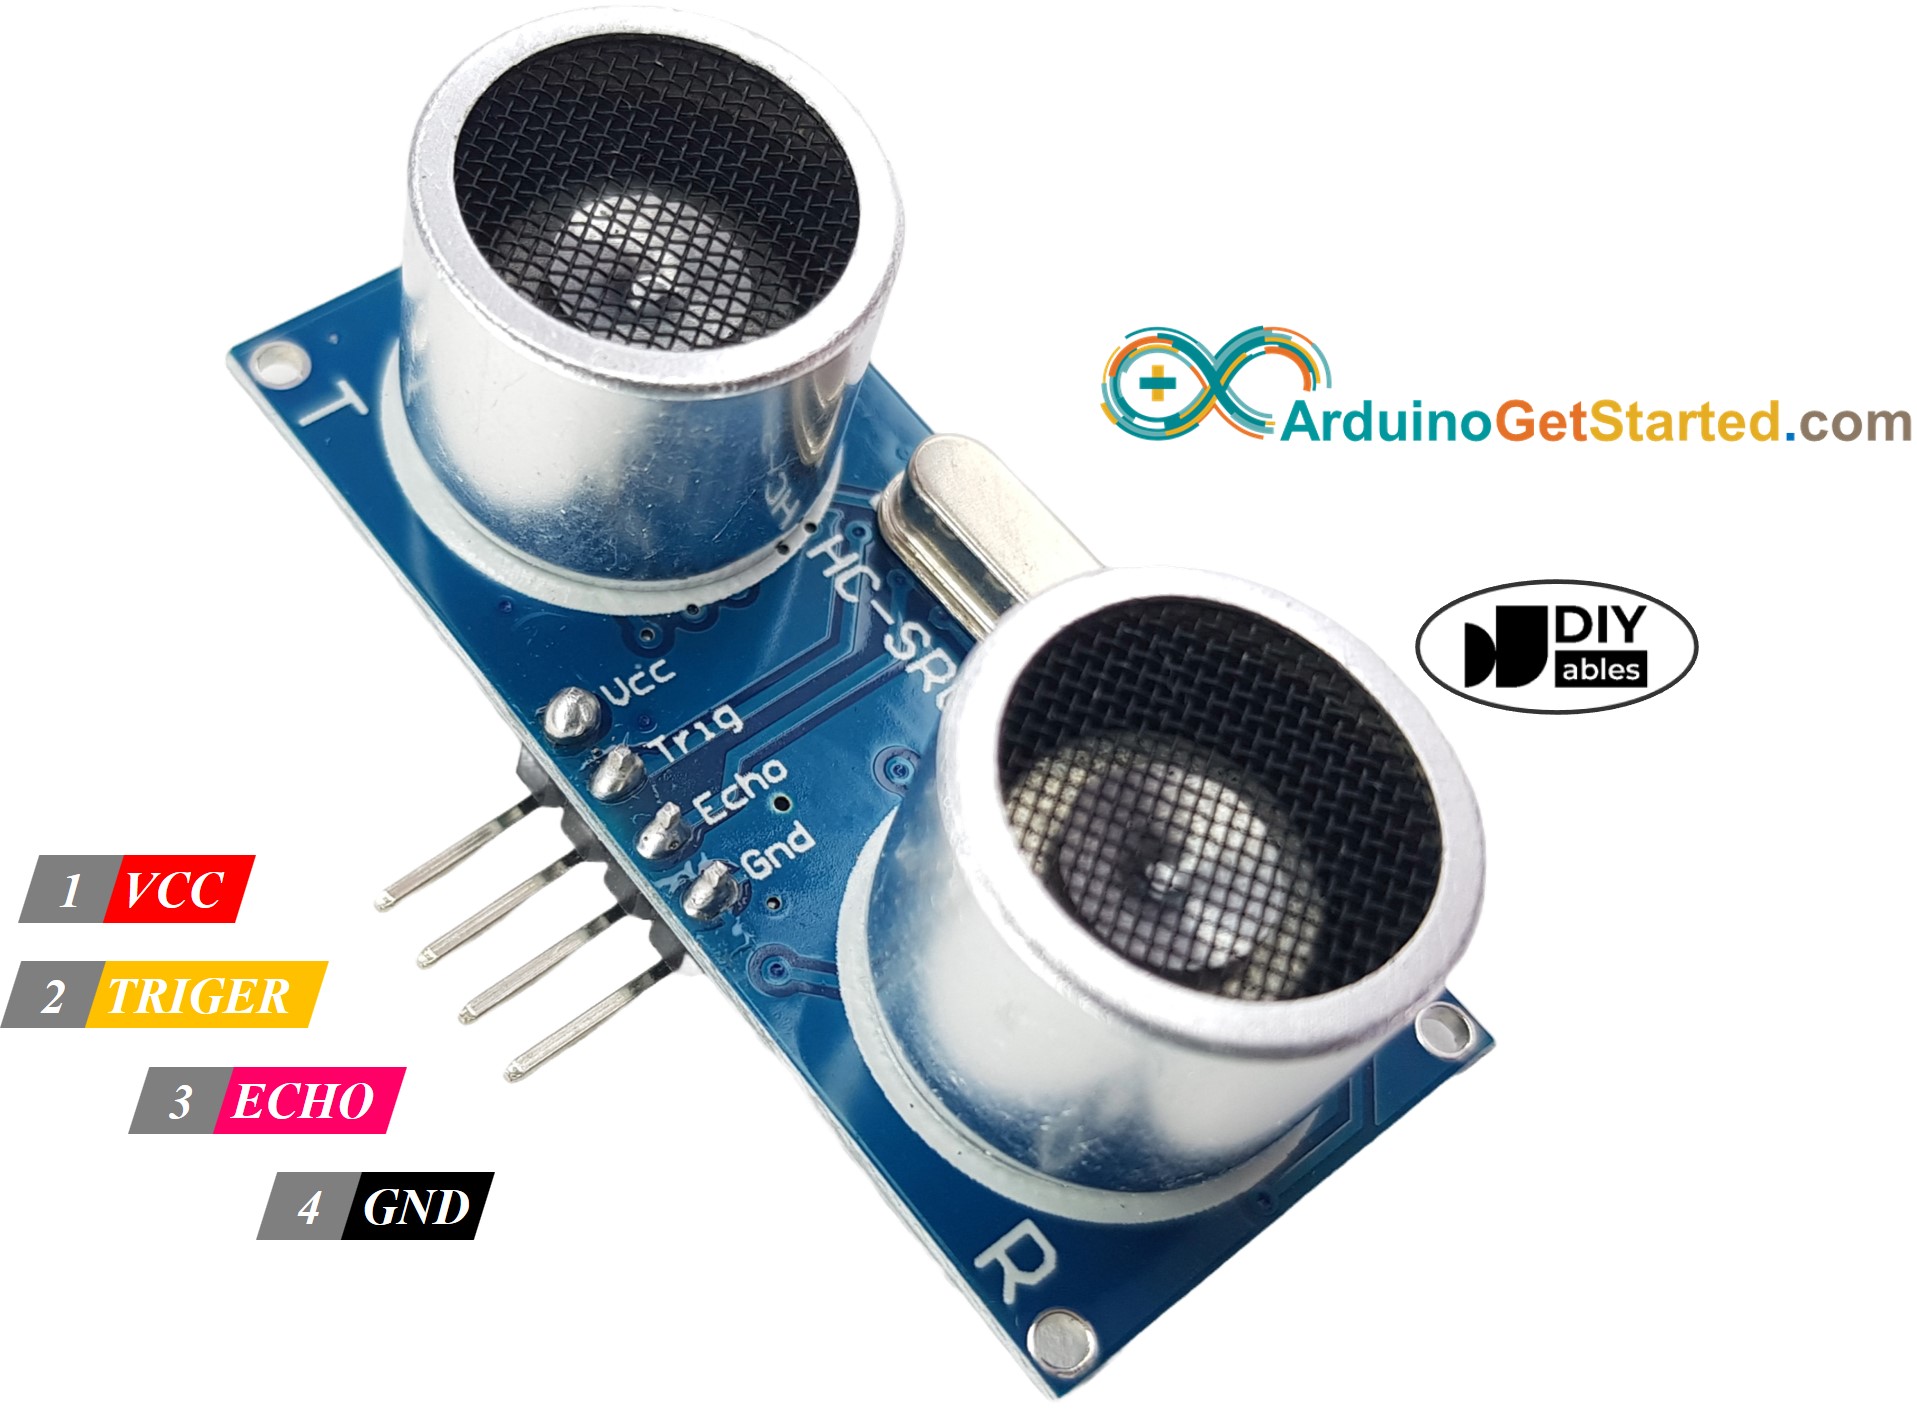
Pinout
The ultrasonic sensor HC-SR04 includes four pins:
- VCC pin: needs to be connected to VCC (5V)
- GND pin: needs to be connected to GND (0V)
- TRIG pin: this pin receives the control signal (pulse) from Arduino.
- ECHO pin: this pin sends a signal (pulse) to Arduino. Arduino measures the duration of pulse to calculate distance.
How It Works
- Micro-controller: generates a 10-microsecond pulse on the TRIG pin.
- The ultrasonic sensor automatically emits the ultrasonic waves.
- The ultrasonic wave is reflected after hitting an obstacle.
- The ultrasonic sensor:
- Detects the reflected ultrasonic wave.
- Measures the travel time of the ultrasonic wave.
How to Get Distance From Ultrasonic Sensor
To get distance from the ultrasonic sensor, we only need to do two steps (1 and 6 on How It Works part)
- Generates a 10-microsecond pulse on TRIG pin
- Measures the pulse duration in ECHO pin, and then calculate the distance between sensor and obstacle
Distance Calculation
We have:
- The travel time of the ultrasonic wave (µs): travel_time = pulse_duration
- The speed of the ultrasonic wave: speed = SPEED_OF_SOUND = 340 m/s = 0.034 cm/µs
So:
- The travel distance of the ultrasonic wave (cm): travel_distance = speed × travel_time = 0.034 × pulse_duration
- The distance between sensor and obstacle (cm): distance = travel_distance / 2 = 0.034 × pulse_duration / 2 = 0.017 × pulse_duration
Arduino - Ultrasonic Sensor
Arduino's pins can generate a 10-microsecond pulse and measure the pulse duration. Therefore, we can get the distance from the ultrasonic sensor by using two Arduino's pins:
- One pin is connected to TRIG PIN to generate 10µs pulse to TRIG pin of the sensor
- Another pin is connected to ECHO PIN measure pulse from the sensor
Wiring Diagram
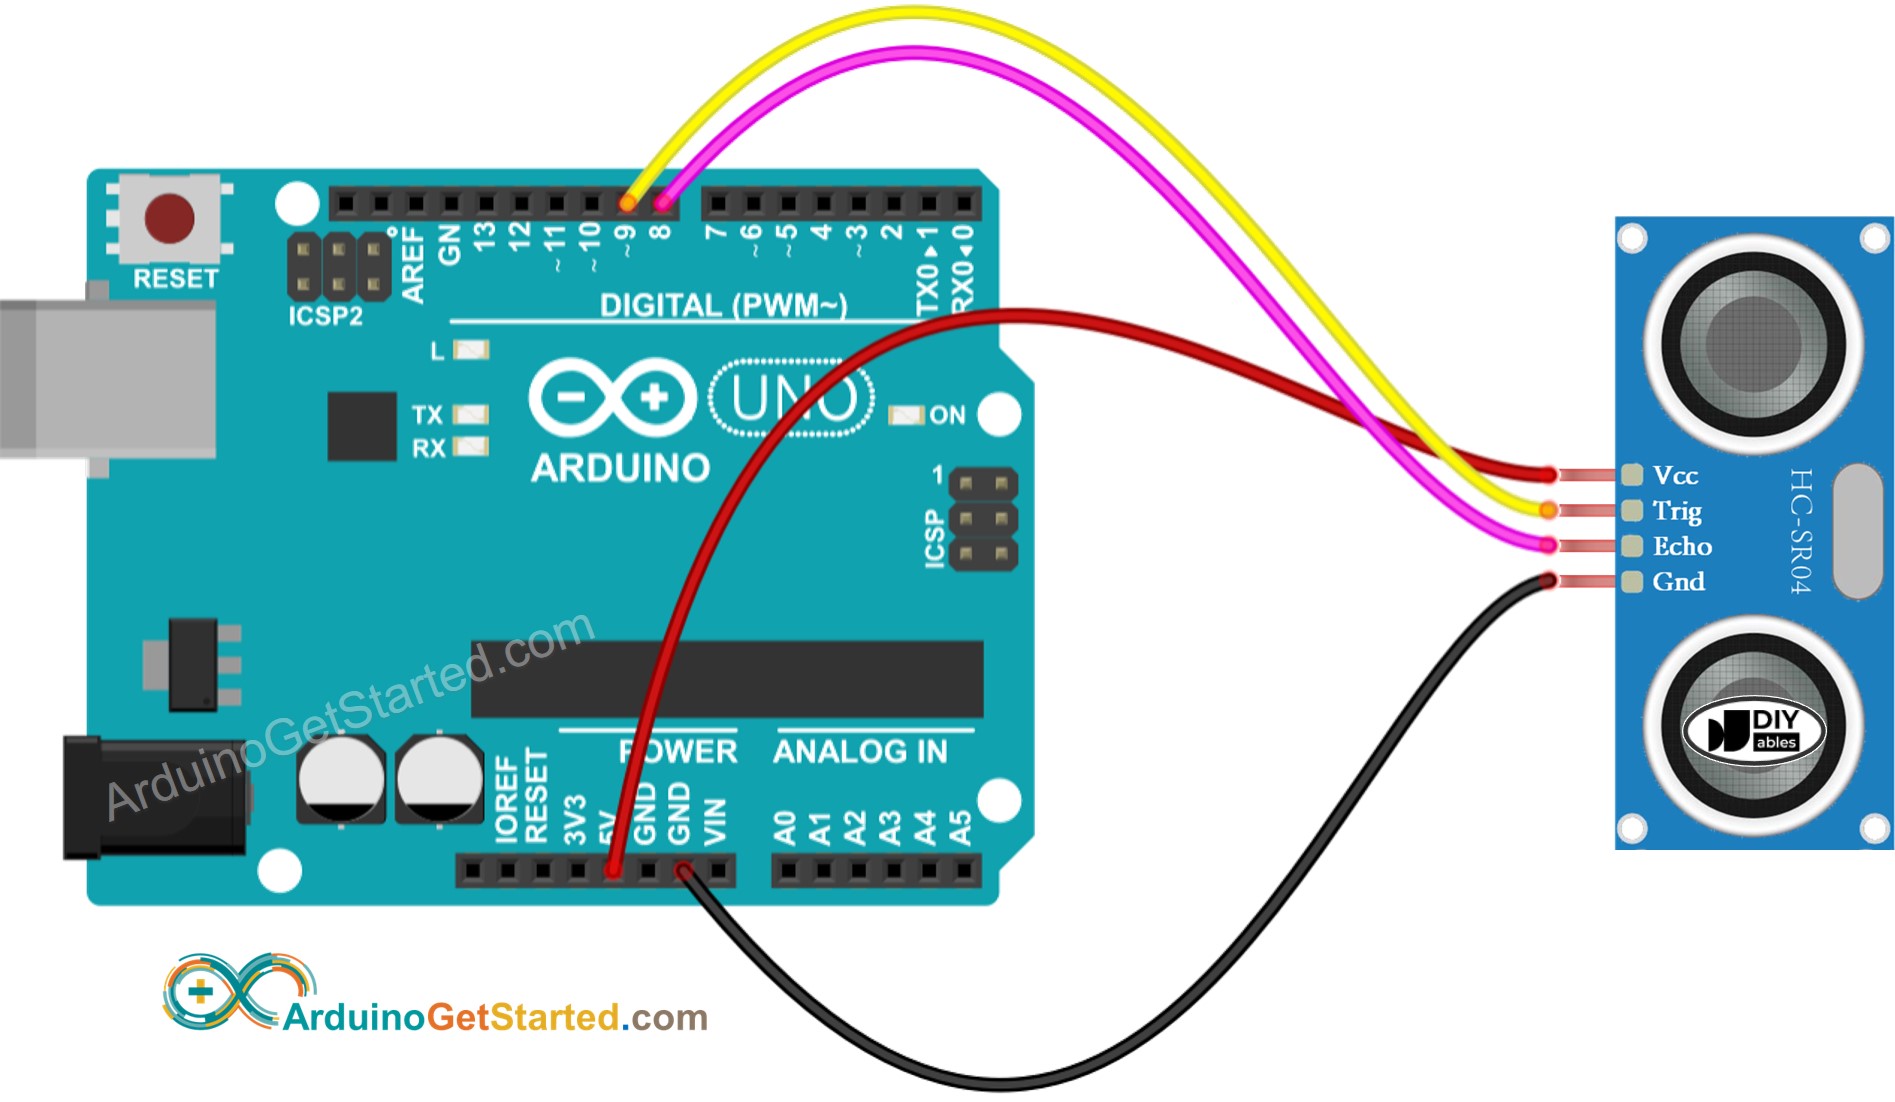
This image is created using Fritzing. Click to enlarge image
How To Program For Ultrasonic Sensor
- Generate a 10-microsecond pulse in Arduino's pin by using digitalWrite() and delayMicroseconds() functions. For example, pin 9:
- Measures the pulse duration (µs) in Arduino's pin by using pulseIn() function. For example, pin 8:
- Calculate distance (cm):
Arduino Code
Quick Steps
- Copy the above code and open with Arduino IDE
- Click Upload button on Arduino IDE to upload code to Arduino
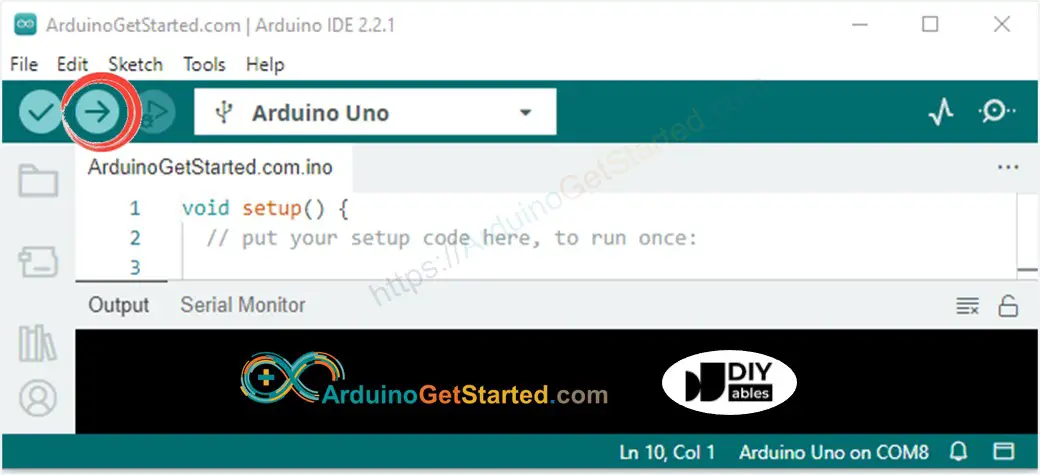
- Open Serial Monitor
- Move your hand in front of ultrasonic sensor
- See the distance from the sensor to your hand on Serial Monitor
Code Explanation
Read the line-by-line explanation in comment lines of code!
How to Filter Noise from Distance Measurements of Ultrasonic Sensor
The measurement result from ultrasonic sensor contains noise. In some application, the noised result causes the unwanted operation. We can remove noise by using the following algorithm:
- Taking multiple measurements and store in an array
- Sorting the array in ascending order
- Filtering noise
- The some smallest samples are considered as noise → ignore it
- The some biggest samples are considered as noise → ignore it
- ⇒ get average of the middle samples
- The five smallest samples are considered as noise → ignore it
- The five biggest samples are considered as noise → ignore it
- ⇒ get average of the 10 middle samples (from 5th to 14th)
The below example code takes 20 measurements
Video Tutorial
We are considering to make the video tutorials. If you think the video tutorials are essential, please subscribe to our YouTube channel to give us motivation for making the videos.
Challenge Yourself
Use ultrasonic sensor to do one of the following projects:
- Collision avoidance for RC car.
- Detecting the fullness of dustbin.
- Monitoring level of the dustbin.
- Automatically open/close the dustbin. Hint: Refer to Arduino - Servo Motor.
Additional Knowledge
Some manufacturers provide the ultrasonic sensor that has 3 pins. TRIG signal and ECHO signal are in the same pin. In this case, we need to use only one Arduino's pin for both purposes: generating a pulse to the sensor and measuring pulse from the sensor.
Ultrasonic Sensor Applications
- Collision Avoidance
- Fullness Detection
- Level Measurement
- Proximity Detection