Arduino - NeoPixel LED Strip

The NeoPixel RGB LED strip is a strip of LEDs that the color and brightness of each LED on the strip can be controlled individually. In this tutorial, we are going to learn how to use Arduino to control NeoPixel RGB LED strip. To control all LEDs on the NeoPixel strip, we just need to use a single Arduino pin.

Hardware Required

1×Arduino UNO or Genuino UNO
1×USB 2.0 cable type A/B
1×NeoPixel RGB LED Strip
1×1000uF Capacitor
1×470Ω resistor
1×5V Power Adapter
1×DC Power Jack
1×Jumper Wires
1×(Optional) 9V Power Adapter for Arduino
1×(Recommended) Screw Terminal Block Shield for Arduino Uno
1×(Optional) Transparent Acrylic Enclosure For Arduino Uno

Or you can buy the following sensor kit:

1×DIYables Sensor Kit 30 types, 69 units
Please note: These are Amazon affiliate links. If you buy the components through these links, We will get a commission at no extra cost to you. We appreciate it.

About NeoPixel RGB LED Strip

Pinout

the NeoPixel RGB LED Strip has three pins:

  • GND pin: needs to be connected to GND (0V)
  • VCC pin: needs to be connected to 5V of external power supply
  • Din pin: is pin that receives the control signal. It should be connected to a Arduino pin.
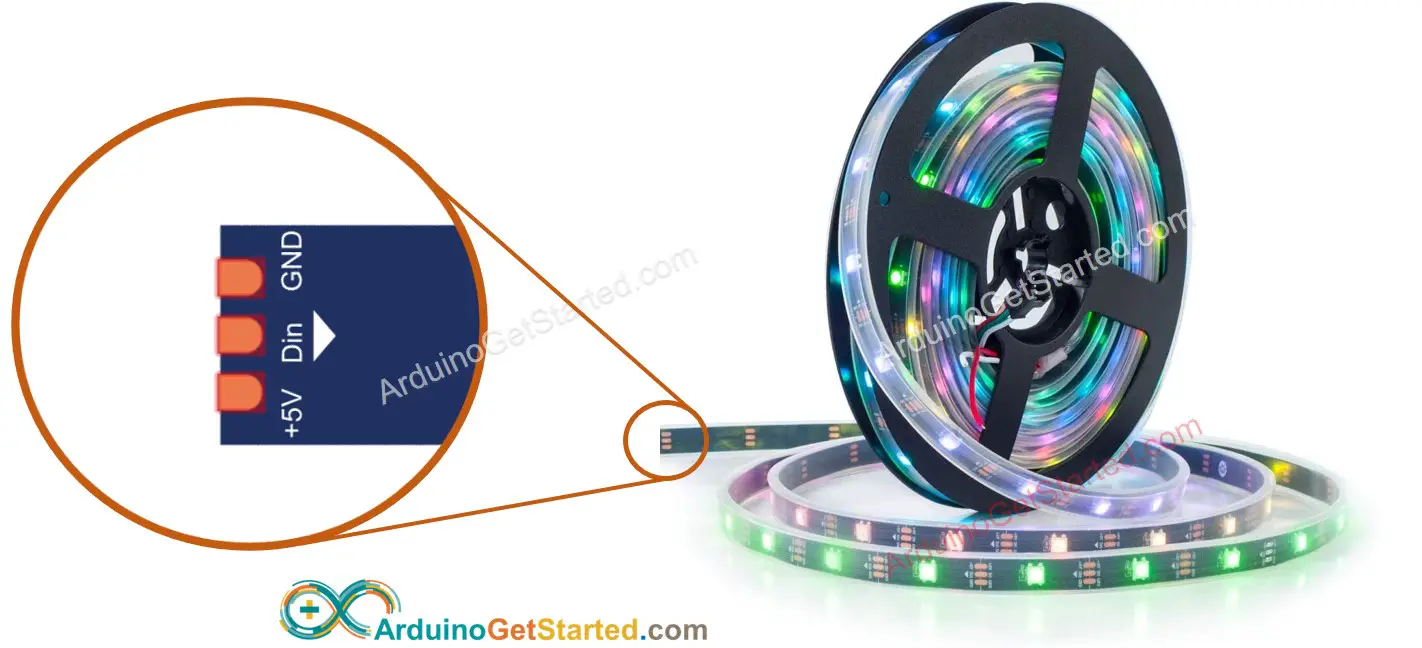
NeoPixel Pinout

※ NOTE THAT:

The order of pins can vary between manufacturers. ALWAYS use the labels printed on the LED Strip.

Wiring Diagram

Arduino NeoPixel RGB LED strip Wiring Diagram

This image is created using Fritzing. Click to enlarge image

How To Program For NeoPixel RGB LED Strip

  • Declare a NeoPixel object
#define PIN_NEO_PIXEL 4 // Arduino pin that connects to NeoPixel #define NUM_PIXELS 30 // The number of LEDs (pixels) on NeoPixel Adafruit_NeoPixel NeoPixel(NUM_PIXELS, PIN_NEO_PIXEL, NEO_GRB + NEO_KHZ800);
  • Initializes the NeoPixel
NeoPixel.begin(); // INITIALIZE NeoPixel strip object (REQUIRED)
  • Set color of each individual LED (called pixel).
NeoPixel.setPixelColor(pixel, NeoPixel.Color(255, 0, 0));
  • Set brightness of all strip.
NeoPixel.setBrightness(100); // a value from 0 to 255

※ NOTE THAT:

  • NeoPixel.setBrightness() is used for all pixel on LED strip. To set the brightness for each individual pixel, we can scale the color value.
  • The values set by NeoPixel.setBrightness() and NeoPixel.setPixelColor() only take effect when NeoPixel.show() is called.

Arduino Code

The below code does:

  • Turn pixels to green one by one with a delay between each pixel
  • Turn off all pixels for two seconds
  • Turn on all pixels to red at the same time for two seconds
  • Repeat the above process infinitely
/* * Created by ArduinoGetStarted.com * * This example code is in the public domain * * Tutorial page: https://arduinogetstarted.com/tutorials/arduino-neopixel-led-strip */ #include <Adafruit_NeoPixel.h> #ifdef __AVR__ #include <avr/power.h> // Required for 16 MHz Adafruit Trinket #endif #define PIN_NEO_PIXEL 4 // Arduino pin that connects to NeoPixel #define NUM_PIXELS 30 // The number of LEDs (pixels) on NeoPixel #define DELAY_INTERVAL 250 // 250ms pause between each pixel Adafruit_NeoPixel NeoPixel(NUM_PIXELS, PIN_NEO_PIXEL, NEO_GRB + NEO_KHZ800); void setup() { NeoPixel.begin(); // INITIALIZE NeoPixel strip object (REQUIRED) } void loop() { NeoPixel.clear(); // set all pixel colors to 'off'. It only takes effect if pixels.show() is called // turn pixels to green one by one with delay between each pixel for (int pixel = 0; pixel < NUM_PIXELS; pixel++) { // for each pixel NeoPixel.setPixelColor(pixel, NeoPixel.Color(0, 255, 0)); // it only takes effect if pixels.show() is called NeoPixel.show(); // send the updated pixel colors to the NeoPixel hardware. delay(DELAY_INTERVAL); // pause between each pixel } // turn off all pixels for two seconds NeoPixel.clear(); NeoPixel.show(); // send the updated pixel colors to the NeoPixel hardware. delay(2000); // off time // turn on all pixels to red at the same time for two seconds for (int pixel = 0; pixel < NUM_PIXELS; pixel++) { // for each pixel NeoPixel.setPixelColor(pixel, NeoPixel.Color(255, 0, 0)); // it only takes effect if pixels.show() is called } NeoPixel.show(); // send the updated pixel colors to the NeoPixel hardware. delay(2000); // on time // turn off all pixels for one seconds NeoPixel.clear(); NeoPixel.show(); // send the updated pixel colors to the NeoPixel hardware. delay(2000); // off time }

Quick Steps

  • Navigate to the Libraries icon on the left bar of the Arduino IDE.
  • Search “Adafruit NeoPixel”, then find the NeoPixel library by Adafruit
  • Click Install button to install NeoPixel library.
Arduino neopixel library
  • Copy the above code and open with Arduino IDE
  • Click Upload button on Arduino IDE to upload code to Arduino
  • See the LED effect

※ NOTE THAT:

For any complicated LED effect, we offer the paid programming service

Video Tutorial

We are considering to make the video tutorials. If you think the video tutorials are essential, please subscribe to our YouTube channel to give us motivation for making the videos.

The Best Arduino Starter Kit

※ OUR MESSAGES