Arduino - IR Remote Control

You've likely encountered the infrared remote controller, also known as the IR remote controller, while using home electronic devices like TVs and air conditioners... In this tutorial, we are going to learn how to use infrared (IR) remote controller and infrared receiver to control Arduino. In detail, we will learn:

Then you can modify the code to control LED, fan, pump, actuator... via IR remote controller.
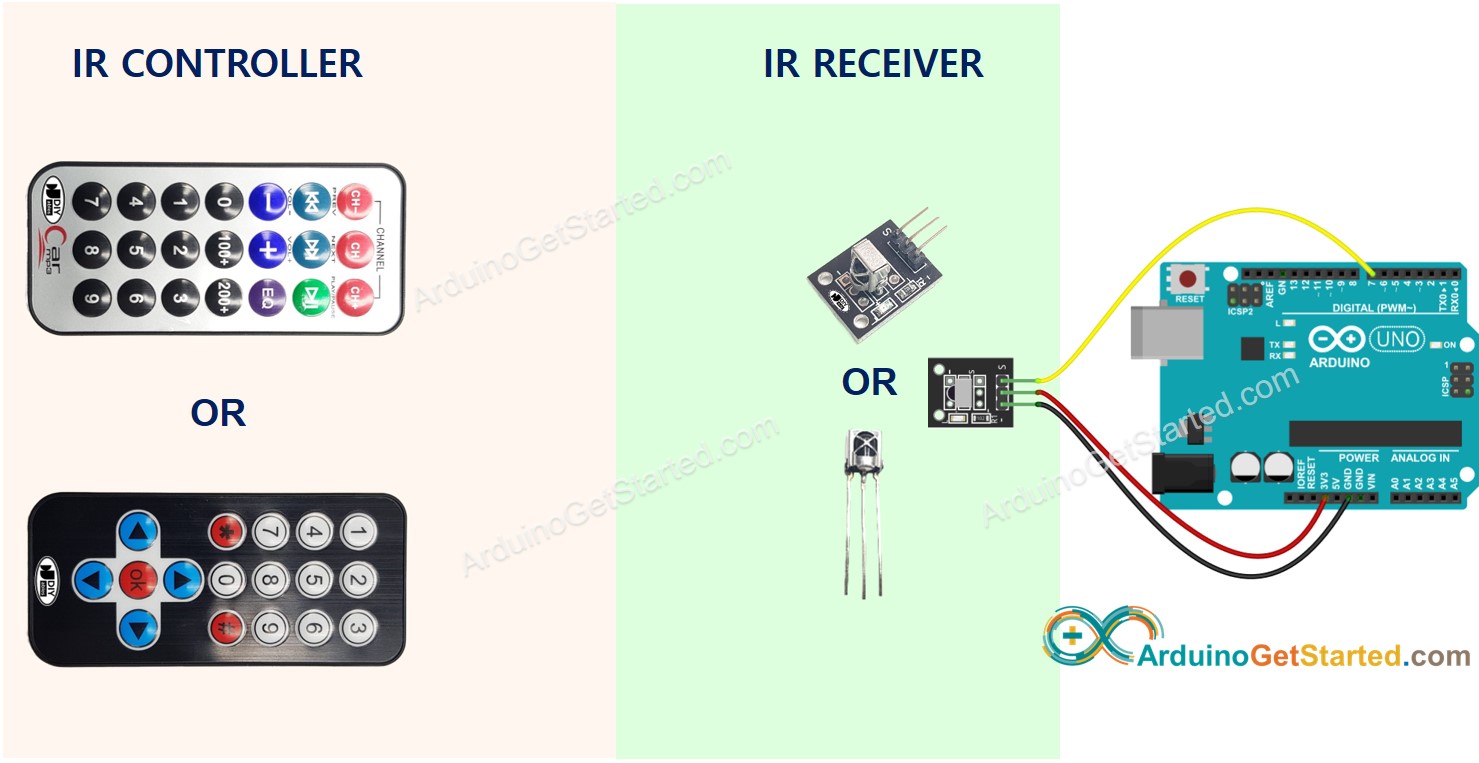
IR controller - IR receiver - Arduino

Hardware Required

1×Arduino UNO or Genuino UNO
1×USB 2.0 cable type A/B
1×IR Kit (Remote Controller and Receiver)
1×CR2025 Battery
1×Jumper Wires
1×(Optional) 9V Power Adapter for Arduino
1×(Recommended) Screw Terminal Block Shield for Arduino Uno
1×(Optional) Transparent Acrylic Enclosure For Arduino Uno

Or you can buy the following sensor kits:

1×DIYables Sensor Kit (30 sensors/displays)
1×DIYables Sensor Kit (18 sensors/displays)
Please note: These are Amazon affiliate links. If you buy the components through these links, We will get a commission at no extra cost to you. We appreciate it.

About IR Remote Control

An IR control system includes two components:

  • IR remote controller
  • IR receiver

An IR kit usually includes two above components.

IR remote controller

The IR remote controller is a handheld device that emits infrared signals. The IR remote controller consists of a keypad with various buttons:

  • Each button on the remote controller corresponds to a specific function or command.
  • When a button is pressed, the remote emits an infrared signal that carries a unique code or pattern associated with the pressed button.
  • These infrared signals are not visible to the human eye as they are in the infrared spectrum.
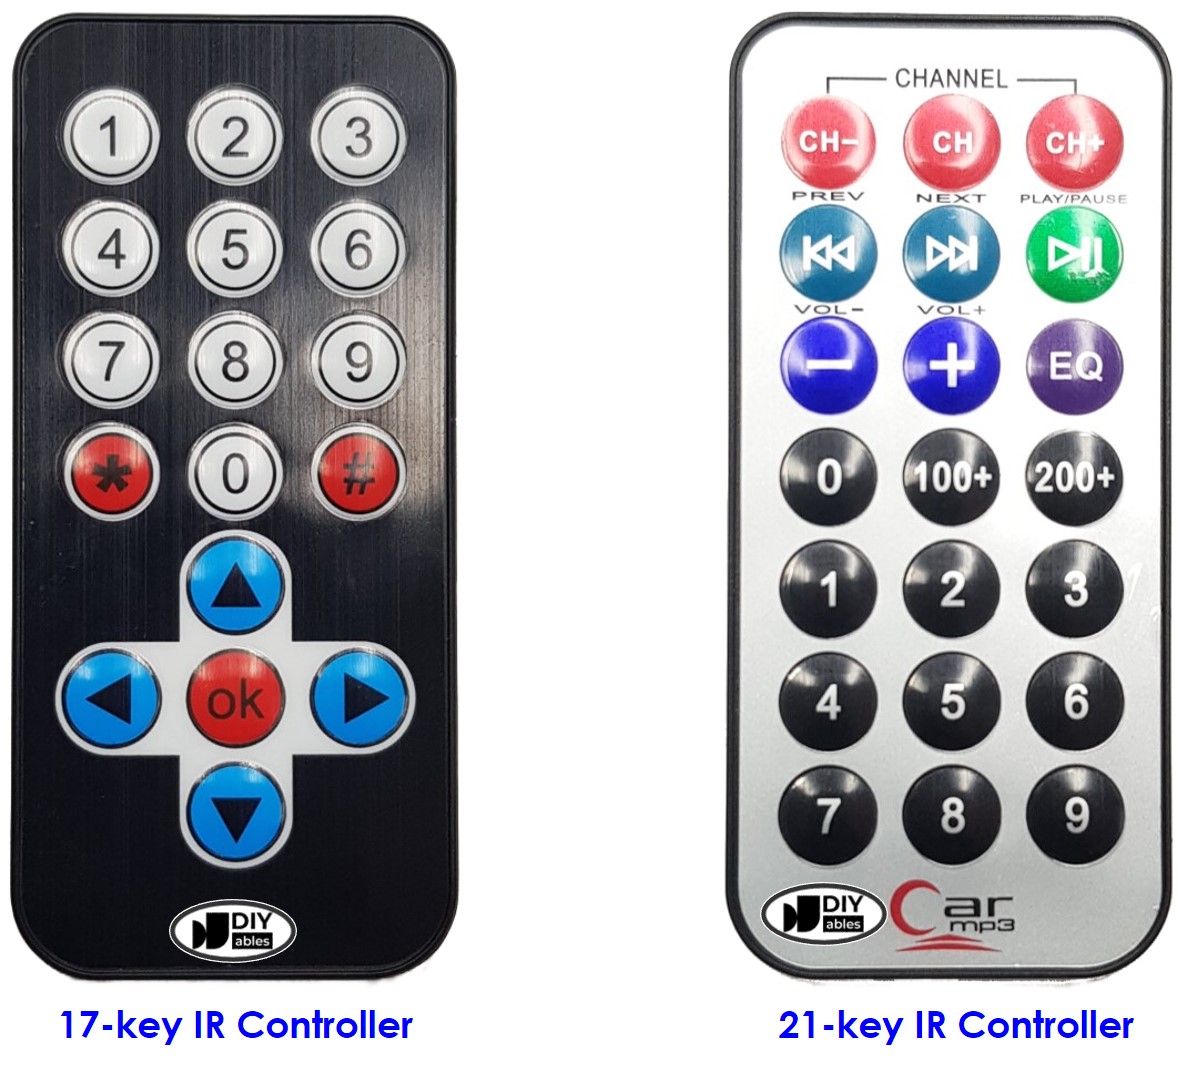
IR controller
image source: diyables.io

IR Receiver

The IR receiver module is a sensor that detects and receives the infrared signals emitted by the remote controller.

The infrared receiver detects the incoming infrared signals and converts them into the code (command) representing the button pressed on the remote controller.

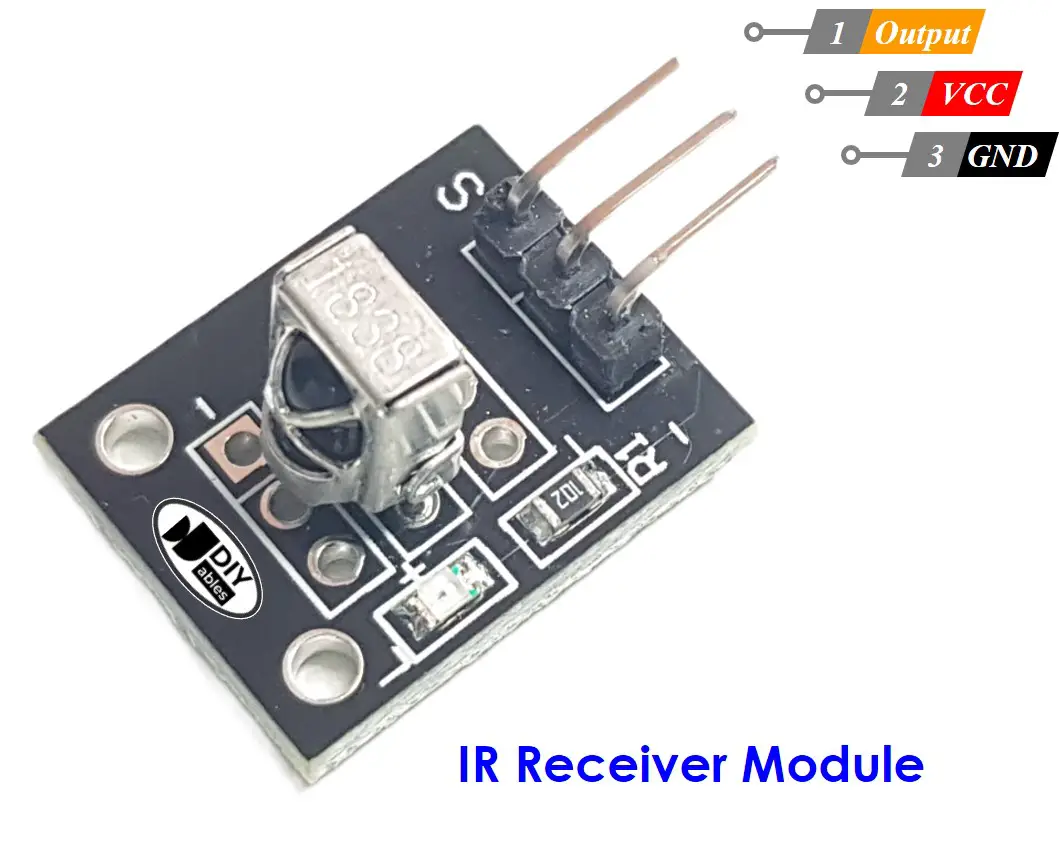
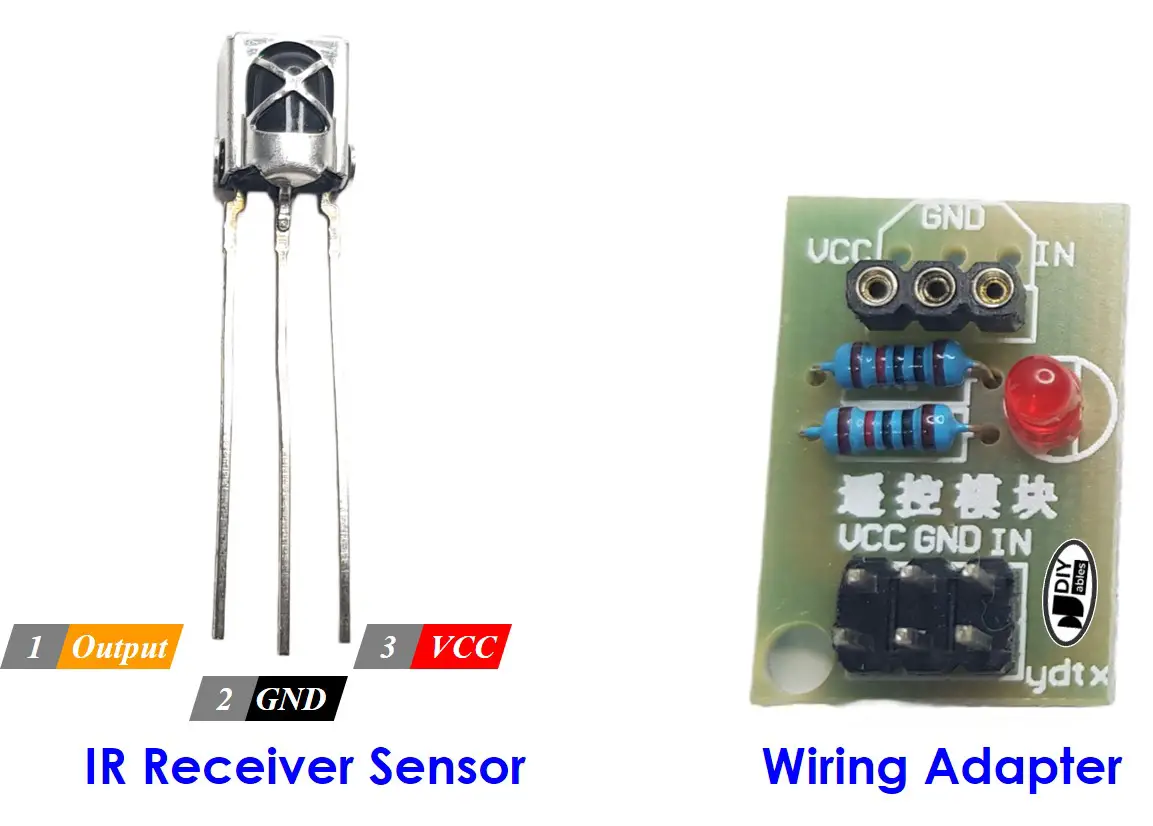
The IR Receiver can be a sensor or a module. You can use the following choices:

  • IR Receiver Module only
  • IR Receiver Sensor only
  • IR Receiver Sensor + Adapter
IR Receiver sensor module
image source: diyables.io
IR Receiver sensor adapter
image source: diyables.io

IR Receiver Pinout

IR receiver module or sensor has three pins:

  • VCC pin: Connect this pin to the 3.3V or 5V pin of the Arduino or external power source.
  • GND pin: Connect this pin to GND pin of the Arduino or external power source..
  • OUT (Output) pin: This pin is the output pin of the IR receiver module. Connected to a digital input pin on the Arduino.

How It Works

When user presses a button on the IR remote controller

  • The IR remote controller encodes the command corresponding to the button to the infrared signal via a specific protocol
  • The IR remote controller emits the encoded infrared signal
  • The IR receiver receives the encoded infrared signal
  • The IR receiver decoded the encoded infrared signal in to the command
  • The Arduino reads the command from the IR receiver
  • The Arduino maps the command to the key pressed

It seems to be complicated but don't worry. With the help of DIYables_IRcontroller library, it is a piece of cake.

Wiring Diagram

Wiring diagram between Arduino and IR Receiver Module
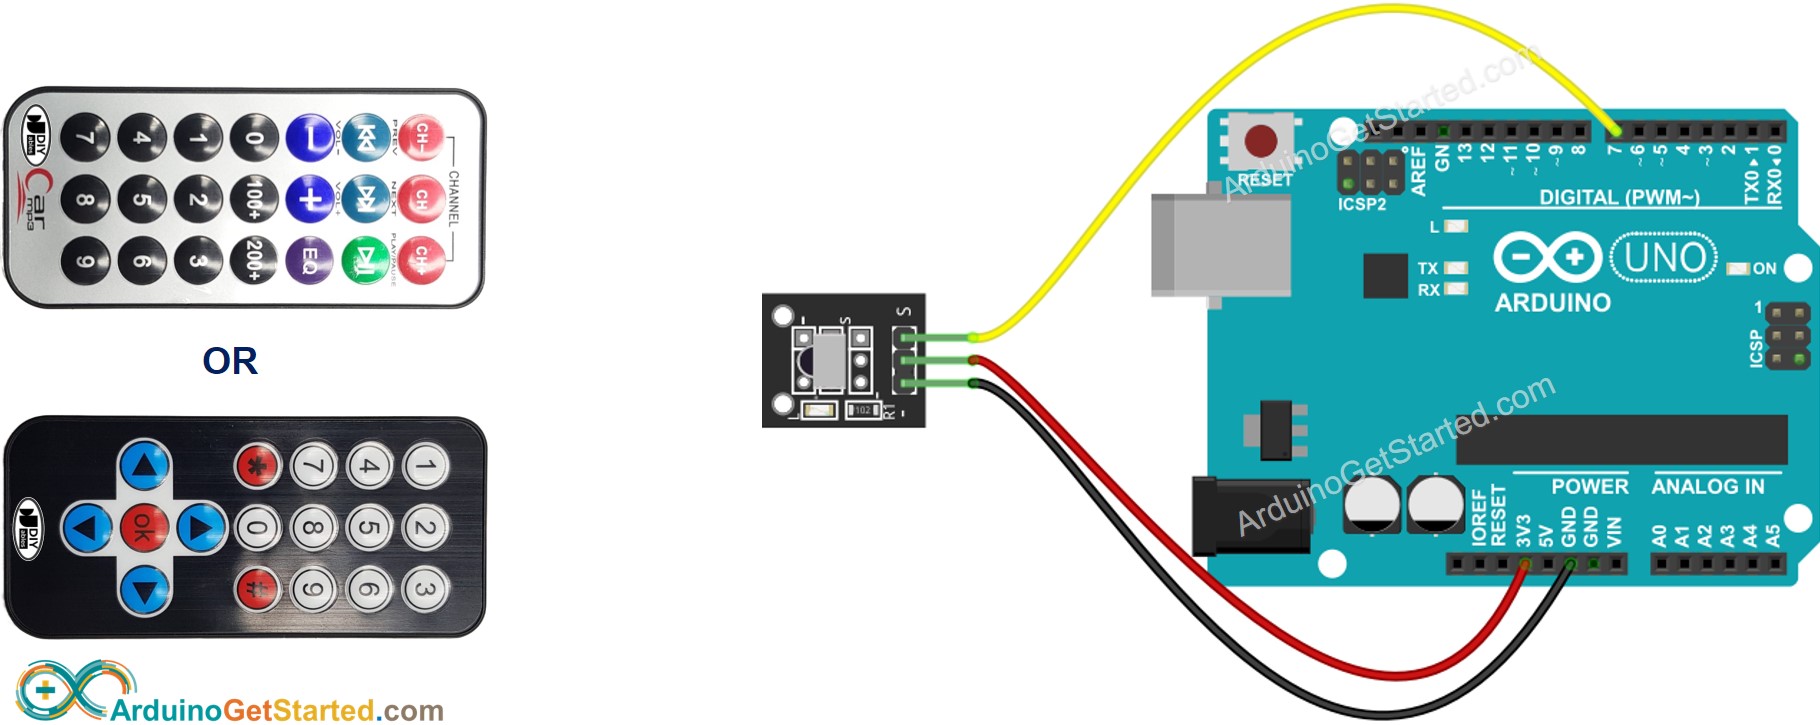
Arduino IR Remote Control Wiring Diagram

This image is created using Fritzing. Click to enlarge image

The real wiring diagram
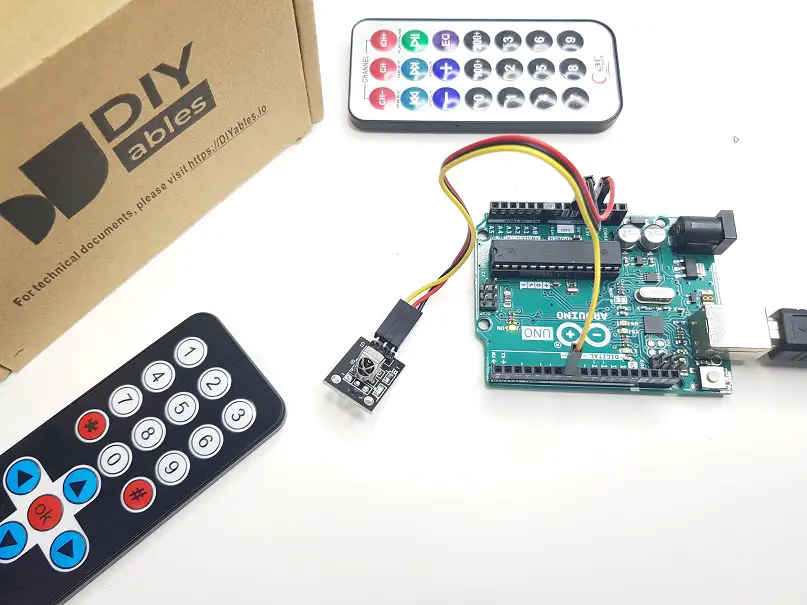
Arduino IR remote control receiver module
image source: diyables.io

Wiring diagram between Arduino and IR Receiver Sensor
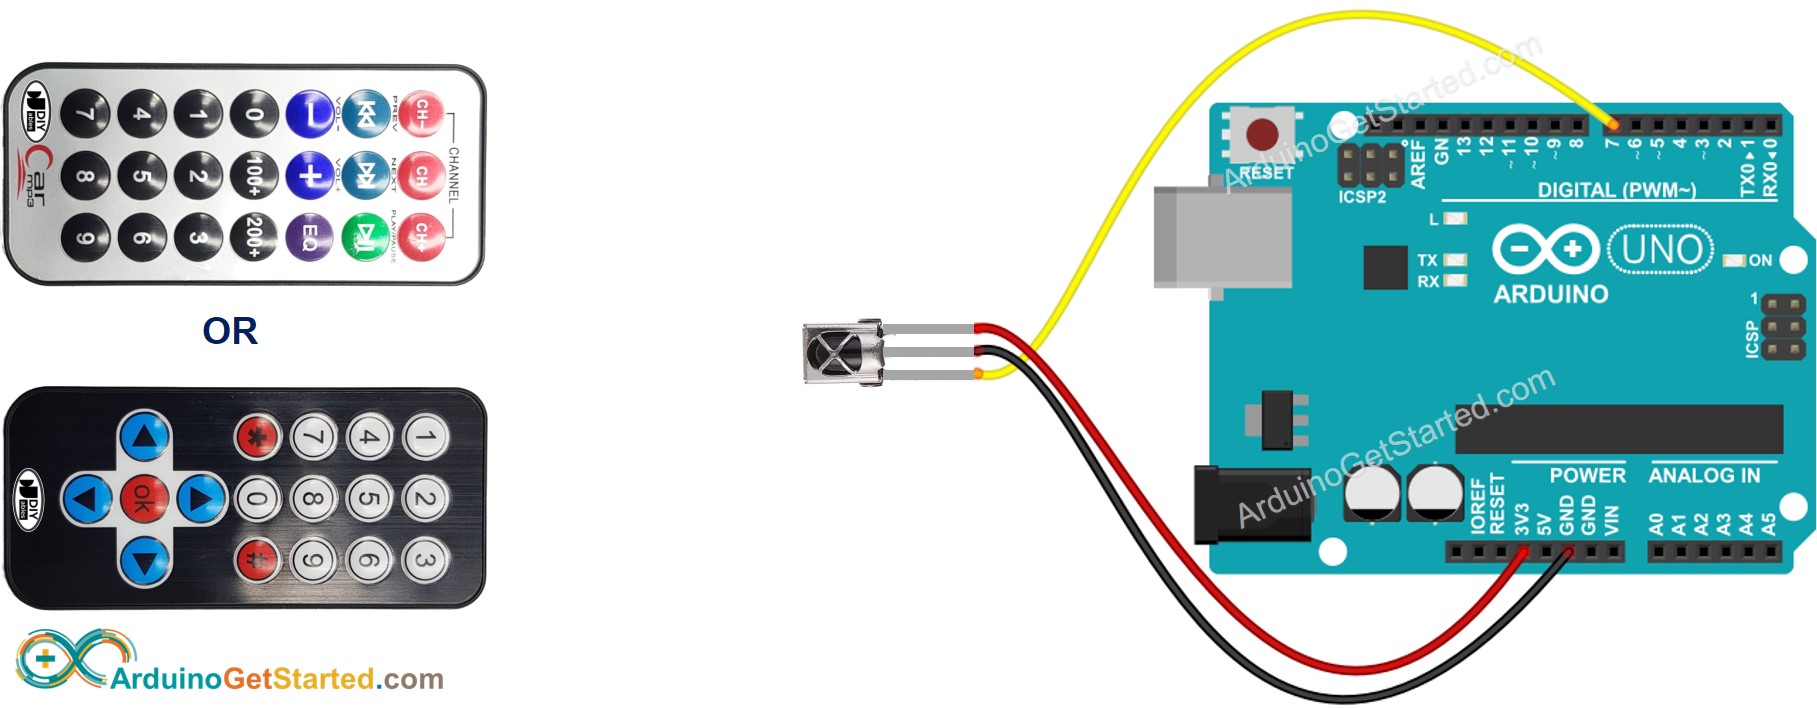
Arduino IR Remote Control Wiring Diagram

This image is created using Fritzing. Click to enlarge image

The real wiring diagram
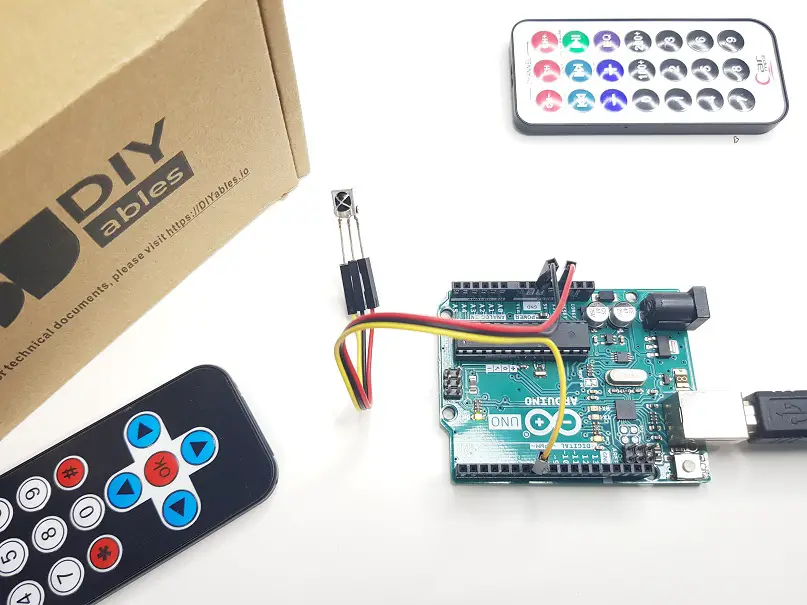
Arduino IR remote control receiver sensor
image source: diyables.io

Wiring diagram between Arduino and IR Receiver Sensor and Adapter

You can also connect The IR receiver sensor to the adapter before connecting to the Arduino.
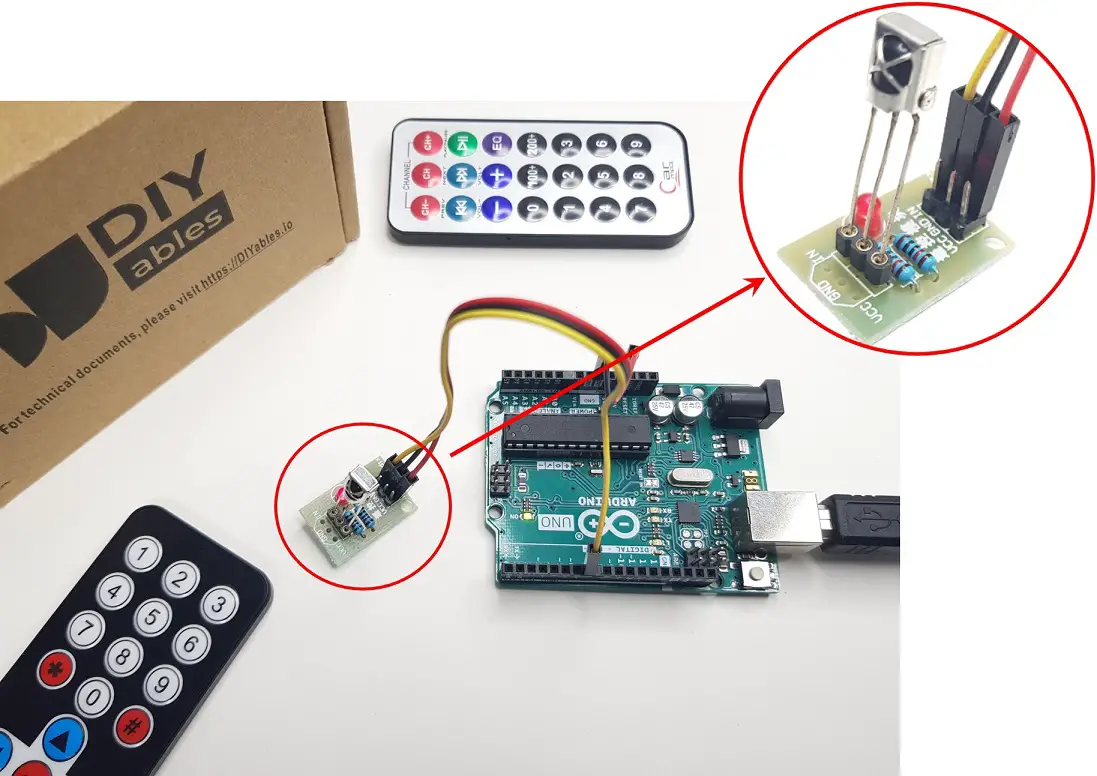
Arduino IR remote control receiver adapter
image source: diyables.io

How To Program For IR Remote Controller

  • Include the library:
#include <DIYables_IRcontroller.h> // Library for IR Receiver
  • Declare a DIYables_IRcontroller_17 or DIYables_IRcontroller_21 object corresponds with 17-key or 21-key IR remote controllers:
DIYables_IRcontroller_17 irController(IR_RECEIVER_PIN, 200); // debounce time is 200ms // OR DIYables_IRcontroller_21 irController(IR_RECEIVER_PIN, 200); // debounce time is 200ms
  • Initialize the IR Controller.
irController.begin();
  • In the loop, check if a key is pressed or not. If yes, get the key
Key17 key = irController.getKey(); // if using 17-key IR controller // OR Key21 key = irController.getKey(); // if using 21-key IR controller
  • Once you have detected a key press, you can perform specific actions based on each key.

Arduino Code

/* * Created by ArduinoGetStarted.com * * This example code is in the public domain * * Tutorial page: https://arduinogetstarted.com/tutorials/arduino-ir-remote-control */ #include <DIYables_IRcontroller.h> // DIYables_IRcontroller library #define IR_RECEIVER_PIN 7 // The Arduino pin connected to IR controller DIYables_IRcontroller_17 irController(IR_RECEIVER_PIN, 200); // debounce time is 200ms void setup() { Serial.begin(9600); irController.begin(); } void loop() { Key17 key = irController.getKey(); if (key != Key17::NONE) { switch (key) { case Key17::KEY_1: Serial.println("1"); // TODO: YOUR CONTROL break; case Key17::KEY_2: Serial.println("2"); // TODO: YOUR CONTROL break; case Key17::KEY_3: Serial.println("3"); // TODO: YOUR CONTROL break; case Key17::KEY_4: Serial.println("4"); // TODO: YOUR CONTROL break; case Key17::KEY_5: Serial.println("5"); // TODO: YOUR CONTROL break; case Key17::KEY_6: Serial.println("6"); // TODO: YOUR CONTROL break; case Key17::KEY_7: Serial.println("7"); // TODO: YOUR CONTROL break; case Key17::KEY_8: Serial.println("8"); // TODO: YOUR CONTROL break; case Key17::KEY_9: Serial.println("9"); // TODO: YOUR CONTROL break; case Key17::KEY_STAR: Serial.println("*"); // TODO: YOUR CONTROL break; case Key17::KEY_0: Serial.println("0"); // TODO: YOUR CONTROL break; case Key17::KEY_SHARP: Serial.println("#"); // TODO: YOUR CONTROL break; case Key17::KEY_UP: Serial.println("UP"); // TODO: YOUR CONTROL break; case Key17::KEY_DOWN: Serial.println("DOWN"); // TODO: YOUR CONTROL break; case Key17::KEY_LEFT: Serial.println("LEFT"); // TODO: YOUR CONTROL break; case Key17::KEY_RIGHT: Serial.println("RIGHT"); // TODO: YOUR CONTROL break; case Key17::KEY_OK : Serial.println("OK"); // TODO: YOUR CONTROL break; default: Serial.println("WARNING: undefined key:"); break; } } }
/* * Created by ArduinoGetStarted.com * * This example code is in the public domain * * Tutorial page: https://arduinogetstarted.com/tutorials/arduino-ir-remote-control */ #include <DIYables_IRcontroller.h> // DIYables_IRcontroller library #define IR_RECEIVER_PIN 7 // The Arduino pin connected to IR controller DIYables_IRcontroller_21 irController(IR_RECEIVER_PIN, 200); // debounce time is 200ms void setup() { Serial.begin(9600); irController.begin(); } void loop() { Key21 key = irController.getKey(); if (key != Key21::NONE) { switch (key) { case Key21::KEY_CH_MINUS: Serial.println("CH-"); // TODO: YOUR CONTROL break; case Key21::KEY_CH: Serial.println("CH"); // TODO: YOUR CONTROL break; case Key21::KEY_CH_PLUS: Serial.println("CH+"); // TODO: YOUR CONTROL break; case Key21::KEY_PREV: Serial.println("<<"); // TODO: YOUR CONTROL break; case Key21::KEY_NEXT: Serial.println(">>"); // TODO: YOUR CONTROL break; case Key21::KEY_PLAY_PAUSE: Serial.println(">||"); // TODO: YOUR CONTROL break; case Key21::KEY_VOL_MINUS: Serial.println("–"); // TODO: YOUR CONTROL break; case Key21::KEY_VOL_PLUS: Serial.println("+"); // TODO: YOUR CONTROL break; case Key21::KEY_EQ: Serial.println("EQ"); // TODO: YOUR CONTROL break; case Key21::KEY_100_PLUS: Serial.println("100+"); // TODO: YOUR CONTROL break; case Key21::KEY_200_PLUS: Serial.println("200+"); // TODO: YOUR CONTROL break; case Key21::KEY_0: Serial.println("0"); // TODO: YOUR CONTROL break; case Key21::KEY_1: Serial.println("1"); // TODO: YOUR CONTROL break; case Key21::KEY_2: Serial.println("2"); // TODO: YOUR CONTROL break; case Key21::KEY_3: Serial.println("3"); // TODO: YOUR CONTROL break; case Key21::KEY_4: Serial.println("4"); // TODO: YOUR CONTROL break; case Key21::KEY_5: Serial.println("5"); // TODO: YOUR CONTROL break; case Key21::KEY_6: Serial.println("6"); // TODO: YOUR CONTROL break; case Key21::KEY_7: Serial.println("7"); // TODO: YOUR CONTROL break; case Key21::KEY_8: Serial.println("8"); // TODO: YOUR CONTROL break; case Key21::KEY_9: Serial.println("9"); // TODO: YOUR CONTROL break; default: Serial.println("WARNING: undefined key:"); break; } } }

Quick Steps

  • Navigate to the Libraries icon on the left bar of the Arduino IDE.
  • Search "DIYables_IRcontroller", then find the DIYables_IRcontroller library by DIYables
  • Click Install button to install DIYables_IRcontroller library.
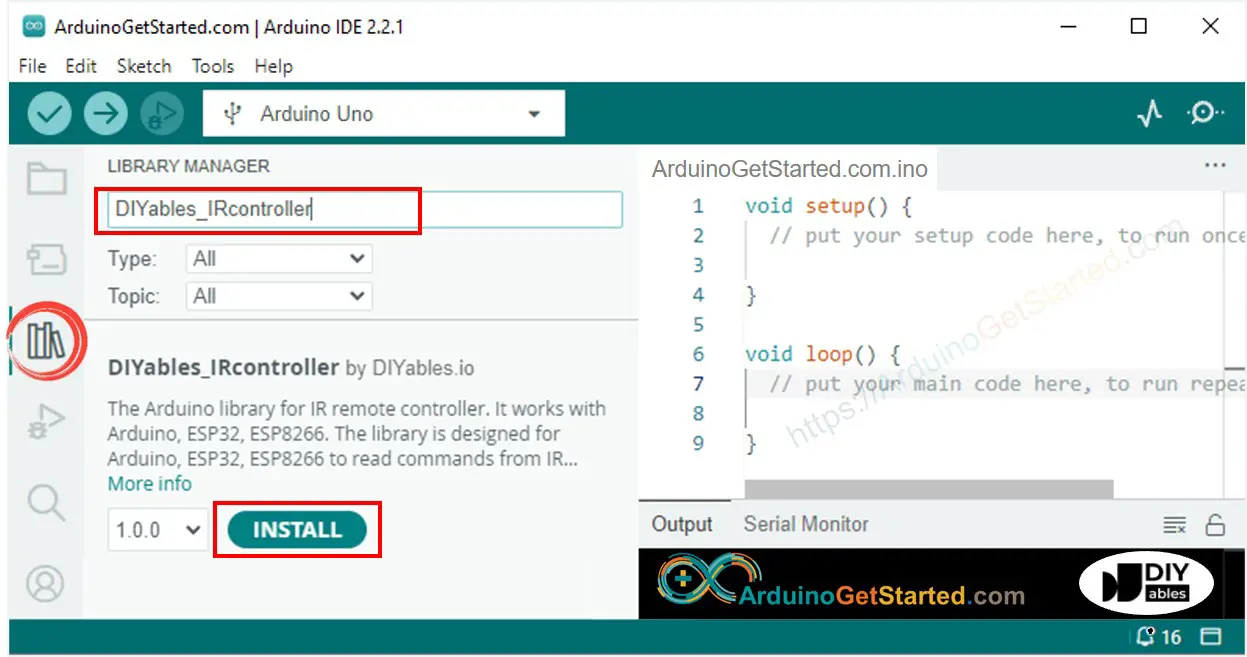
Arduino DIYables_IRcontroller library
  • You will be asked for installing the library dependency as below image:
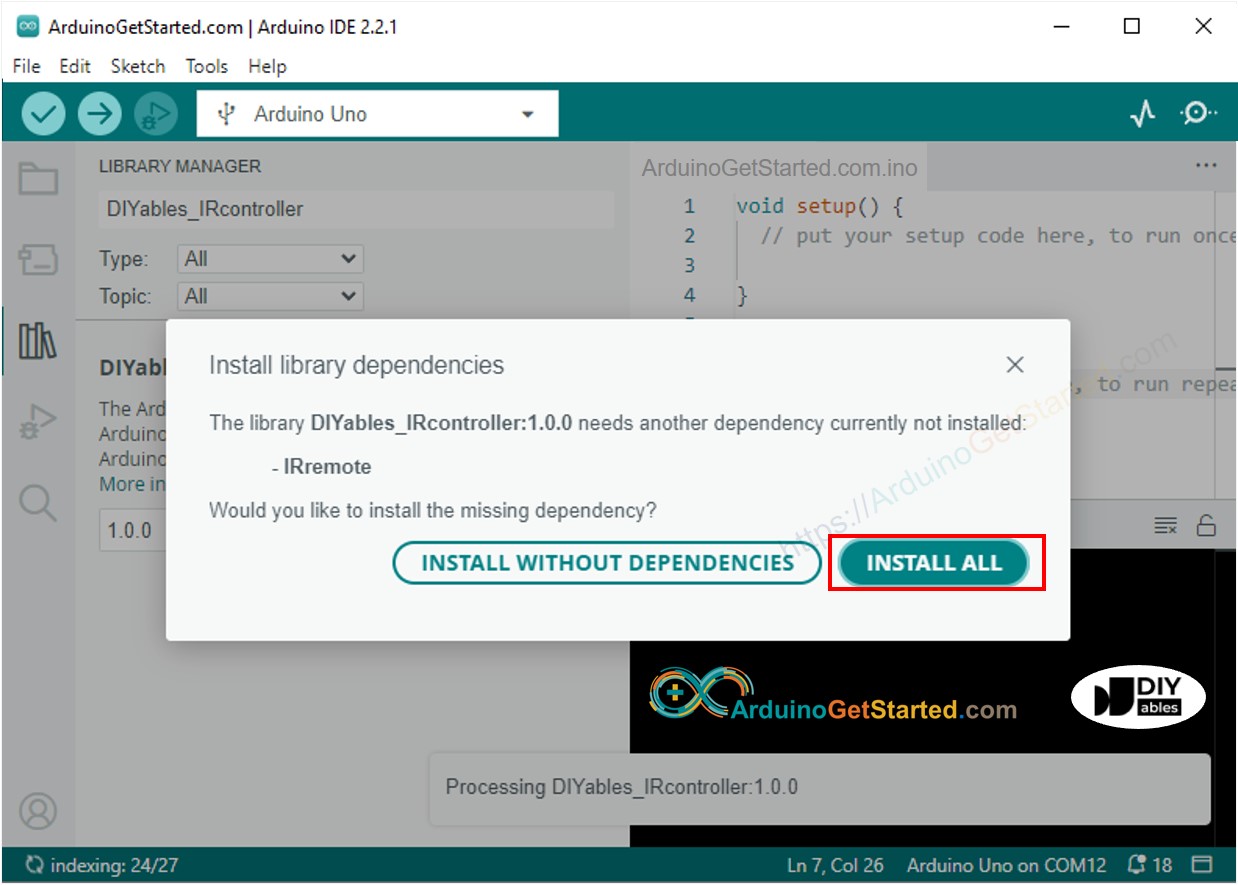
Arduino IRremote library
  • Click Install all button to install the dependency
  • Copy the above code and open with Arduino IDE
  • Click Upload button on Arduino IDE to upload code to Arduino
  • Press keys on the remote controller one by one
  • See the result on Serial Monitor.
  • The below is the result when you press keys on 21-key IR controller one by one:
COM6
Send
CH- CH CH+ << >> >|| – + EQ 100+ 200+ 0 1 2 3 4 5 6 7 8 9
Autoscroll Show timestamp
Clear output
9600 baud  
Newline  

Now you can modify the code to control LED, fan, pump, actuator... via IR remote controllers.

Video Tutorial

We are considering to make the video tutorials. If you think the video tutorials are essential, please subscribe to our YouTube channel to give us motivation for making the videos.

The Best Arduino Starter Kit

※ OUR MESSAGES