Disclosure: Some links in this section are Amazon affiliate links. If you make a purchase through these links, we may earn a commission at no extra cost to you. Additionally, some links direct to products from our own brand, DIYables .
About Arduino and MQTT
We have a detailed tutorial on how to use Arduino with MQTT here:
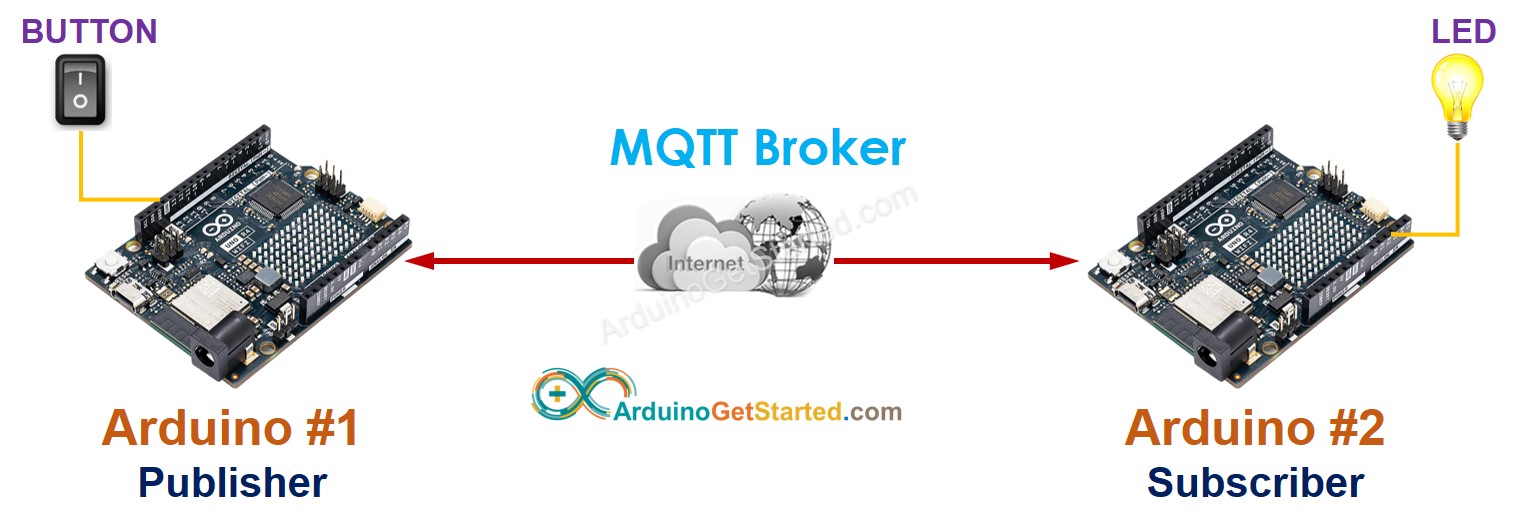
Two Arduino boards can communicate with each other through an MQTT server. If you wish for two Arduinos to communicate directly without using an MQTT server, please refer to the tutorial on Arduino to Arduino TCP Client/Server communication.
When Arduino #1 and Arduino #2 exchange data via an MQTT broker:
Both Arduinos connect to the MQTT broker.
To have Arduino #2 send data to Arduino #1:
Arduino #1 subscribes to a topic, for instance: arduino-1/data.
Arduino #2 can send data to Arduino #1 by publishing the data to the topic that Arduino #1 is subscribed to.
Similarly, to have Arduino #1 send data to Arduino #2:
Arduino #2 subscribes to a topic, for instance: arduino-2/data.
Arduino #1 can send data to Arduino #2 by publishing the data to the topic that Arduino #2 is subscribed to.
By following this method, two Arduinos can exchange data bidirectionally.
Example Use Case
Let's realize the following application: A button/switch connected to Arduino #1 controls an LED connected to Arduino #2 via MQTT.
As mentioned above, there are some application protocols we can use. In this example, to make it simple, we will define a protocol by ourself (a self-defined protocol)
Self-defined Protocol
Let's define a simple protocol:
Arduino #1 and Arduino #2 connects to MQTT Broker (MQTT server)
Arduino #1:
Arduino #1 publish a MQTT message to a topic when the state of switch is changed.
When the button/switch is switched to on, the MQTT message payload is 1.
When the button/switch is switched to off, the MQTT message payload is 0.
Arduino #2:
Arduino #2 subscribes to the topic
If Arduino #2 receives an MQTT message with payload is 1, it turns on LED
If Arduino #2 receives an MQTT message with payload is 0, it turns off LED
Wiring Diagram
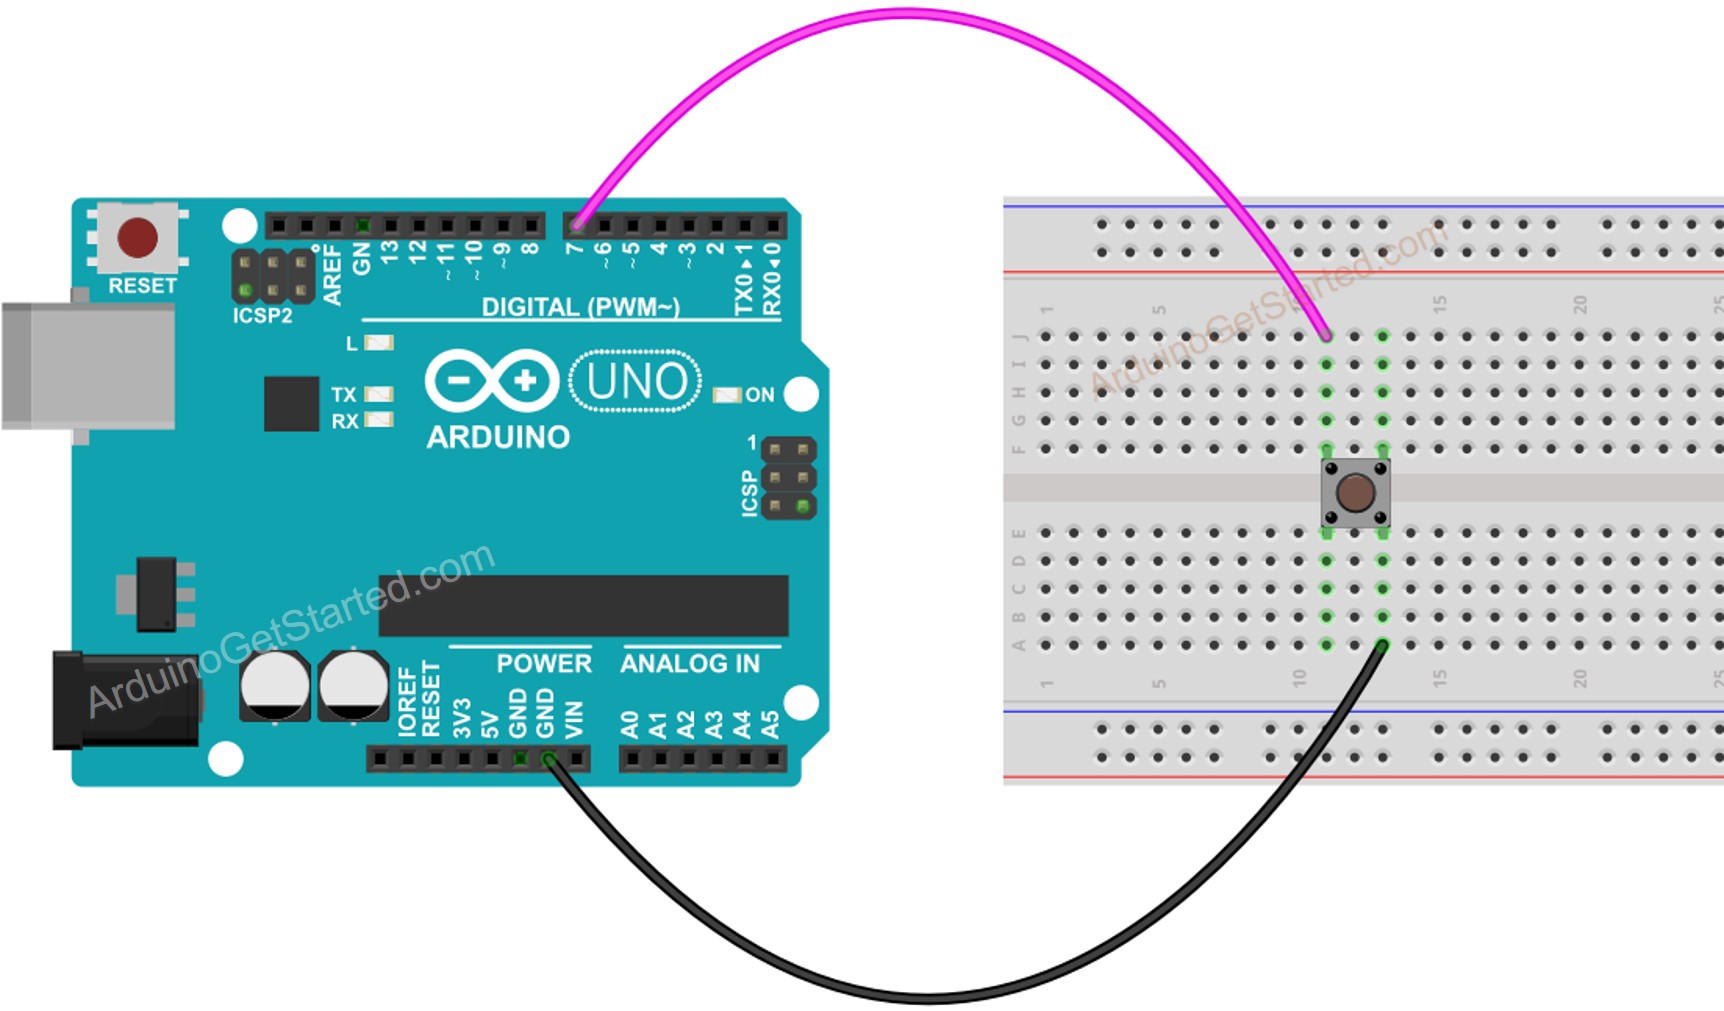
Arduino #1 - Wiring diagram between Arduino and button
This image is created using Fritzing. Click to enlarge image
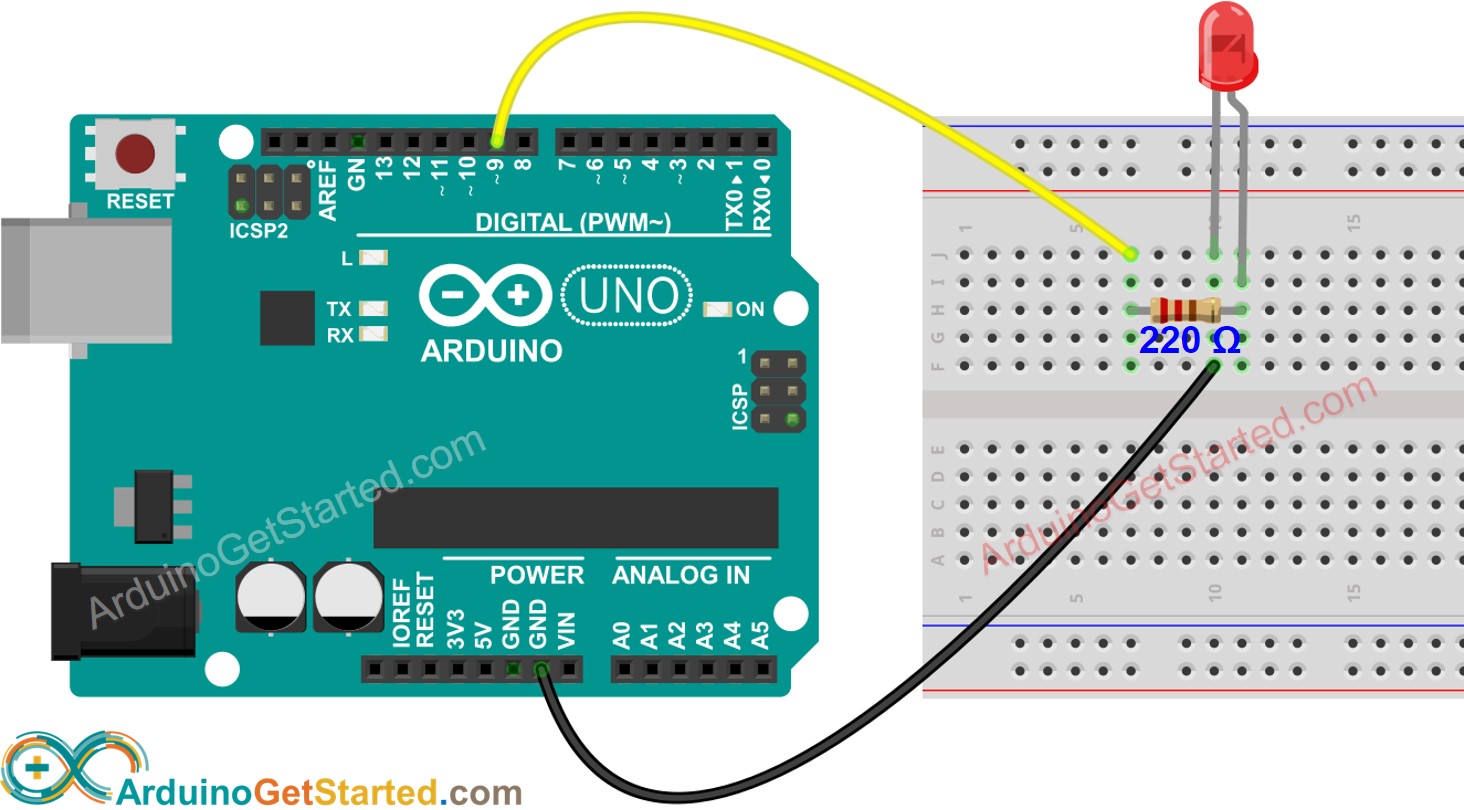
Arduino #2 - Wiring diagram between Arduino and LED
This image is created using Fritzing. Click to enlarge image
Communication between two Arduino via MQTT
Arduino Code #1
/* * Created by ArduinoGetStarted.com * * This example code is in the public domain * * Tutorial page: https://arduinogetstarted.com/tutorials/arduino-to-arduino-mqtt-communication */// ARDUINO #1: CONNECTED TO A BUTTON/SWITCH, ACTED AS A MQTT PUBLISHER#include <WiFiS3.h>#include <MQTTClient.h>#include <ezButton.h>constint BUTTON_PIN = 7;constchar WIFI_SSID[] = "YOUR_WIFI_SSID"; // CHANGE TO YOUR WIFI SSIDconstchar WIFI_PASSWORD[] = "YOUR_WIFI_PASSWORD"; // CHANGE TO YOUR WIFI PASSWORDconstchar MQTT_BROKER_ADRRESS[] = "test.mosquitto.org"; // CHANGE TO MQTT BROKER'S ADDRESS//const char MQTT_BROKER_ADRRESS[] = "192.168.0.26"; // CHANGE TO MQTT BROKER'S IP ADDRESSconstint MQTT_PORT = 1883;constchar MQTT_CLIENT_ID[] = "arduino-001"; // CHANGE IT AS YOU DESIREconstchar MQTT_USERNAME[] = ""; // CHANGE IT IF REQUIRED, empty if not requiredconstchar MQTT_PASSWORD[] = ""; // CHANGE IT IF REQUIRED, empty if not required// The MQTT topics that Arduino should publish/subscribeconstchar MQTT_TOPIC[] = "arduino/command"; // CHANGE IT AS YOU DESIREWiFiClient network;MQTTClientmqtt = MQTTClient(256);ezButtonbutton(BUTTON_PIN); // create ezButton that attach to pin 7voidsetup() {Serial.begin(9600);button.setDebounceTime(100); // set debounce time to 100 millisecondsSerial.println("ARDUINO #1: CONNECTED TO A BUTTON/SWITCH, ACTED AS A MQTT PUBLISHER");intstatus = WL_IDLE_STATUS;while (status != WL_CONNECTED) {Serial.print("Arduino - Attempting to connect to SSID: ");Serial.println(WIFI_SSID);// Connect to WPA/WPA2 network. Change this line if using open or WEP network:status = WiFi.begin(WIFI_SSID, WIFI_PASSWORD);// wait 10 seconds for connection:delay(10000); }// print your board's IP address:Serial.print("IP Address: ");Serial.println(WiFi.localIP()); connectToMQTT();}voidloop() {mqtt.loop();button.loop(); // MUST call the loop() function firstif (button.isPressed()) {Serial.println("- The button is pressed, send command: 1"); sendToMQTT('1'); }if (button.isReleased()) {Serial.println("- The button is released, send command: 0"); sendToMQTT('0'); }}void connectToMQTT() {// Connect to the MQTT brokermqtt.begin(MQTT_BROKER_ADRRESS, MQTT_PORT, network);Serial.print("Arduino - Connecting to MQTT broker");while (!mqtt.connect(MQTT_CLIENT_ID, MQTT_USERNAME, MQTT_PASSWORD)) {Serial.print(".");delay(100); }Serial.println();if (!mqtt.connected()) {Serial.println("Arduino - MQTT broker Timeout!");return; }Serial.println("Arduino - MQTT broker Connected!");}void sendToMQTT(charcommand) {char messageBuffer[1]; messageBuffer[0] = command;mqtt.publish(MQTT_TOPIC, messageBuffer);Serial.println("Arduino - sent to MQTT:");Serial.print("- topic: ");Serial.println(MQTT_TOPIC);Serial.print("- payload:");Serial.println(messageBuffer);}
Arduino Code #2
/* * Created by ArduinoGetStarted.com * * This example code is in the public domain * * Tutorial page: https://arduinogetstarted.com/tutorials/arduino-to-arduino-mqtt-communication */// ARDUINO #2: CONNECTED TO A LED, ACTED AS A MQTT SUBSCRIBER#include <WiFiS3.h>#include <MQTTClient.h>constint LED_PIN = 9;constchar WIFI_SSID[] = "YOUR_WIFI_SSID"; // CHANGE TO YOUR WIFI SSIDconstchar WIFI_PASSWORD[] = "YOUR_WIFI_PASSWORD"; // CHANGE TO YOUR WIFI PASSWORDconstchar MQTT_BROKER_ADRRESS[] = "test.mosquitto.org"; // CHANGE TO MQTT BROKER'S ADDRESS//const char MQTT_BROKER_ADRRESS[] = "192.168.0.26"; // CHANGE TO MQTT BROKER'S IP ADDRESSconstint MQTT_PORT = 1883;constchar MQTT_CLIENT_ID[] = "arduino-002"; // CHANGE IT AS YOU DESIREconstchar MQTT_USERNAME[] = ""; // CHANGE IT IF REQUIRED, empty if not requiredconstchar MQTT_PASSWORD[] = ""; // CHANGE IT IF REQUIRED, empty if not required// The MQTT topics that Arduino should publish/subscribeconstchar MQTT_TOPIC[] = "arduino/command"; // CHANGE IT AS YOU DESIREWiFiClient network;MQTTClientmqtt = MQTTClient(256);voidsetup() {Serial.begin(9600);pinMode(LED_PIN, OUTPUT);Serial.println("ARDUINO #2: CONNECTED TO A LED, ACTED AS A MQTT SUBSCRIBER");intstatus = WL_IDLE_STATUS;while (status != WL_CONNECTED) {Serial.print("Arduino - Attempting to connect to SSID: ");Serial.println(WIFI_SSID);// Connect to WPA/WPA2 network. Change this line if using open or WEP network:status = WiFi.begin(WIFI_SSID, WIFI_PASSWORD);// wait 10 seconds for connection:delay(10000); }// print your board's IP address:Serial.print("IP Address: ");Serial.println(WiFi.localIP()); connectToMQTT();}voidloop() {mqtt.loop();}void connectToMQTT() {// Connect to the MQTT brokermqtt.begin(MQTT_BROKER_ADRRESS, MQTT_PORT, network);// Create a handler for incoming messagesmqtt.onMessage(messageReceived);Serial.print("Arduino - Connecting to MQTT broker");while (!mqtt.connect(MQTT_CLIENT_ID, MQTT_USERNAME, MQTT_PASSWORD)) {Serial.print(".");delay(100); }Serial.println();if (!mqtt.connected()) {Serial.println("Arduino - MQTT broker Timeout!");return; }// Subscribe to a topic, the incoming messages are processed by messageReceived() functionif (mqtt.subscribe(MQTT_TOPIC))Serial.print("Arduino - Subscribed to the topic: ");elseSerial.print("Arduino - Failed to subscribe to the topic: ");Serial.println(MQTT_TOPIC);Serial.println("Arduino - MQTT broker Connected!");}void messageReceived(String &topic, String &payload) {Serial.println("Arduino - received from MQTT:");Serial.println("- topic: " + topic);Serial.print("- payload: ");Serial.println(payload);charcommand = payload[0];if (command == '1') {Serial.print("- Received command: ");Serial.print(command);Serial.println(" => Turned LED on");digitalWrite(LED_PIN, HIGH); // Turn LED on } elseif (command == '0') {Serial.print("- Received command: ");Serial.print(command);Serial.println(" => Turned LED off");digitalWrite(LED_PIN, LOW); // Turn LED off } else {Serial.print("- Received an unsupported command: ");Serial.println(command); }}
Quick Steps
Wire a button/switch to Arduino #1
Wire an LED to Arduino #2
Open Arduino IDE (called Arduino IDE #1)
Open another Arduino IDE window (called Arduino IDE #2) by clicking on Arduino IDE icon on your PC (important!())
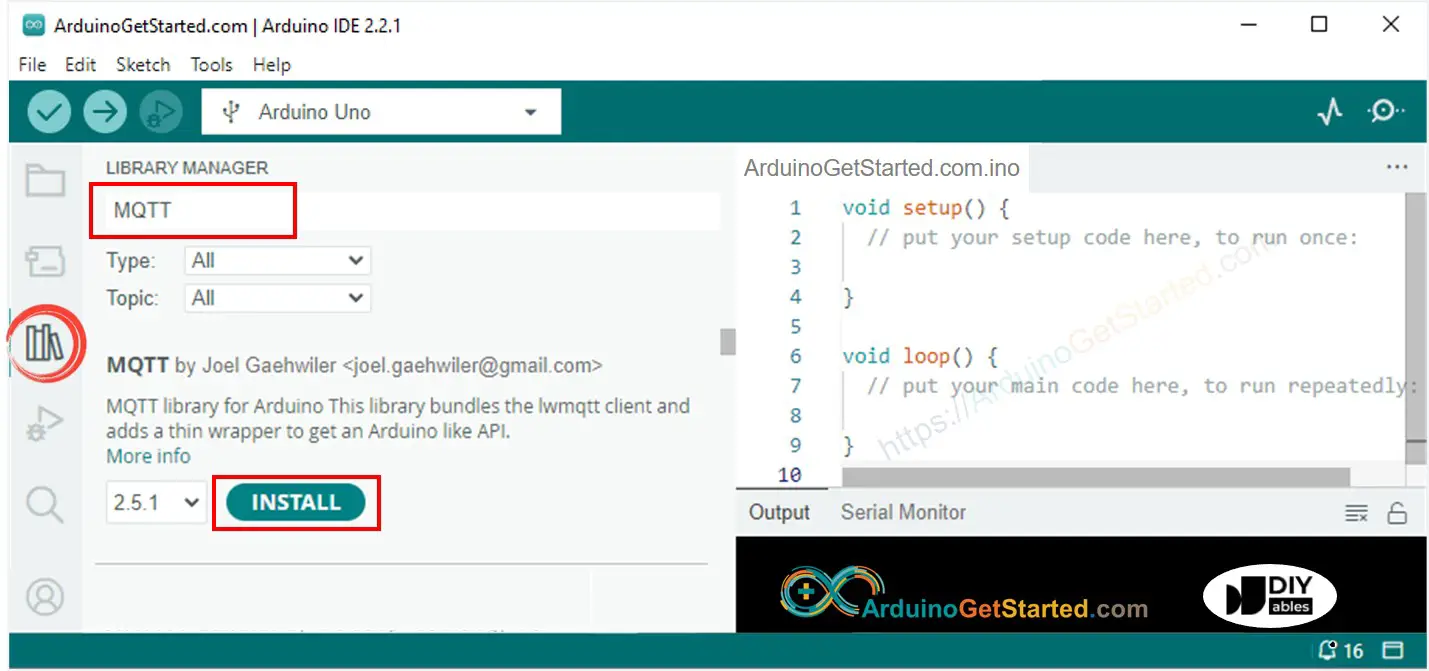
Open the Library Manager by clicking on the Library Manager icon on the left navigation bar of Arduino IDE
Type MQTT on the search box, then look for the MQTT library by Joel Gaehwiler.
Click Install button to install MQTT library.
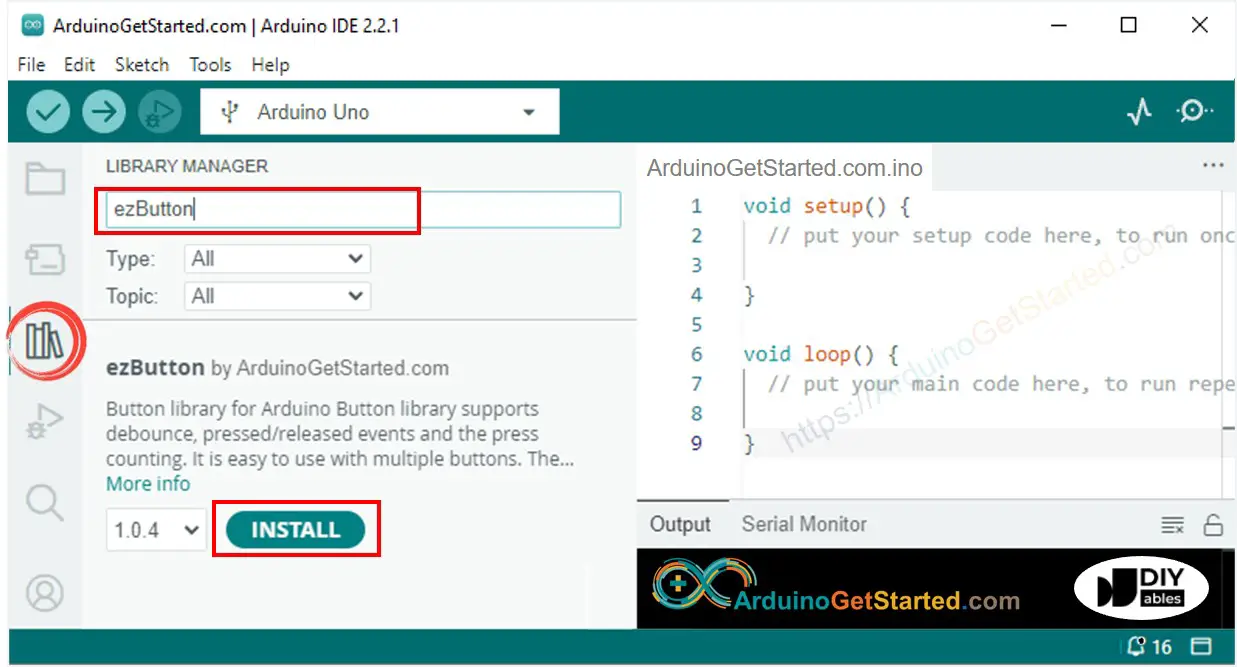
Type ezButton on the search box, then find the button library by ArduinoGetStarted
Click Install button to install ezButton library.
Connect Arduino #1 to PC via USB cable and select COM port of Arduino #1 on Arduino IDE #1
Connect Arduino #2 to PC via USB cable and select COM port of Arduino #2 on Arduino IDE #2
Copy Arduino #1 code, paste to Arduino IDE #1 and save it (named Arduino-1)
Copy Arduino #2 code, paste to Arduino IDE #2 and save it (named Arduino-2)
Replace the WiFi information (SSID and password) in both codes with your own.
Replace the MQTT broker address in both codes (domain name or IP address).
Upload Arduino #1 code to Arduino #1
Upload Arduino #2 code to Arduino #2
Open Serial Monitor on Arduino IDE #1
Open Serial Monitor on Arduino IDE #2
Press and hold the button on Arduino #1 → see LED's state on Arduino #2 (ON)
Release button on Arduino #1 → see LED's state on Arduino #2 (OFF)
Press, hold, and release the button several times.
See output on both Serial Monitors
Serial Monitor of Arduino #1
Newbiely | Arduino IDE 2.3.8
──
☐
✕
File
Edit
Sketch
Tools
Help
Arduino Uno
Newbiely.ino
···
8Serial.println("Hello World!");
Output
Serial Monitor
Message (Enter to send message to 'Arduino Uno' on 'COM15')
New Line
9600 baud
Arduino #1: CONNECTED TO A BUTTON/SWITCH, ACTED AS A MQTT PUBLISHER
Arduino - Attempting to connect to SSID: YOUR_WIFI_SSID
IP Address: 192.168.0.2
Arduino - Connecting to MQTT broker
Arduino - MQTT broker Connected!
- The button is pressed, send command: 1
Arduino - sent to MQTT:
- topic: arduino/command
- payload:1
- The button is released, send command: 0
Arduino - sent to MQTT:
- topic: arduino/command
- payload:0
Ln 11, Col 1
Arduino Uno on COM15
2
Serial Monitor of Arduino #2
Newbiely | Arduino IDE 2.3.8
──
☐
✕
File
Edit
Sketch
Tools
Help
Arduino Uno
Newbiely.ino
···
8Serial.println("Hello World!");
Output
Serial Monitor
Message (Enter to send message to 'Arduino Uno' on 'COM15')
New Line
9600 baud
Arduino #2: CONNECTED TO A LED, ACTED AS A MQTT SUBSCRIBER
Arduino - Attempting to connect to SSID: YOUR_WIFI_SSID
IP Address: 192.168.0.2
Arduino - Connecting to MQTT broker
Arduino - Subscribed to the topic: arduino/command
Arduino - MQTT broker Connected!
Arduino - received from MQTT:
- topic: arduino/command
- payload: 1
- Received command: 1 => Turned LED on
Arduino - received from MQTT:
- topic: arduino/command
- payload: 0
- Received command: 0 => Turned LED off
You can share the link of this tutorial anywhere. Howerver, please do not copy the content to share on other websites. We took a lot of time and effort to create the content of this tutorial, please respect our work!