Arduino - IFTTT
In this tutorial, we are going to learn how to use Arduino with IFTTT. In detail, We will learn:
- What is IFTTT?
- How Arduino and IFTTT works with each other
- How outside services (Google Assistant, Alexa ...) controls Arduino via IFTTT
- How Arduino triggers/send data to outside services (email, SMS, voice call ...) via IFTTT
IFTTT makes Arduino possible:
- Arduino sends the notification to your smartphone
- Arduino sends the email
- Arduino sends the SMS message
- Google Assistant controls Arduino
- Amazon Echo (Alexa) controls Arduino
- Set schelude for Arduino via Google Calendar
And much much more than those.
Hardware Required
Or you can buy the following kits:
| 1 | × | DIYables STEM V4 IoT Starter Kit (Arduino included) | |
| 1 | × | DIYables Sensor Kit (18 sensors/displays) |
Additionally, some links direct to products from our own brand, DIYables .
What is IFTTT?
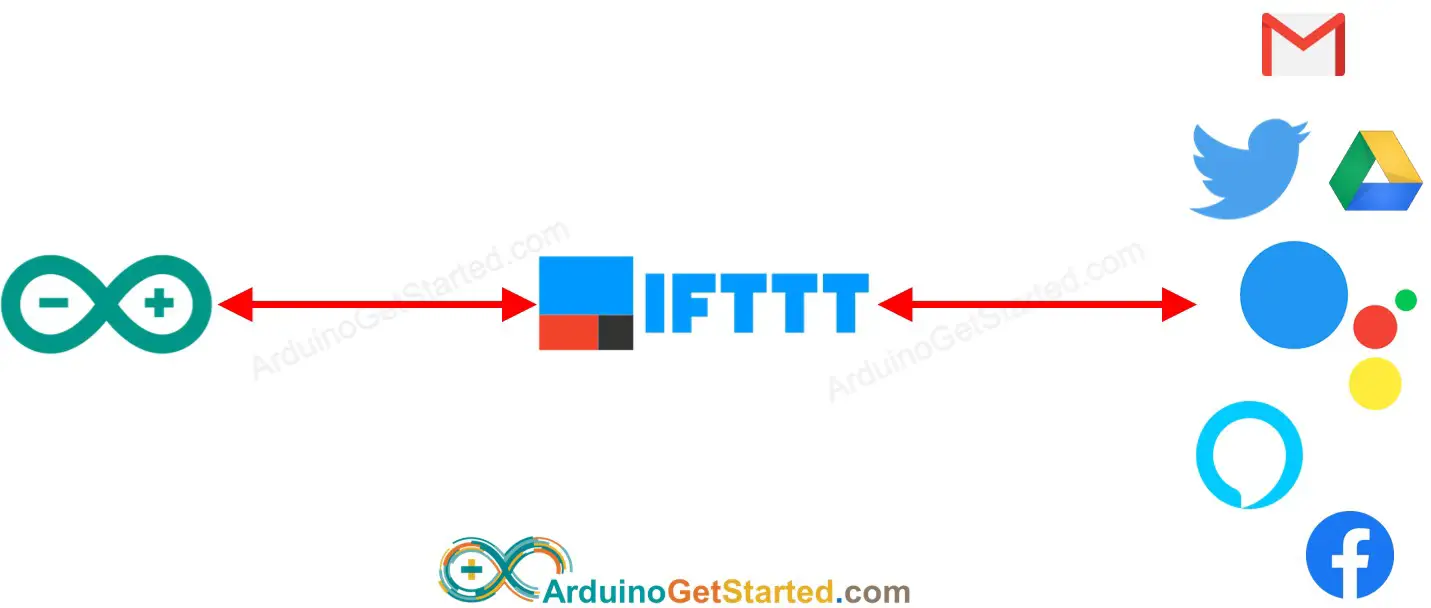
IFTTT is a free web service that connects different Web services (e.g Facebook, Email, Twitter, Google Assistant ...) together. For example:
- If you connect your Facebook to your Dropbox via IFTTT, whenever you post a photo on Facebook, IFTTT can automatically save the photo to Dropbox.
- If you connect your Amazon Alex to your Email via IFTTT, IFTTT can automatically send email to you whenever you ask Alexa what's on your shopping list
There are four important concepts on IFTTT: Applet, service, trigger, and action.
- IFTTT is composed of Applets.
- The Applet is typically composed of two IFTTT services. One service acts as a trigger and the other acts as an action. IFTTT service in an Applet are connected together.
- IFTTT service ( ex. Twitter, Dropbox, Evernote, Facebook, Email, Amazon Alexa, and Google Assistant...) does either:
- Receive the request from outside, and then triggers other IFTTT service in the same Applets (acts as the trigger)
- Be triggered by other IFTTT service in the same Applets, and then do something with outside services (acts as the action)
- An Applet can be composed of three or more IFTTT services. It is out of the scope of this tutorial.
- Please do not confuse the service in IFTTT with outside service. They may have the same name. For example, Alexa is a voice service created and owned by Amazon, IFTTT has a service also called Alexa that intertact with Amazon Alexa. Therefore, let's call the service in IFTTT is IFTTT service, and non-IFTTT service is the outside service.
- by IFTTT company: you just need to enable it to use
- by the third party: you just need to enable it to use
- by yourself: You can create your own Applet, enable it to use. It is very easy to create Applets.
※ NOTE THAT:
The Applet is created:
To works with Arduino, you need to create an Applet by yourself. Don't worry, it is very simple to create an Applet.
IFTTT stands for "If This Then That". It means if a service is triggered, other IFTTT service take the action
Prerequisite
Create an IFTTT account. It is free and completely simple to create.
How Arduino and IFTTT works with each other
In general, Arduino interacts with IFTTT, IFTTT interacts with the outside services, and vice versa.
More detail, Arduino interacts with an Applet in IFTTT, the Applet interacts with outside services, and vice versa.
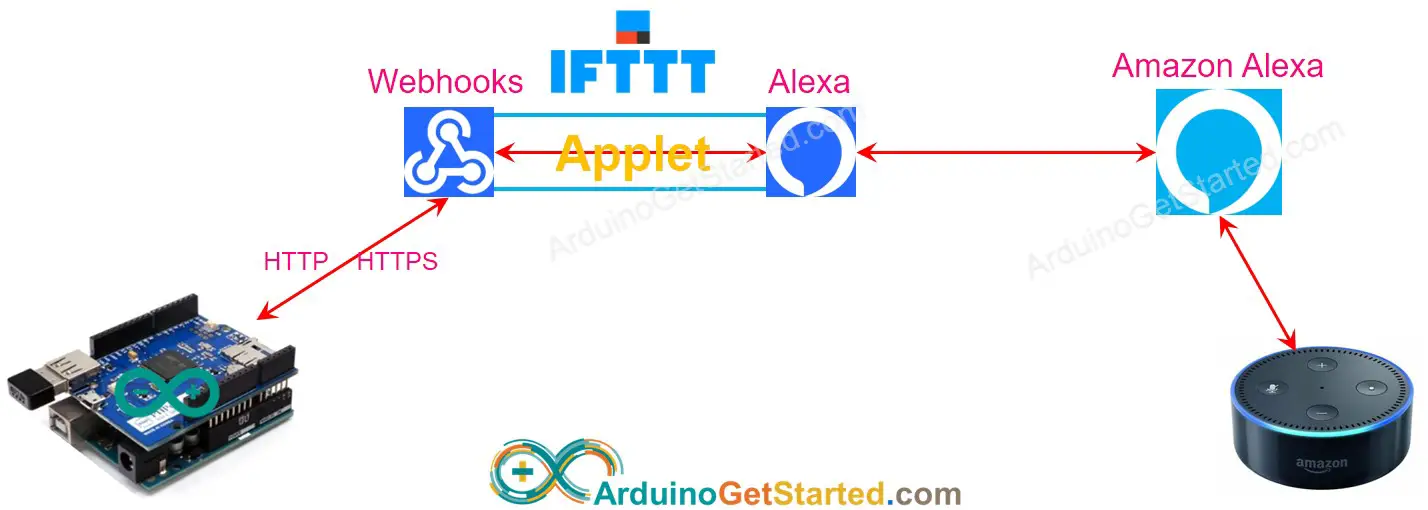
In depth, Arduino interacts with the Webhooks service in IFTTT, the Webhooks service triggers other service in IFTTT, the other service in IFTTT interacts with outside services, and vice versa. The below is an example of how Arduino interacts with Amazon Echo dot.
Summary
| In general | Arduino | ↔ | IFTTT | ↔ | Outside services |
| More detail | Arduino | ↔ | Applet in IFTTT | ↔ | Outside services |
| In depth | Arduino | ↔ | (Webhooks ↔ Other service) in IFTTT | ↔ | Outside services |
We need to create an Applet of Webhooks and another service. Depending on use-case, Webhooks can acts as the trigger or the action.
There are two use-case categories:
- Another service controls Arduino via IFTTT (e.g Google Assistant, Amazon Alexa controls Arduino)
- Arduino sends data to other IFTTT service via IFTTT (e.g sending notification to your phone, post on Twitter)
Let's see one by one in detail.
How outside services control Arduino via IFTTT
As mentioned above, an IFTTT Applets usually includes two IFTTT service: one acts as the trigger and the other acts as the action. In this case, Webhooks acts as the trigger.
In the interaction between Arduino and Webhooks, Arduino acts as Web Server, Webhooks of IFTTT acts as Web client.
The workflow:
- A service triggers an event to the corresponding service on IFTTT
- The corresponding service on IFTTT extracts the data from event if available
- The corresponding service on IFTTT triggers Webhooks of IFTTT (including data if available)
- The Webhooks of IFTTT takes the action by making HTTP request Arduino (including data if available)
- Arduino extracts the data from the HTTP request and do something.
The below image shows how Amazon Echo controls Arduino via IFTTT
How To Use IFTTT with Arduino
- Login to IFTTT
- Create an Applet, which connect a desired service (e.g Google Assistant, Amazon Alexa, Google Calendar ...) to Webhooks. Webhooks acts as the action and other service acts as the trigger
- Write Arduino code to handle HTTP request from Webhooks.
When you create the Applet, Arduino's IP address is inputted in the Applet's setting. When an event is triggered, IFTTT makes an HTTP request to Arduino via the inputted IP address.
The detail step-by-step intruction will be presented in specific tutorials.
Example Code
Step-by-step instructions and example codes of another service control Arduino via IFTTT are available in the following tutorials:
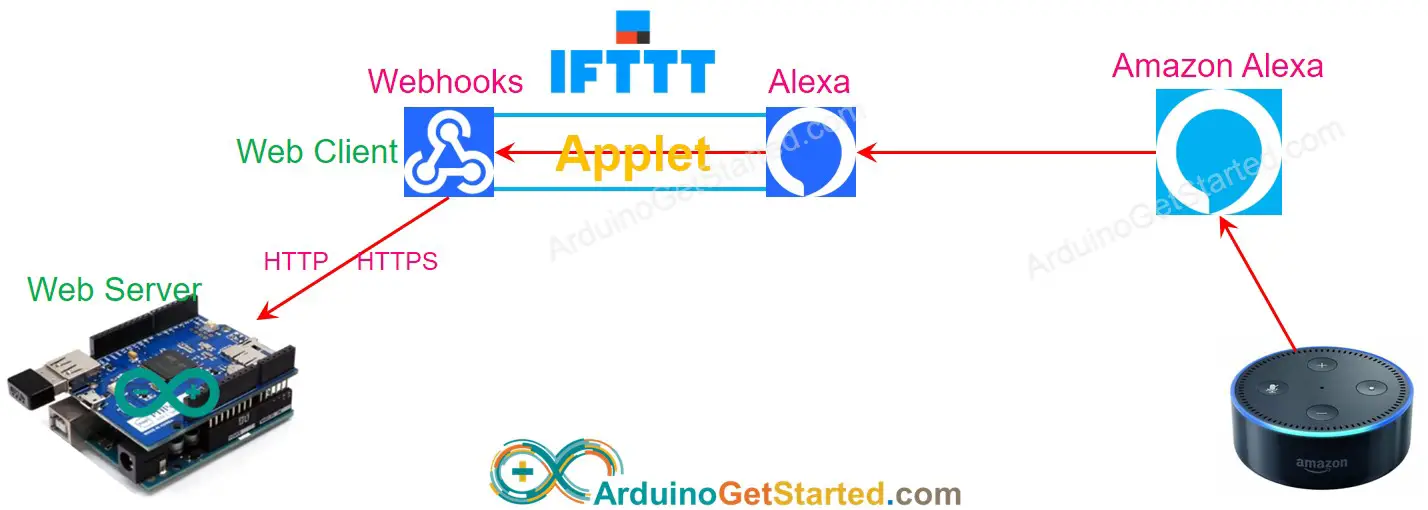
How Arduino triggers/send data to outside service via IFTTT
As mentioned above, an IFTTT Applets usually includes two IFTTT service: one acts as the trigger and the other acts as the action. In this case, Webhooks acts as the action.
In the interaction between Arduino and Webhooks, Arduino acts as Web Client, Webhooks of IFTTT acts as Web server.
The workflow:
- Arduino makes HTTP or HTTPS request to Webhooks of IFTTT
- Webhooks extracts the data from HTTP request if available
- Webhooks of IFTTT triggers another service of IFTTT (including data if available).
- Another service of IFTTT takes the action
The below image shows how Arduino sends email via IFTTT

How To
What we need to do
- Login to IFTTT
- Create an Applet, which connect Webhooks to a desired service (e.g Email, Twitter, VoIP ...). Webhooks acts as the trigger and other service acts as the action
- Go to Webhooks's document page to get Webhooks key.
- Write Arduino code to make HTTP (POST or GET)request to Webhooks.
To learn how to make HTTP request using Arduino.
What We need to include in the HTTP request
- Webhooks key: unique and secret key to identify your Webhooks. One account has only one key. You can log into your account and copy it from IFTTT website
- Event name: the name to identify the event. The event name is named by you when you create the applet. One account can create multiple event names.
- (Optional) data: you can send the sensor's data to IFTTT
Webhooks key and event name are parts of URL. Data is optional and is included in the query string. As mentioned in the HTTP tutorial, the query string is a part of the URL in the GET request and is the HTTP body in the POST request.
The query string allows the maximum 3 variables with the fixed name: value1, value2, value3.
HTTP GET Request Format:
- Send the trigger without data: http://maker.ifttt.com/trigger/EVENT-NAME/with/key/YOUR-KEY
- Send the trigger with one variable: http://maker.ifttt.com/trigger/EVENT-NAME/with/key/YOUR-KEY?value1=10
- Send the trigger with two variables: http://maker.ifttt.com/trigger/EVENT-NAME/with/key/YOUR-KEY?value1=10&value2=21
- Send the trigger with three variables: http://maker.ifttt.com/trigger/EVENT-NAME/with/key/YOUR-KEY?value1=10&value2=21&value3=25
Replace EVENT-NAME, YOUR-KEY and values in above format.
How to send data from Arduino to IFTTT
To send data from Arduino to other IFTTT service (e.g. Email, facebook), we need to do:
- In Arduino: Include data into HTTP request
- In Applet: modify the setting to extract data from the HTTP request.
There are 5 variables we can use in the setting of IFTTT Applet:
| {{EventName}} | Extracted from HTTP request |
|---|---|
| {{OccurredAt}} | System time when event occurs |
| {{Value1}} | Extracted from the variable value1 of query string in HTTP request |
| {{Value2}} | Extracted from the variable value2 of query string in HTTP request |
| {{Value3}} | Extracted from the variable value3 of query string in HTTP request |
The detail step-by-step intruction will be presented in specific tutorials.
Example Code
Step-by-step instructions and example codes of Arduino send data to other IFTTT service via IFTTT are available in the following tutorials:
Additional Knowledge
⇒ Your HTTP request contains your Webhooks key. Each account has one and unique Webhooks key. IFTTT uses Webhooks key to identify you.
⇒ You can create multiple applets. Each applet corresponds to a trigger.
you can combine some data into one variable of the query string with your designed delimiter. For example: http://maker.ifttt.com/trigger/EVENT-NAME/with/key/YOUR-KEY?value1=10&value2=21&value3=25-32