Arduino - Motion Sensor - MP3 Player

In this tutorial, we'll delve into the utilization of Arduino, an HC-SR501 motion sensor, and an MP3 player to trigger the playback of a recorded audio file upon detecting motion. This project is versatile and can be tailored for applications like automatically delivering recorded audio instructions or warnings whenever a human presence is detected.

Hardware Required

1×Arduino UNO or Genuino UNO
1×USB 2.0 cable type A/B
1×HC-SR501 Motion Sensor
1×Serial MP3 Player Module
1×Micro SD Card
1×3.5mm Aux Speaker
1×Jumper Wires
1×(Optional) 9V Power Adapter for Arduino
1×(Recommended) Screw Terminal Block Shield for Arduino Uno
1×(Optional) Transparent Acrylic Enclosure For Arduino Uno

Or you can buy the following sensor kits:

1×DIYables Sensor Kit (30 sensors/displays)
1×DIYables Sensor Kit (18 sensors/displays)
Please note: These are Amazon affiliate links. If you buy the components through these links, We will get a commission at no extra cost to you. We appreciate it.

About MP3 Player and Motion Sensor

If you do not know about MP3 player and motion sensor (pinout, how it works, how to program ...), learn about them in the following tutorials:

Wiring Diagram

Arduino Motion Sensor MP3 Player Wiring Diagram

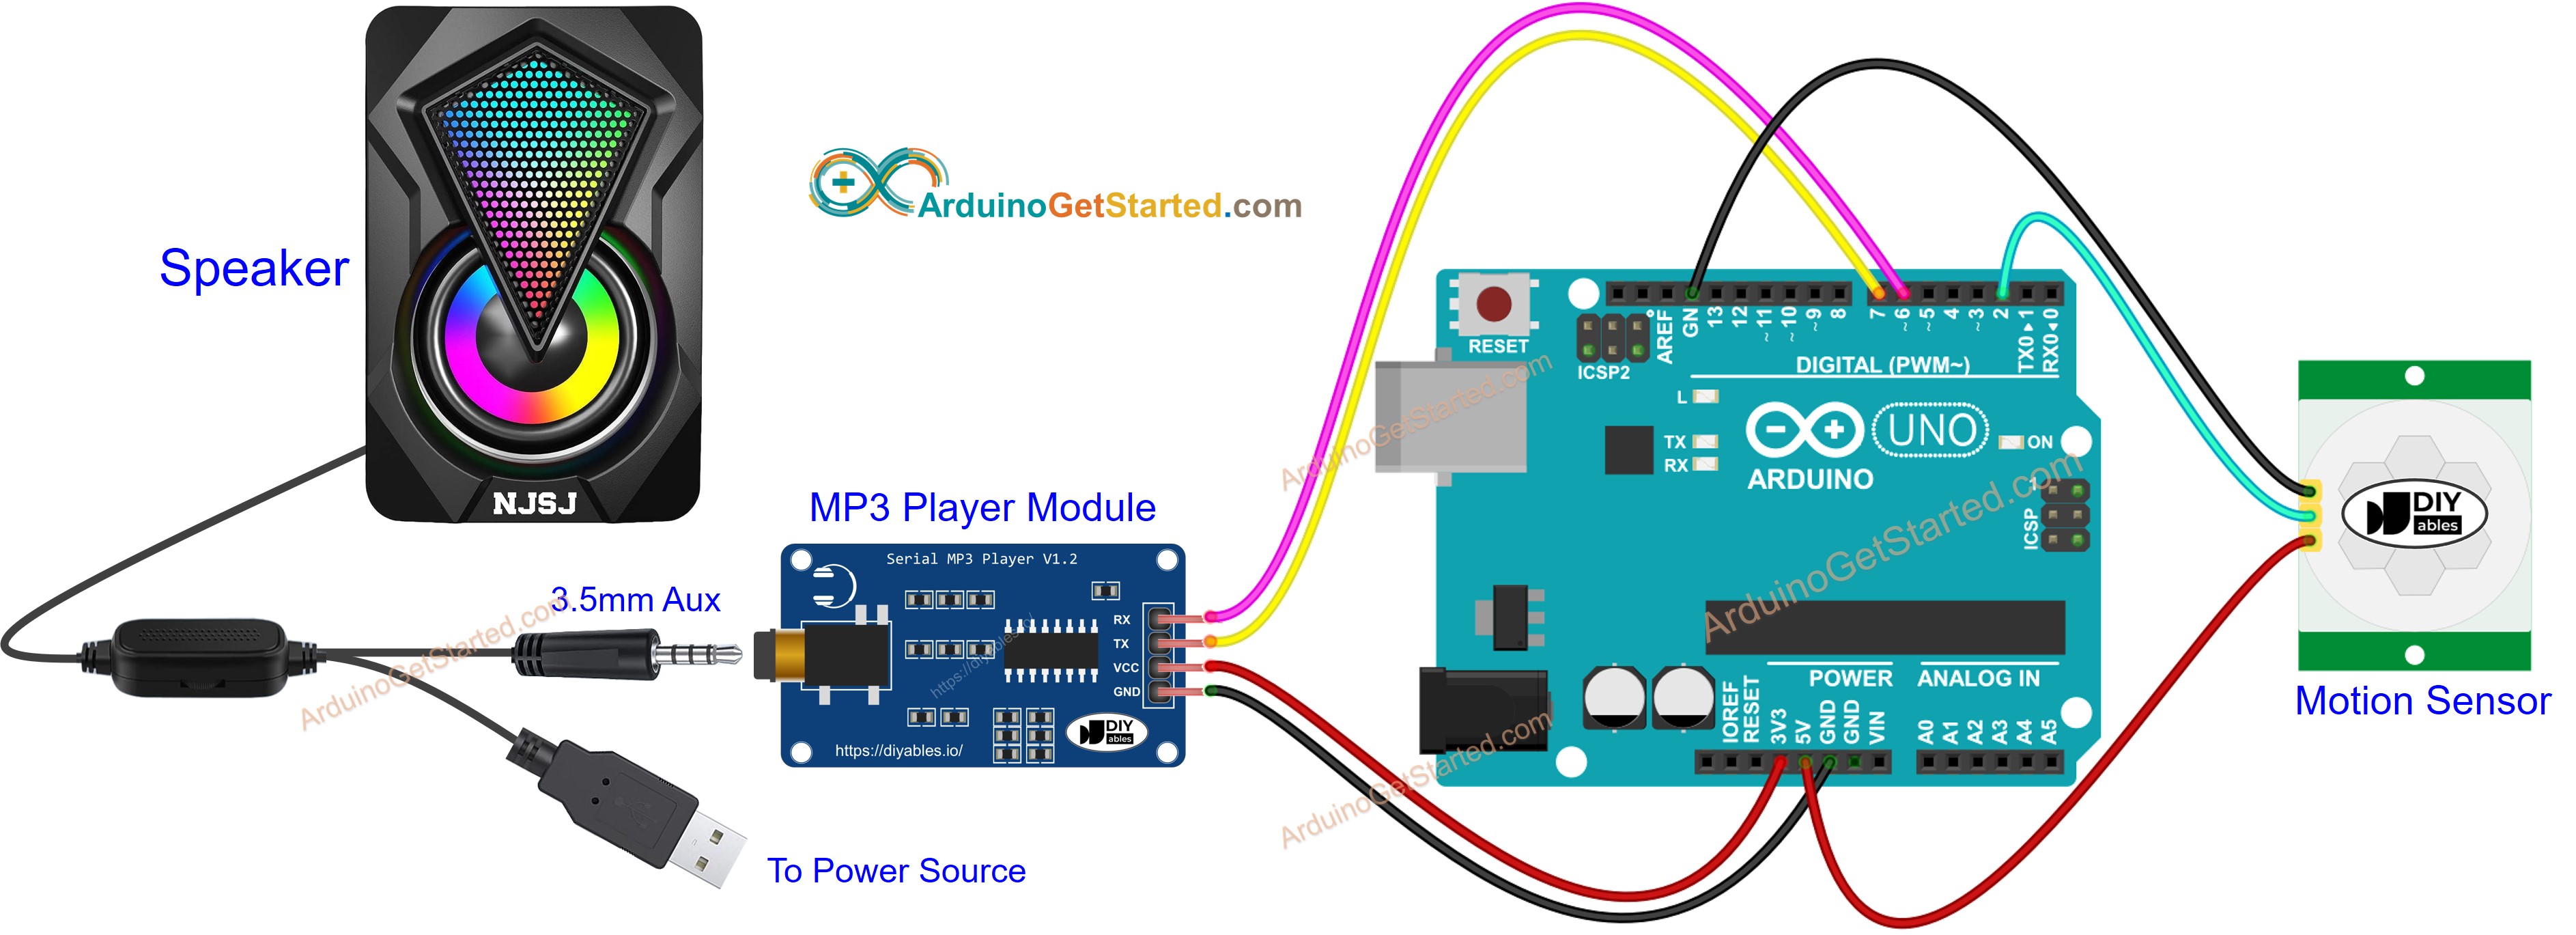
This image is created using Fritzing. Click to enlarge image

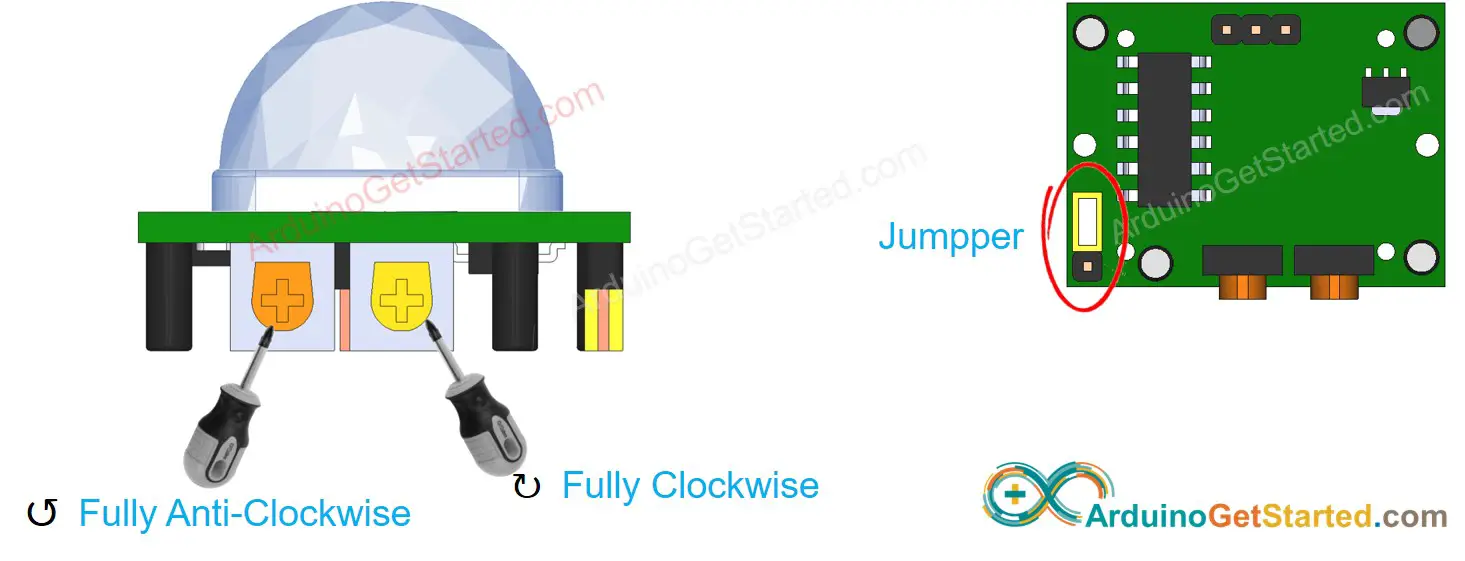
Motion Sensor Initial Setting

Time Delay AdjusterScrew it in anti-clockwise direction fully.
Detection Range AdjusterScrew it in clockwise direction fully.
Repeat Trigger SelectorPut jumper as shown on the image.
arduino motion sensor initial setting

Preparation

  • Pre-store the recorded mp3 file that we want to play to the micro SD Card.
  • Insert the micro SD Card to the MP3 player module
  • Connect the MP3 player module to Arduino
  • Connect the speaker to the MP3 player module to a
  • Connect the speaker to a power source.
  • Connect the motion sensor to the Arduino.

Arduino Code - Motion Sensor Controls MP3 Player

/* * Created by ArduinoGetStarted.com * * This example code is in the public domain * * Tutorial page: https://arduinogetstarted.com/tutorials/arduino-motion-sensor-mp3-player */ #include <SoftwareSerial.h> #include <Servo.h> #define CMD_PLAY_NEXT 0x01 #define CMD_PLAY_PREV 0x02 #define CMD_PLAY_W_INDEX 0x03 #define CMD_SET_VOLUME 0x06 #define CMD_SEL_DEV 0x09 #define CMD_PLAY_W_VOL 0x22 #define CMD_PLAY 0x0D #define CMD_PAUSE 0x0E #define CMD_SINGLE_CYCLE 0x19 #define DEV_TF 0x02 #define SINGLE_CYCLE_ON 0x00 #define SINGLE_CYCLE_OFF 0x01 #define ARDUINO_RX 7 // Arduino Pin connected to the TX of the Serial MP3 Player module #define ARDUINO_TX 6 // Arduino Pin connected to the RX of the Serial MP3 Player module #define MOTION_SENSOR_PIN 2 // Arduino pin connected to motion sensor's pin SoftwareSerial mp3(ARDUINO_RX, ARDUINO_TX); int prev_motion_state; // the previous state of motion sensor int motion_state; // the current state of motion sensor void setup() { Serial.begin(9600); mp3.begin(9600); delay(500); // wait chip initialization is complete mp3_command(CMD_SEL_DEV, DEV_TF); // select the TF card delay(200); // wait for 200ms pinMode(MOTION_SENSOR_PIN, INPUT); // set arduino pin to input mode motion_state = digitalRead(MOTION_SENSOR_PIN); } void loop() { prev_motion_state = motion_state; // save the last state motion_state = digitalRead(MOTION_SENSOR_PIN); // read new state if (motion_state == LOW && prev_motion_state == HIGH) { // pin state change: LOW -> HIGH Serial.println("Motion detected!"); mp3_command(CMD_PLAY, 0x0000); // Play the first mp3 file } else if (motion_state == HIGH && prev_motion_state == LOW) { // pin state change: HIGH -> LOW Serial.println("Motion stopped!"); } } void mp3_command(int8_t command, int16_t dat) { int8_t frame[8] = { 0 }; frame[0] = 0x7e; // starting byte frame[1] = 0xff; // version frame[2] = 0x06; // the number of bytes of the command without starting byte and ending byte frame[3] = command; // frame[4] = 0x00; // 0x00 = no feedback, 0x01 = feedback frame[5] = (int8_t)(dat >> 8); // data high byte frame[6] = (int8_t)(dat); // data low byte frame[7] = 0xef; // ending byte for (uint8_t i = 0; i < 8; i++) { mp3.write(frame[i]); } }

Quick Steps

  • Connect Arduino to PC via USB cable
  • Open Arduino IDE, select the right board and port
  • Copy the above code and open with Arduino IDE
  • Click Upload button on Arduino IDE to upload code to Arduino
  • Move your hand in front of sensor
  • Check out the audio from MP3 player

Video Tutorial

We are considering to make the video tutorials. If you think the video tutorials are essential, please subscribe to our YouTube channel to give us motivation for making the videos.

The Best Arduino Starter Kit

※ OUR MESSAGES