Arduino - Sound Sensor - Servo Motor

In this tutorial, we'll explore how to utilize the sound sensor to control servo motor. Specifically, we'll delve into two exciting applications:

Hardware Required

1×Arduino UNO or Genuino UNO
1×USB 2.0 cable type A/B (for USB-A PC)
1×USB 2.0 cable type C/B (for USB-C PC)
1×Sound Sensor
1×Servo Motor
1×Jumper Wires
1×(Recommended) Screw Terminal Block Shield for Arduino Uno
1×(Recommended) Breadboard Shield For Arduino Uno
1×(Recommended) Enclosure For Arduino Uno

Or you can buy the following sensor kits:

1×DIYables Sensor Kit (30 sensors/displays)
1×DIYables Sensor Kit (18 sensors/displays)
Disclosure: Some links in this section are Amazon affiliate links. If you make a purchase through these links, we may earn a commission at no extra cost to you.
Additionally, some links direct to products from our own brand, DIYables.

About Servo Motor and Sound Sensor

If you do not know about servo motor and sound sensor (pinout, how it works, how to program ...), learn about them in the following tutorials:

Wiring Diagram
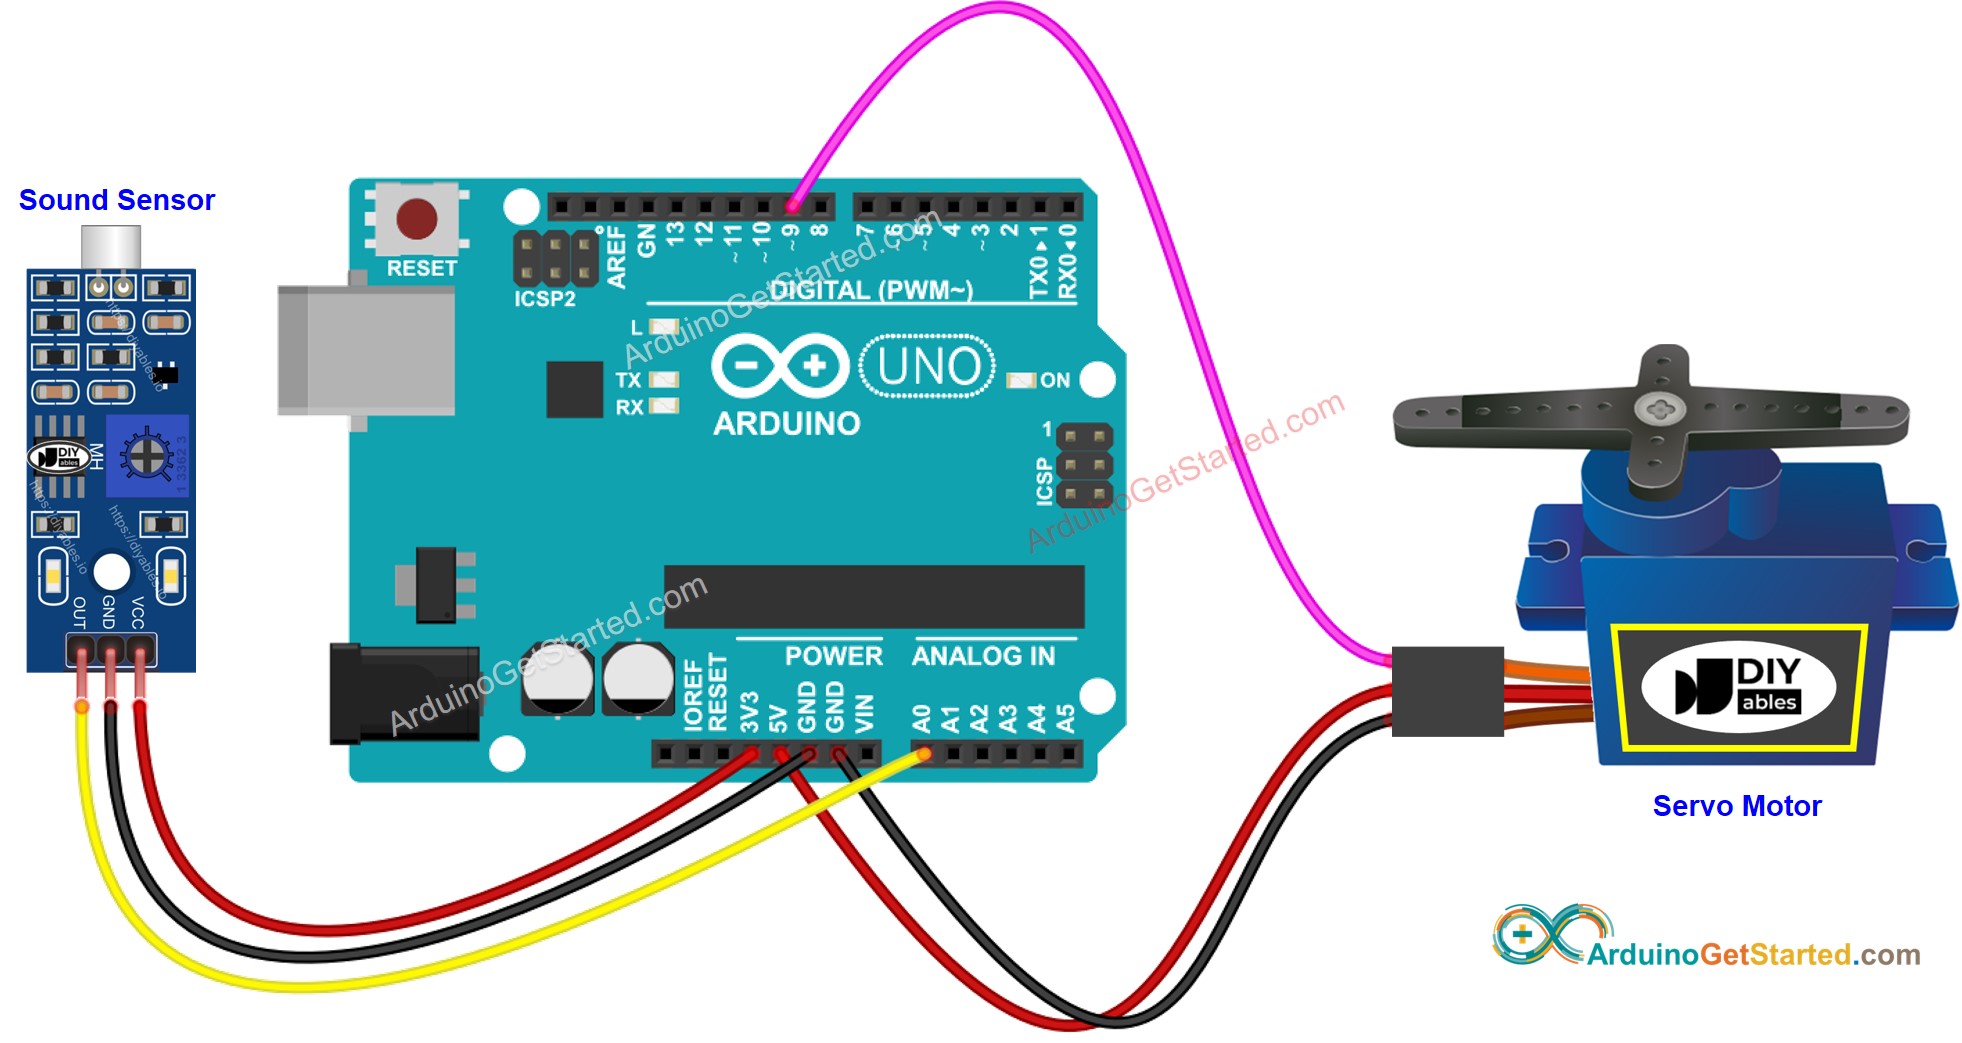
Arduino Sound Sensor Servo Motor Wiring Diagram

This image is created using Fritzing. Click to enlarge image

Arduino Code - Sound Switch toggles Angle of Servo Motor

The below code toggles the angle of servo motor between 0 and 90 degree each time the sound is detected.

/* * Created by ArduinoGetStarted.com * * This example code is in the public domain * * Tutorial page: https://arduinogetstarted.com/tutorials/arduino-sound-sensor-servo-motor */ #include <Servo.h> #define SENSOR_PIN A0 // Arduino pin connected to sound sensor's pin #define SERVO_PIN 9 // Arduino pin connected to servo motor's pin Servo servo; // create servo object to control a servo // variables will change: int angle = 0; // the current angle of servo motor int lastSoundState; // the previous state of sound sensor int currentSoundState; // the current state of sound sensor void setup() { Serial.begin(9600); // initialize serial pinMode(SENSOR_PIN, INPUT); // set arduino pin to input mode servo.attach(SERVO_PIN); // attaches the servo on pin 9 to the servo object servo.write(angle); currentSoundState = digitalRead(SENSOR_PIN); } void loop() { lastSoundState = currentSoundState; // save the last state currentSoundState = digitalRead(SENSOR_PIN); // read new state if (lastSoundState == HIGH && currentSoundState == LOW) { // state change: HIGH -> LOW Serial.println("The sound has been detected"); // change angle of servo motor if (angle == 0) angle = 90; else if (angle == 90) angle = 0; // control servo motor arccoding to the angle servo.write(angle); } }

Quick Steps

  • Connect Arduino to PC via USB cable
  • Open Arduino IDE, select the right board and port
  • Copy the above code and open with Arduino IDE
  • Click Upload button on Arduino IDE to upload code to Arduino
  • Clap your hand in front of the sound sensor
  • See the change of servo motor

Arduino Code - Sound-activated Servo Motor for a period of time

The below code rotates the servo motor to 90 degree for a period of time when the sound is detected. After the period of time, the servo motor is rotated back to 0 degree.

/* * Created by ArduinoGetStarted.com * * This example code is in the public domain * * Tutorial page: https://arduinogetstarted.com/tutorials/arduino-sound-sensor-servo-motor */ #include <Servo.h> #define SENSOR_PIN A0 // Arduino pin connected to sound sensor's pin #define SERVO_PIN 9 // Arduino pin connected to servo motor's pin #define TIME_PERIOD 5000 // in milliseconds Servo servo; // create servo object to control a servo // variables will change: int lastSoundState; // the previous state of sound sensor int currentSoundState; // the current state of sound sensor void setup() { Serial.begin(9600); // initialize serial pinMode(SENSOR_PIN, INPUT); // set arduino pin to input mode servo.attach(SERVO_PIN); // attaches the servo on pin 9 to the servo object servo.write(0); currentSoundState = digitalRead(SENSOR_PIN); } void loop() { lastSoundState = currentSoundState; // save the last state currentSoundState = digitalRead(SENSOR_PIN); // read new state if (lastSoundState == HIGH && currentSoundState == LOW) { // state change: HIGH -> LOW Serial.println("The sound has been detected"); servo.write(90); // control servo motor to 90 degree delay(TIME_PERIOD); servo.write(0); // control servo motor to 0 degree } }

Please take note that the code mentioned above utilizes the delay() function for simplicity. However, if you incorporate additional code, it may get blocked during the delay time. To address this, the following code implements a non-blocking approach using the millis() function instead of delay to prevent blocking.

/* * Created by ArduinoGetStarted.com * * This example code is in the public domain * * Tutorial page: https://arduinogetstarted.com/tutorials/arduino-sound-sensor-servo-motor */ #include <Servo.h> #define SENSOR_PIN A0 // Arduino pin connected to sound sensor's pin #define SERVO_PIN 9 // Arduino pin connected to servo motor's pin #define TIME_PERIOD 5000 // in milliseconds Servo servo; // create servo object to control a servo // variables will change: int lastSoundState; // the previous state of sound sensor int currentSoundState; // the current state of sound sensor unsigned long lastTime; // the current state of sound sensor int angle = 0; void setup() { Serial.begin(9600); // initialize serial pinMode(SENSOR_PIN, INPUT); // set arduino pin to input mode servo.attach(SERVO_PIN); // attaches the servo on pin 9 to the servo object servo.write(angle); currentSoundState = digitalRead(SENSOR_PIN); } void loop() { lastSoundState = currentSoundState; // save the last state currentSoundState = digitalRead(SENSOR_PIN); // read new state if (lastSoundState == HIGH && currentSoundState == LOW) { // state change: HIGH -> LOW Serial.println("The sound has been detected"); angle = 90; servo.write(angle); // control servo motor to 90 degree lastTime = millis(); } if (angle == 90 && (millis() - lastTime) > TIME_PERIOD) { angle = 0; servo.write(angle); // control servo motor to 0 degree } }

Video Tutorial

We are considering to make the video tutorials. If you think the video tutorials are essential, please subscribe to our YouTube channel to give us motivation for making the videos.

The Best Arduino Starter Kit

※ OUR MESSAGES