Arduino - Gas Sensor
In this tutorial, we are going to learn how to use Arduino and MQ2 gas sensor to check the air quality by checking the concentrations of LPG, smoke, alcohol, propane, hydrogen, methane and carbon monoxide, or other flammable gasses. In detail, we will learn:
- How to connect the gas sensor to Arduino
- How to program Arduino to read value from the gas sensor
Hardware Required
Or you can buy the following kits:
| 1 | × | DIYables STEM V3 Starter Kit (Arduino included) | |
| 1 | × | DIYables Sensor Kit (18 sensors/displays) |
Additionally, some links direct to products from our own brand, DIYables .
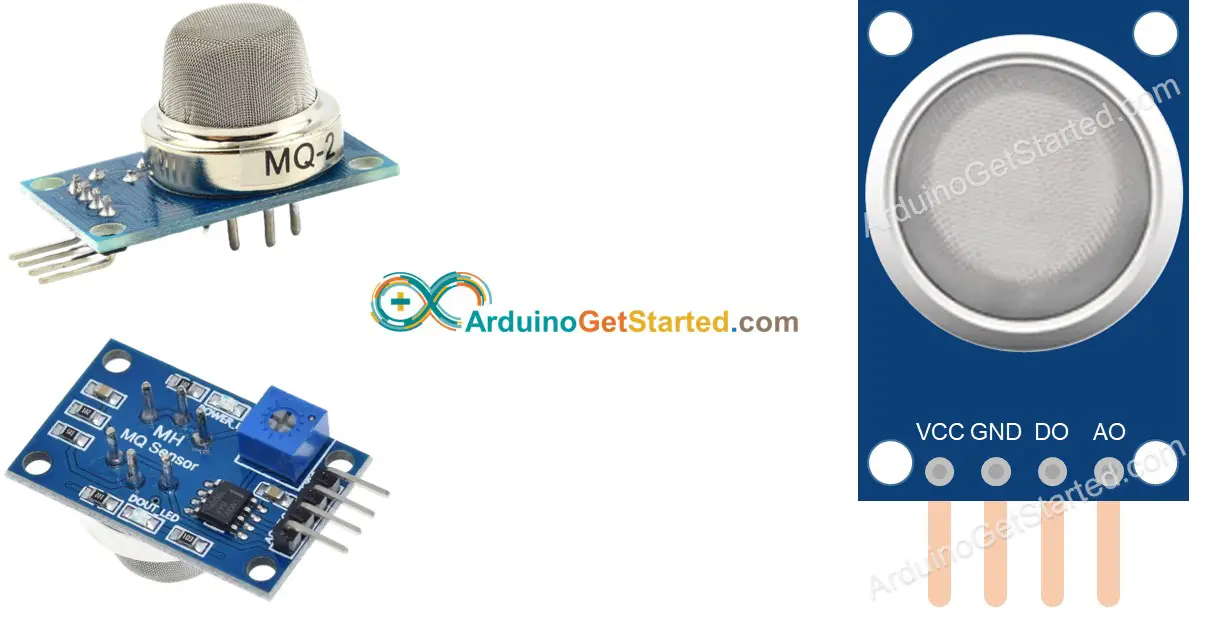
About MQ2 Gas Sensor
The MQ2 gas sensor is capable of detecting the presence of LPG, smoke, alcohol, propane, hydrogen, methane and carbon monoxide concentrations in the surrounding environment. The MQ2 gas sensor provides two options via a digital output pin and analog output pin.
Please note that the MQ2 gas sensor does not provide information about each gas separately. Instead, it gives information about the gas combination or the presence of gasses as a whole.
By using the MQ2 sensor, we can determine if there is a gas leak or if the air quality is not good. This information can help us take appropriate actions to stay safe, like triggering an alarm or turning on ventilation systems.
Pinout
The MQ2 gas sensor includes four pins:
- VCC pin: It needs to be connected to VCC (5V).
- GND pin: It needs to be connected to GND (0V).
- DO pin: A digital output pin indicates the presence of flammable gasses. It is LOW if the gasses concentration is detected, and HIGH if otherwise. The threshold value for detecting gasses concentration can be adjusted using a built-in potentiometer.
- AO pin: An analog output pin generates an analog output voltage that changes proportionally with the gas concentration. When the gas concentration increases, the voltage also rises, and when the gas concentration decreases, the voltage decreases accordingly.
Furthermore, it has two LED indicators:
- One PWR-LED indicator for power.
- One DO-LED indicator for the gas concentration based of the value on DO pin: it is on when gas concentration is present and off if otherwise.
How It Works
For the DO pin:
- The module has a built-in potentiometer for setting the gasses concentration threshold (sensitivity).
- When the gasses concentration in the surrounding environment is above the threshold value, the output pin of the sensor is LOW, and the DO-LED is on.
- When the gasses concentration in the surrounding environment is below the threshold value, the output pin of the sensor is HIGH, and the DO-LED is off.
For the AO pin:
- When the gas concentration increases, the voltage also rises.
- When the gas concentration decreases, the voltage decreases accordingly.
Note that the potentiometer does not affect the value on the AO pin.
The MQ2 Sensor Warm-up
The MQ2 gas sensor needs to be warmed up before using.
- When you first use the sensor after it has been stored for a long time (a month or more), it needs to be warmed up for 24-48 hours to ensure it works accurately.
- If the sensor has been used recently, it will only take 5-10 minutes to fully warm up. During this warm-up period, the sensor may initially give high readings, but they will gradually decrease until it stabilizes.
To warm up the MQ2 sensor, just connect its VCC and GND pins to power supply, or connect them to VCC and GND of Arduino, and then keep it for a period of time.
Wiring Diagram
Since the MQ2 gas sensor module has two outputs, you can choose to use one or both of them, depending on what you need.
- The wiring diagram between Arduino and the MQ2 gas sensor when using DO only.
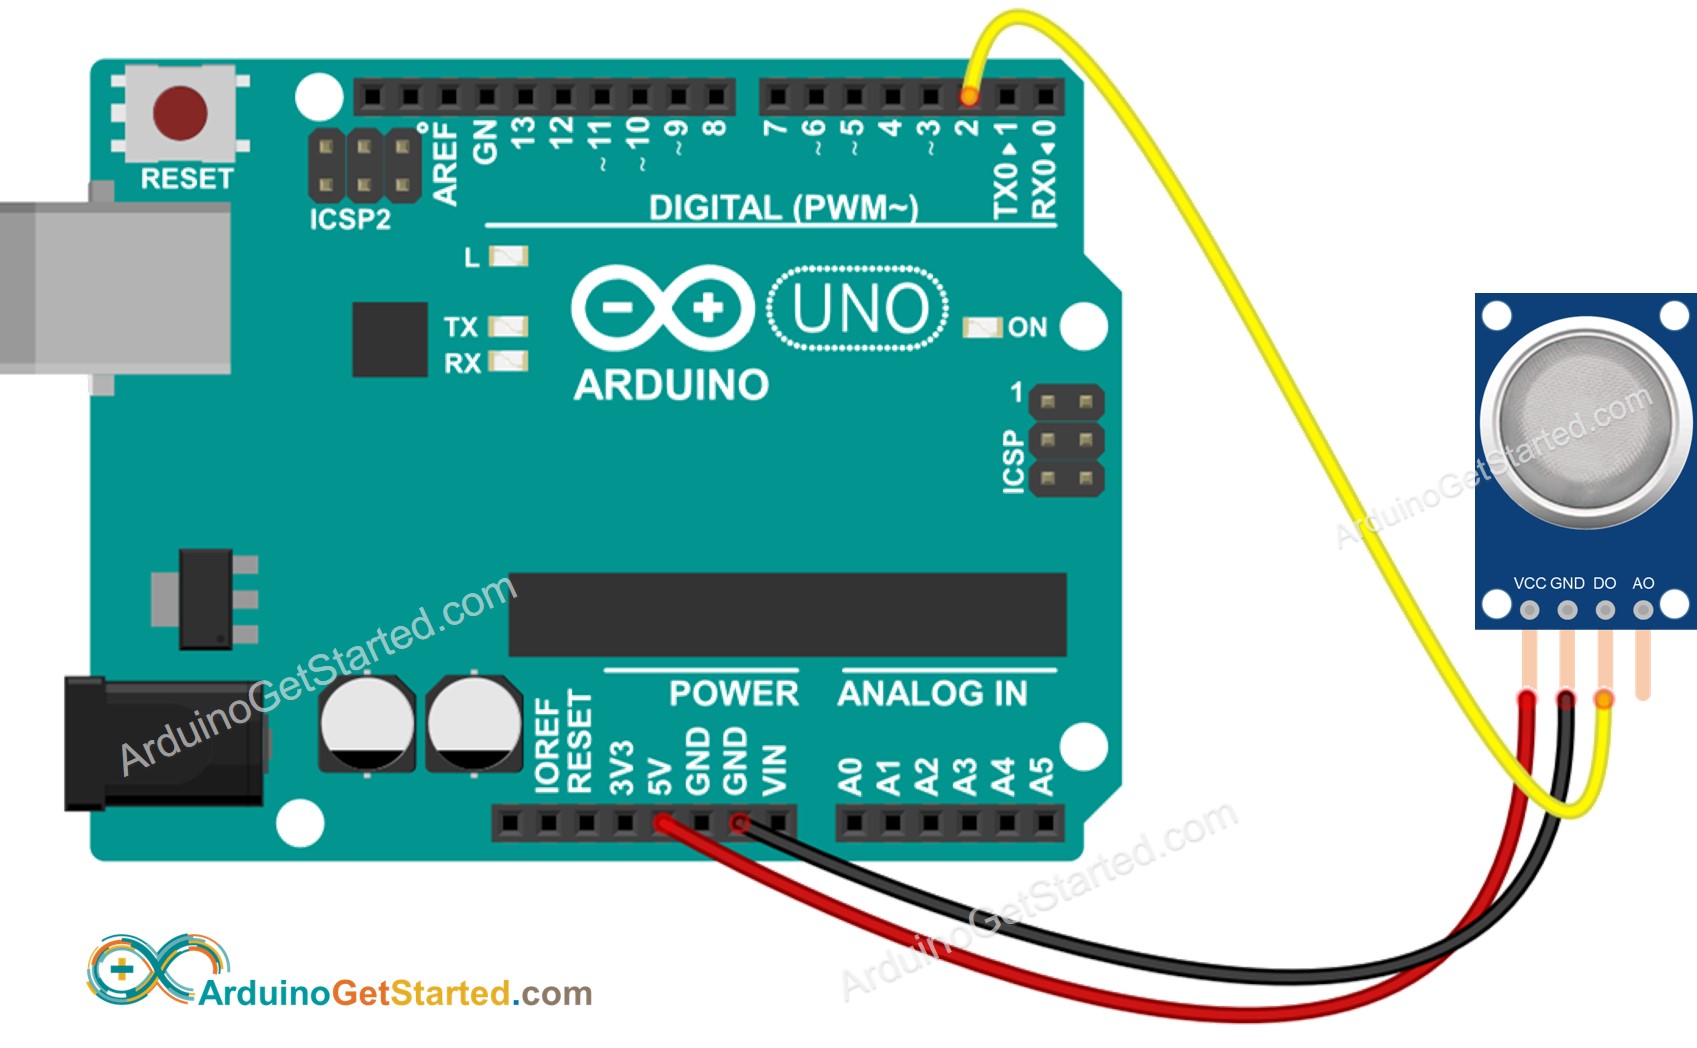
This image is created using Fritzing. Click to enlarge image
- The wiring diagram between Arduino and the MQ2 gas sensor when using AO only.
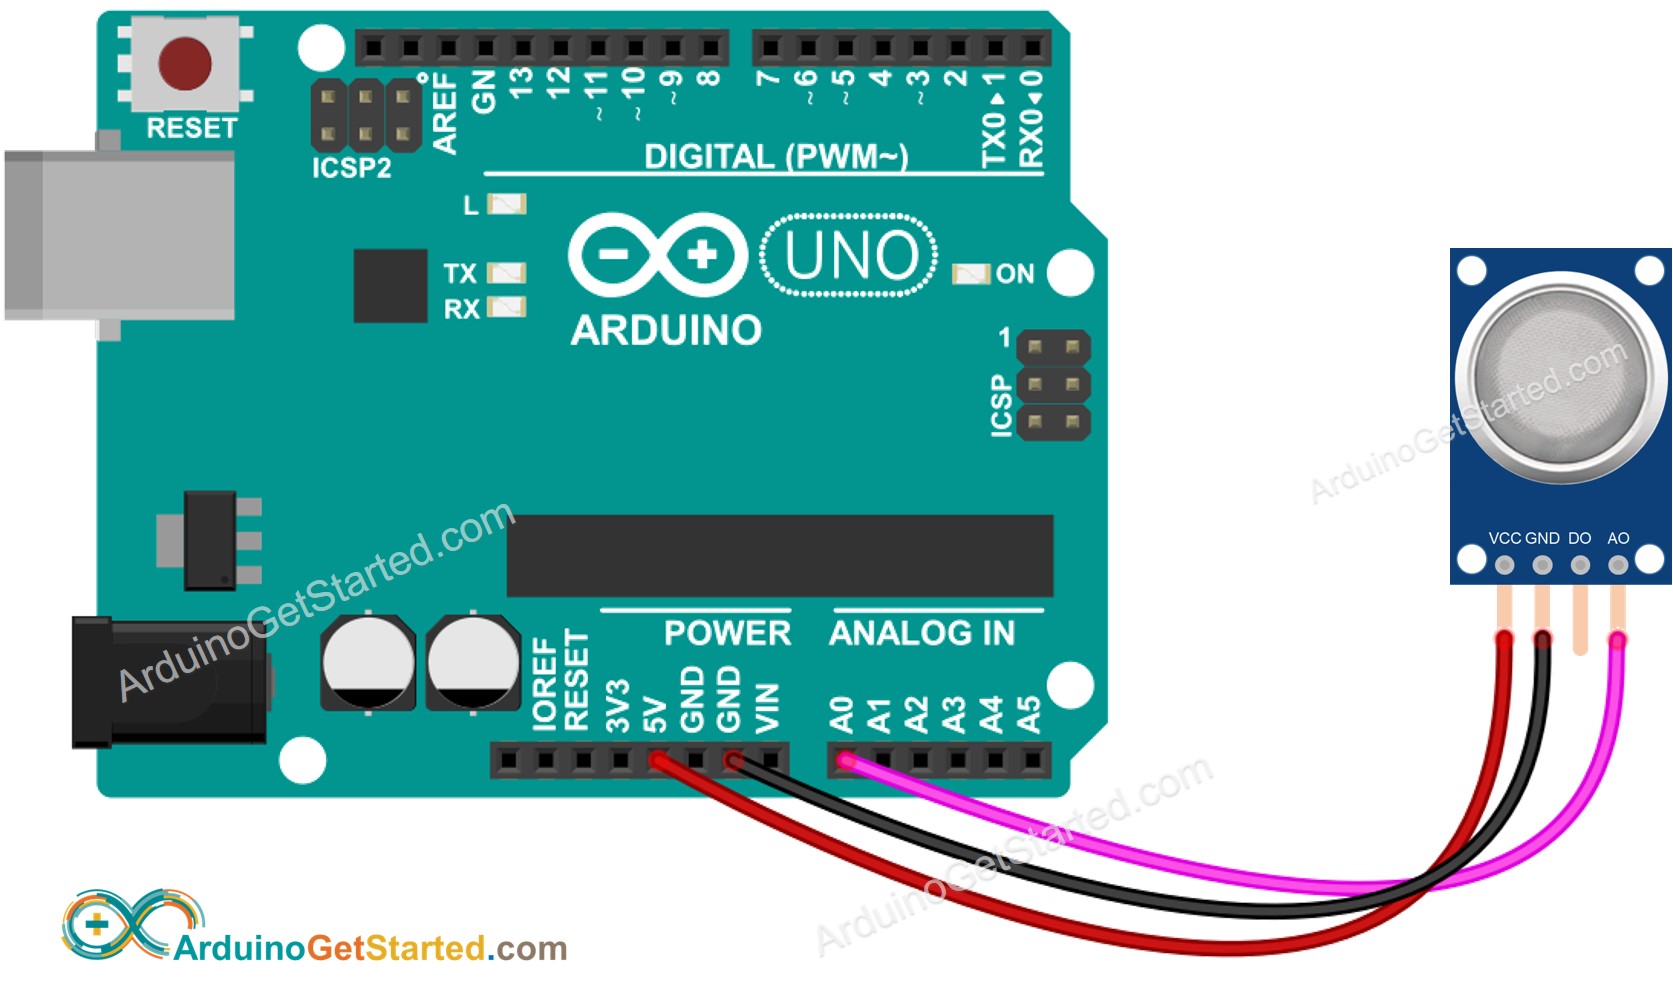
This image is created using Fritzing. Click to enlarge image
- The wiring diagram between Arduino and the MQ2 gas sensor when using both AO an DO.
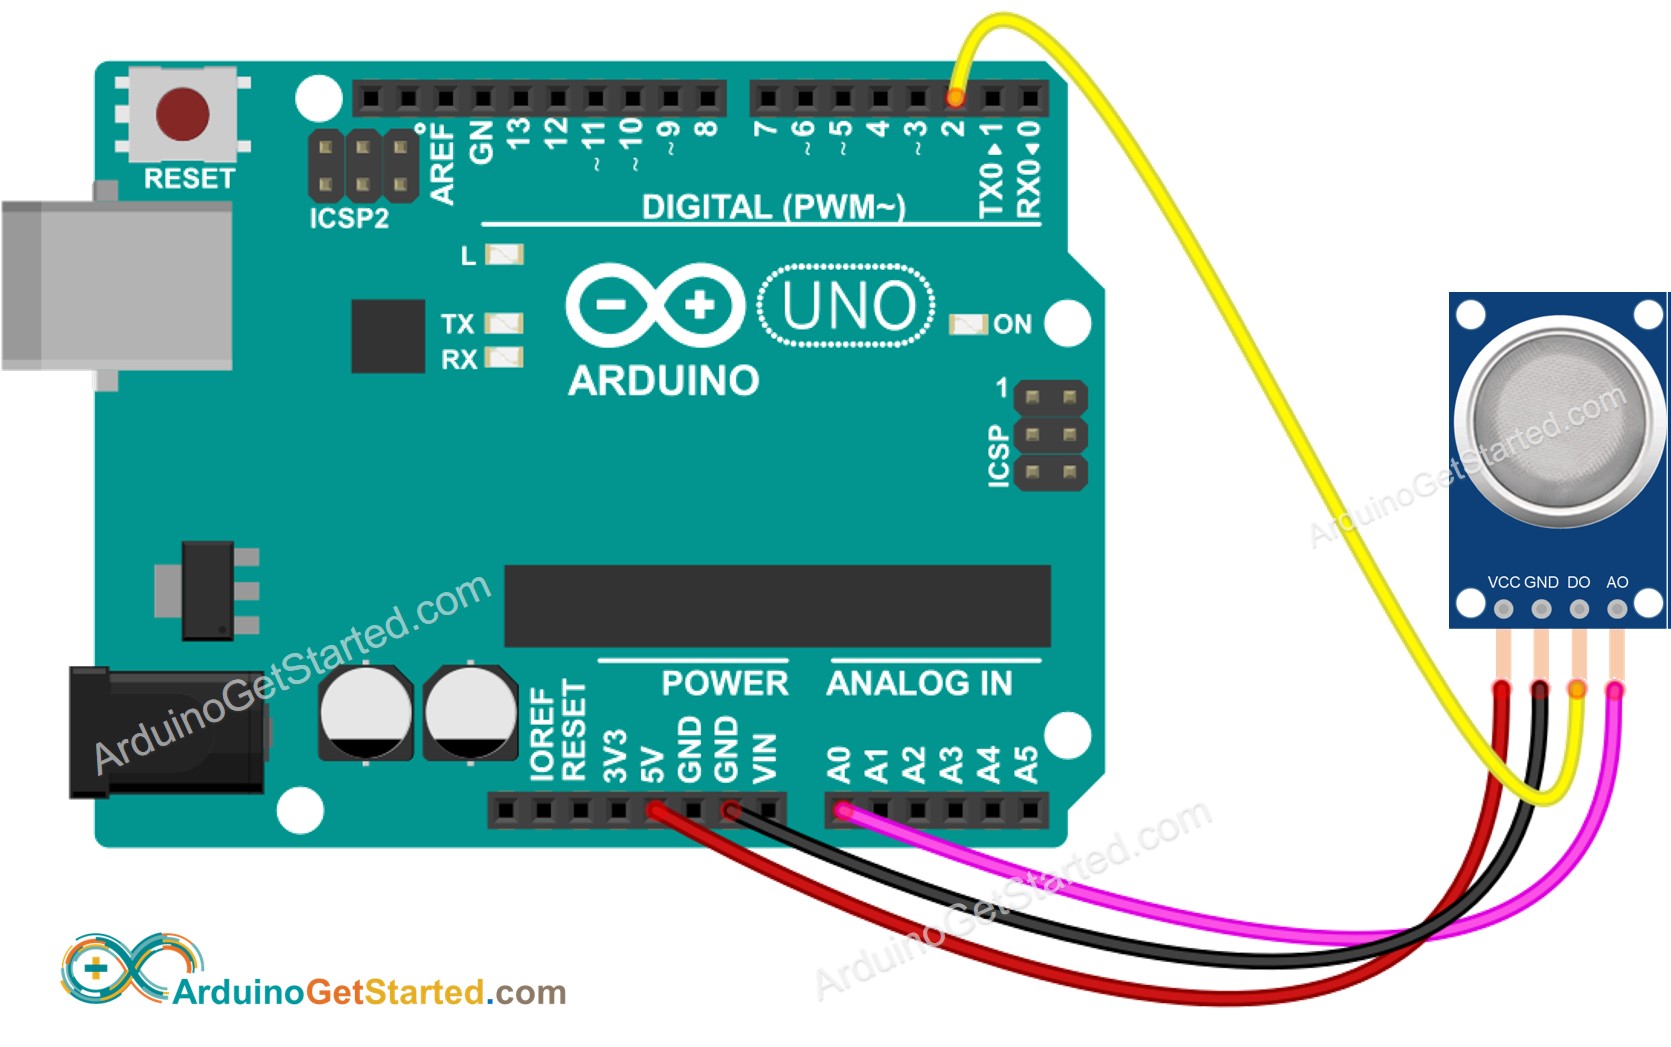
This image is created using Fritzing. Click to enlarge image
Arduino Code - Read value from DO pin
Quick Steps
- Copy the above code and open with Arduino IDE
- Click Upload button on Arduino IDE to upload code to Arduino
- Place the MQ2 gas sensor near the smoke/gas you want to detect
- See the result on Serial Monitor.
Please keep in mind that if you notice the LED status remaining on constantly or off, you can adjust the potentiometer to fine-tune the sensitivity of the sensor.
Arduino Code - Read value from AO pin
Quick Steps
- Copy the above code and open with Arduino IDE
- Click Upload button on Arduino IDE to upload code to Arduino
- Place the MQ2 gas sensor near the smoke/gas you want to detect
- See the result on Serial Monitor.
From values read from DO or AO, you can infer the air quality based on your standard, or trigger an alarm or turn on ventilation systems.
Video Tutorial
We are considering to make the video tutorials. If you think the video tutorials are essential, please subscribe to our YouTube channel to give us motivation for making the videos.