Arduino - LED Matrix via Web
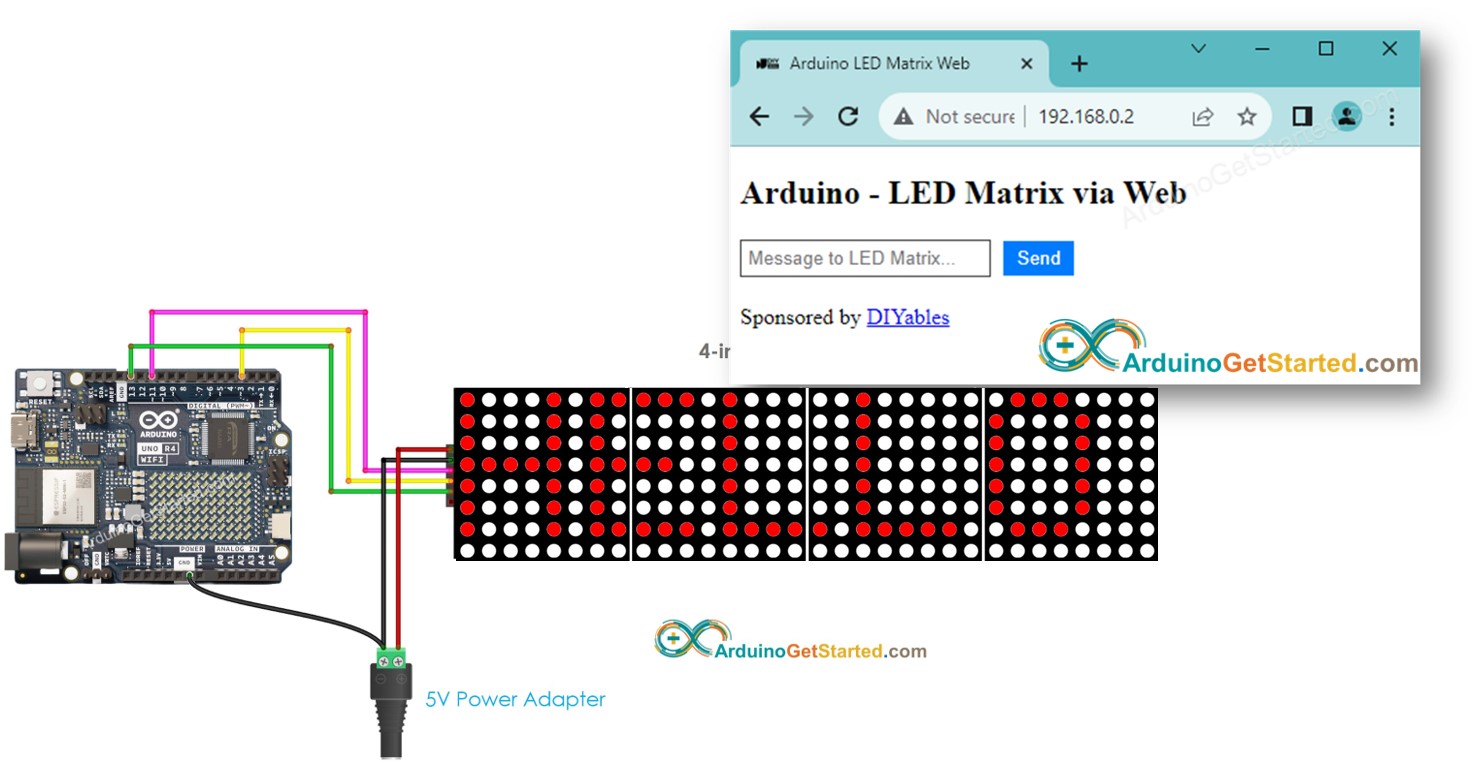
In this tutorial, we are going to learn how to control an LED Matrix through a web interface using a browser on a PC or smartphone, utilizing the Arduino Uno R4 WiFi. In detail, the Arduino Uno R4 WiFi will be programmed to work as a web server. Let's assume that the IP address of the Arduino Uno R4 WiFi is 192.168.0.2. Here are the details of how it works:
- When you enter 192.168.0.2 into the web browser, the browser sends a request to the Arduino, and the Arduino responds with a web page that contains a message box.
- You type a message to the message box and click the send button. The message is sent to Arduino.
- Arduino displays the message on the LED Matrix.
Hardware Required
Or you can buy the following kits:
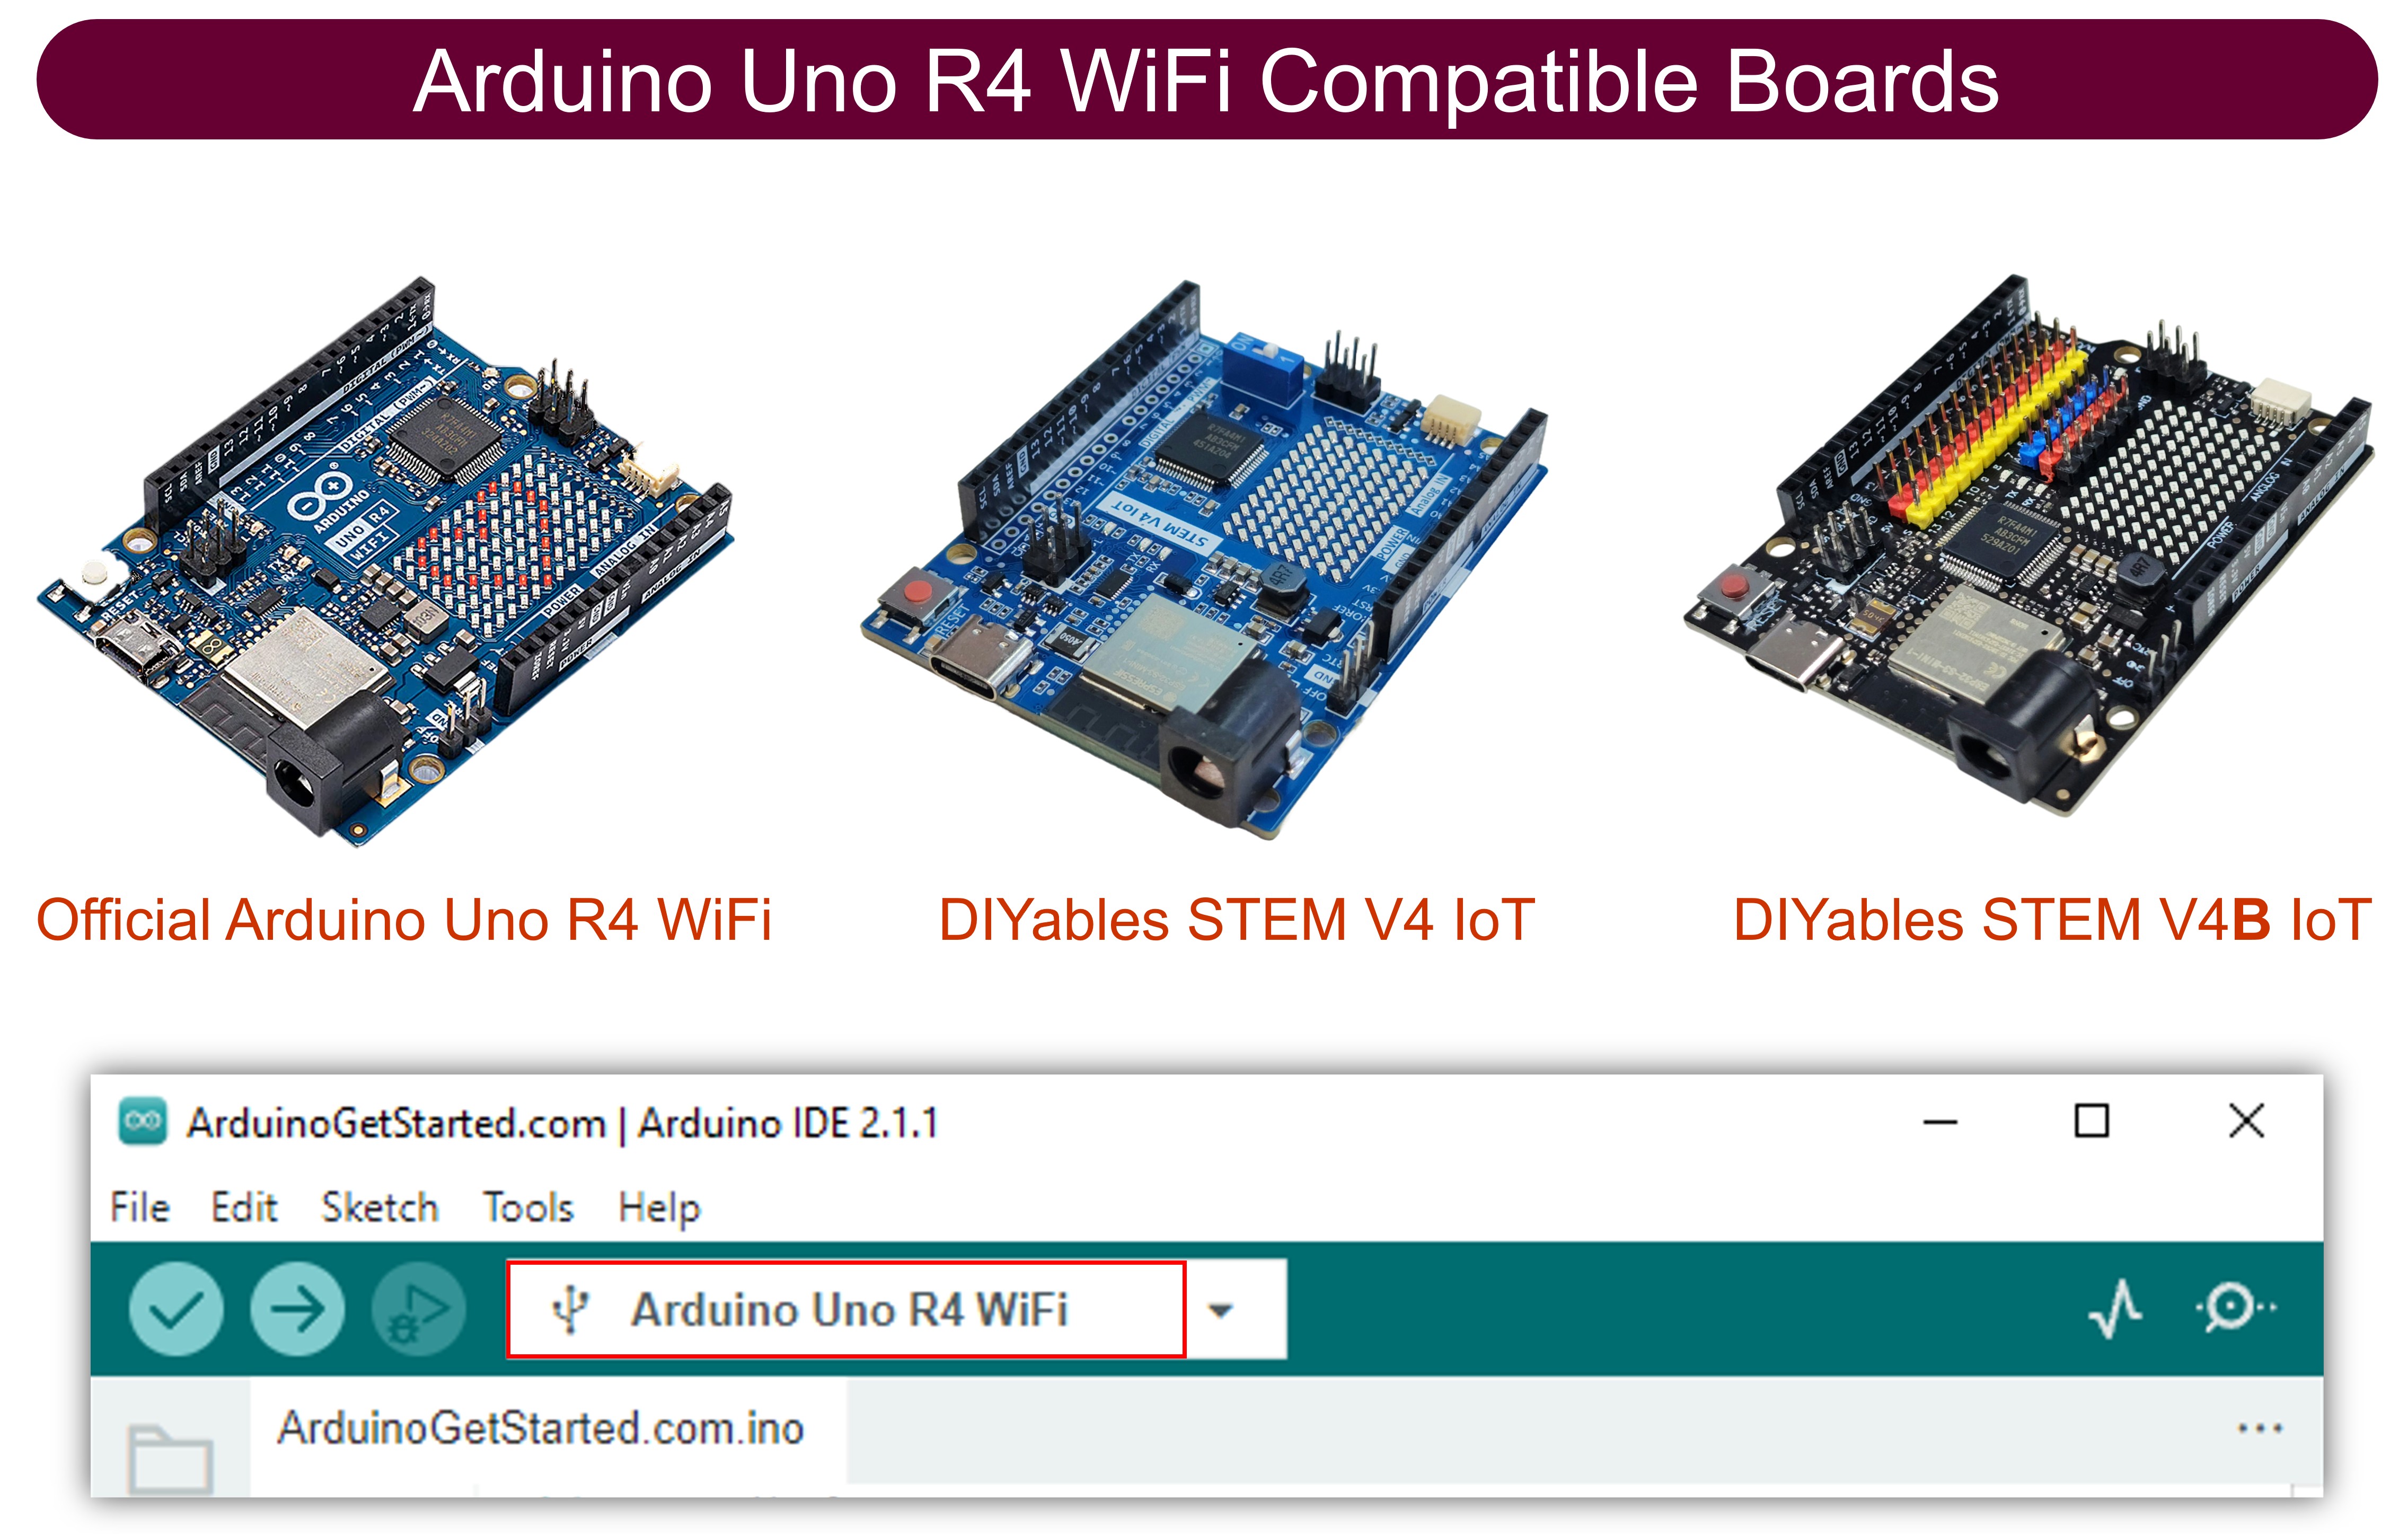
| 1 | × | DIYables STEM V4 IoT Starter Kit (Arduino included) | |
| 1 | × | DIYables Sensor Kit (18 sensors/displays) |
Disclosure: Some links in this section are Amazon affiliate links. If you make a purchase through these links, we may earn a commission at no extra cost to you.
Additionally, some links direct to products from our own brand, DIYables .
Additionally, some links direct to products from our own brand, DIYables .
About LED Matrix and Arduino Uno R4
If you do not know about LED Matrix and Arduino Uno R4 (pinout, how it works, how to program ...), learn about them in the following tutorials:
Wiring Diagram
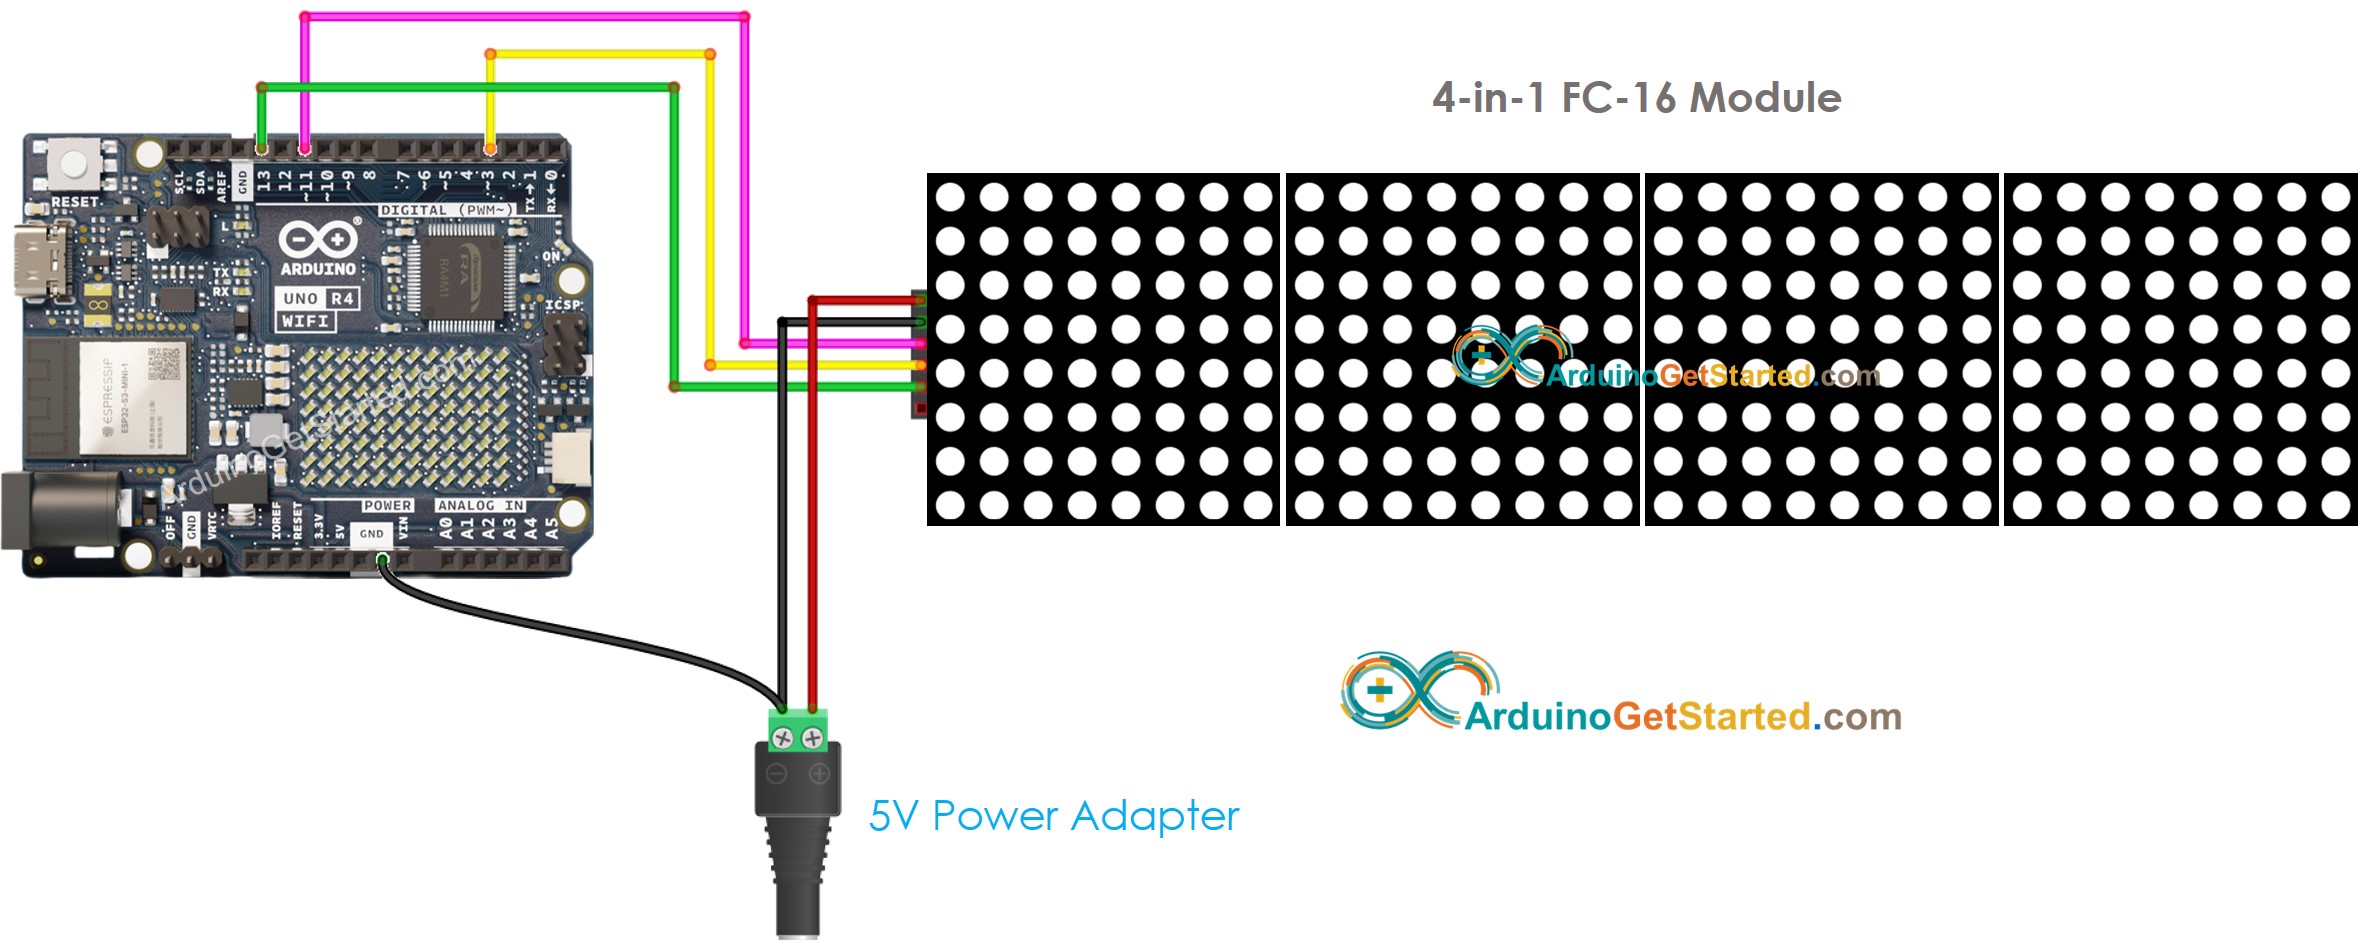
This image is created using Fritzing. Click to enlarge image
Arduino Code
Quick Steps
- If this is the first time you use Arduino Uno R4, see how to setup environment for Arduino Uno R4 on Arduino IDE.
- Open the Arduino IDE.
- Open the Library Manager by clicking on the Library Manager icon on the left side of the Arduino IDE.
- Search for Web Server for Arduino Uno R4 WiFi and locate the Web Server library created by DIYables.
- Click on the Install button to add the Web Server library.

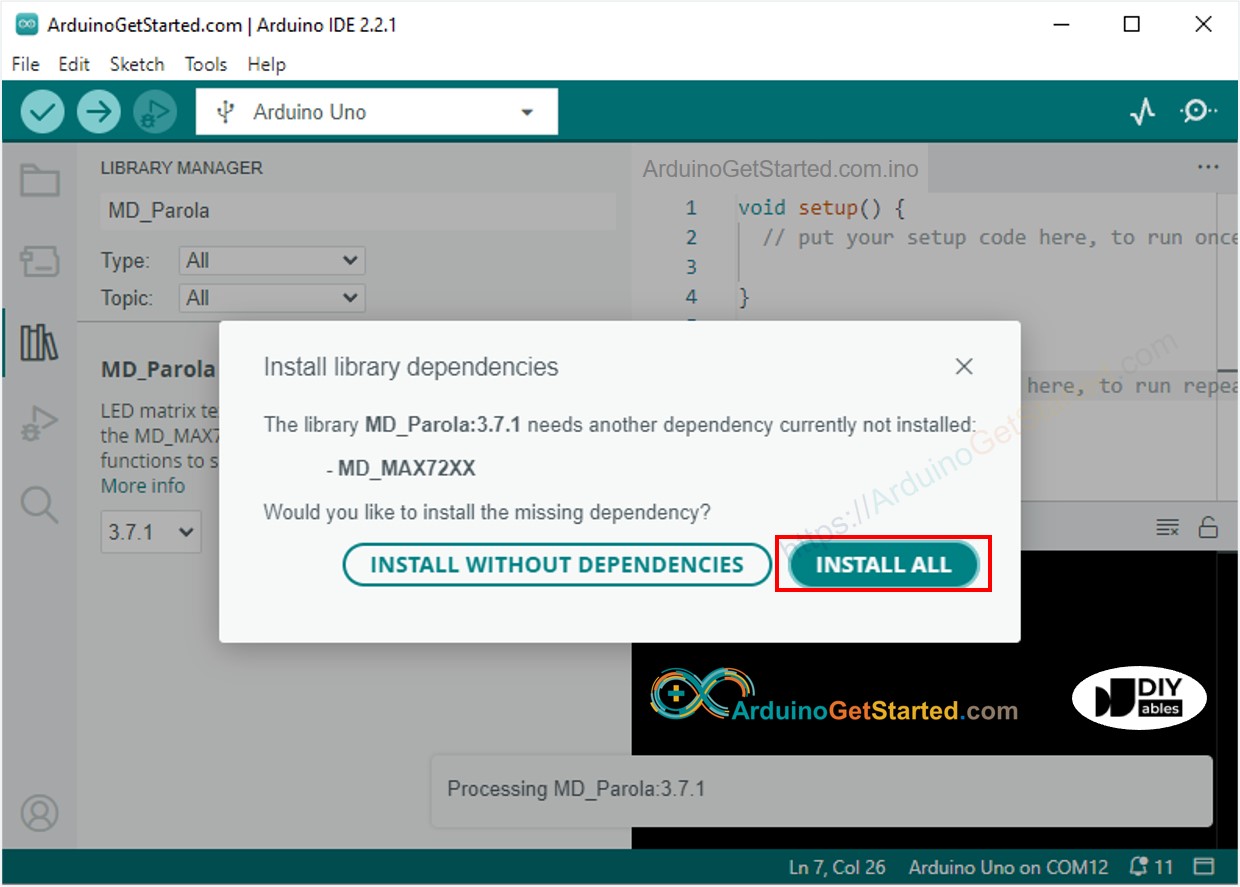
- Search “MD_Parola”, then find the MD_Parola library
- Click Install button.
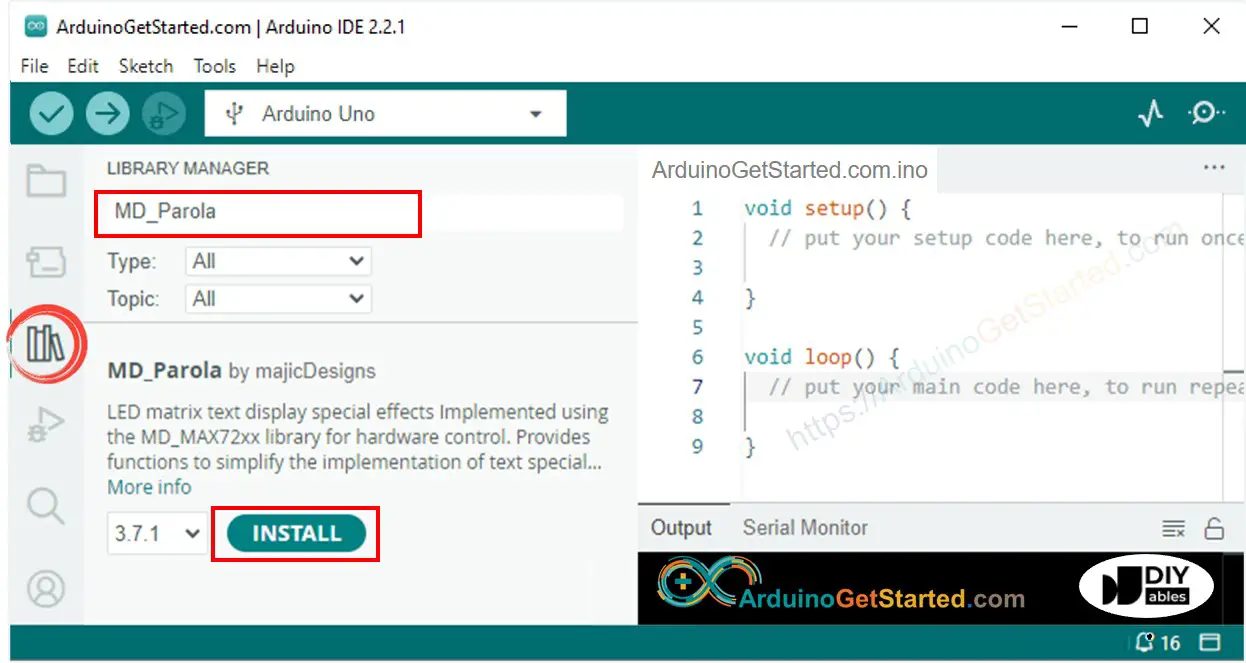
- You will be asked to install the MD_MAX72XX library for dependency. Click Install All button.
- Create a new sketch. Give it a name, for example, ArduinoGetStarted.com.ino.
- Copy the code provided below and paste it to the created file.
/*
* Created by ArduinoGetStarted.com
*
* This example code is in the public domain
*
* Tutorial page: https://arduinogetstarted.com/tutorials/arduino-led-matrix-via-web
*/
#include <UnoR4WiFi_WebServer.h>
#include <MD_Parola.h>
#include <MD_MAX72xx.h>
#include "index.h"
#define HARDWARE_TYPE MD_MAX72XX::FC16_HW
#define MAX_DEVICES 4 // 4 blocks
#define CS_PIN 3
// create an instance of the MD_Parola class
MD_Parola ledMatrix = MD_Parola(HARDWARE_TYPE, CS_PIN, MAX_DEVICES);
// WiFi credentials
const char WIFI_SSID[] = "YOUR_WIFI_SSID"; // change your network SSID (name)
const char WIFI_PASSWORD[] = "YOUR_WIFI_PASSWORD"; // change your network password
// Create web server instance
UnoR4WiFi_WebServer server;
// Handler for LED matrix control
void handleMatrix(WiFiClient& client, const String& method, const String& request, const QueryParams& params, const String& jsonData) {
// Check for message parameter in query string
for (int i = 0; i < params.count; i++) {
if (String(params.params[i].key) == "message") {
String message = params.params[i].value;
Serial.print("message: ");
Serial.println(message);
ledMatrix.displayClear(); // clear led matrix display
ledMatrix.displayScroll(message.c_str(), PA_CENTER, PA_SCROLL_LEFT, 100);
break;
}
}
String html = String(HTML_CONTENT);
server.sendResponse(client, html.c_str());
}
void setup() {
Serial.begin(9600);
delay(1000);
// Initialize LED matrix
ledMatrix.begin(); // initialize the object
ledMatrix.setIntensity(15); // set the brightness of the LED matrix display (from 0 to 15)
ledMatrix.displayClear(); // clear led matrix display
ledMatrix.displayScroll("Hello, DIYables", PA_CENTER, PA_SCROLL_LEFT, 100);
Serial.println("Arduino Uno R4 WiFi - LED Matrix Web Control");
// Connect to WiFi
Serial.print("Connecting to ");
Serial.println(WIFI_SSID);
WiFi.begin(WIFI_SSID, WIFI_PASSWORD);
while (WiFi.status() != WL_CONNECTED) {
delay(500);
Serial.print(".");
}
Serial.println(" connected!");
Serial.print("IP address: ");
Serial.println(WiFi.localIP());
// Configure routes
server.addRoute("/", handleMatrix);
// Start server
server.begin();
Serial.println("\n=== Web Server Ready! ===");
Serial.print("Visit: http://");
Serial.println(WiFi.localIP());
}
void loop() {
server.handleClient();
if (ledMatrix.displayAnimate()) {
ledMatrix.displayReset();
}
}
- Change the WiFi information (SSID and password) in the code to yours
- Create the index.h file On Arduino IDE by:
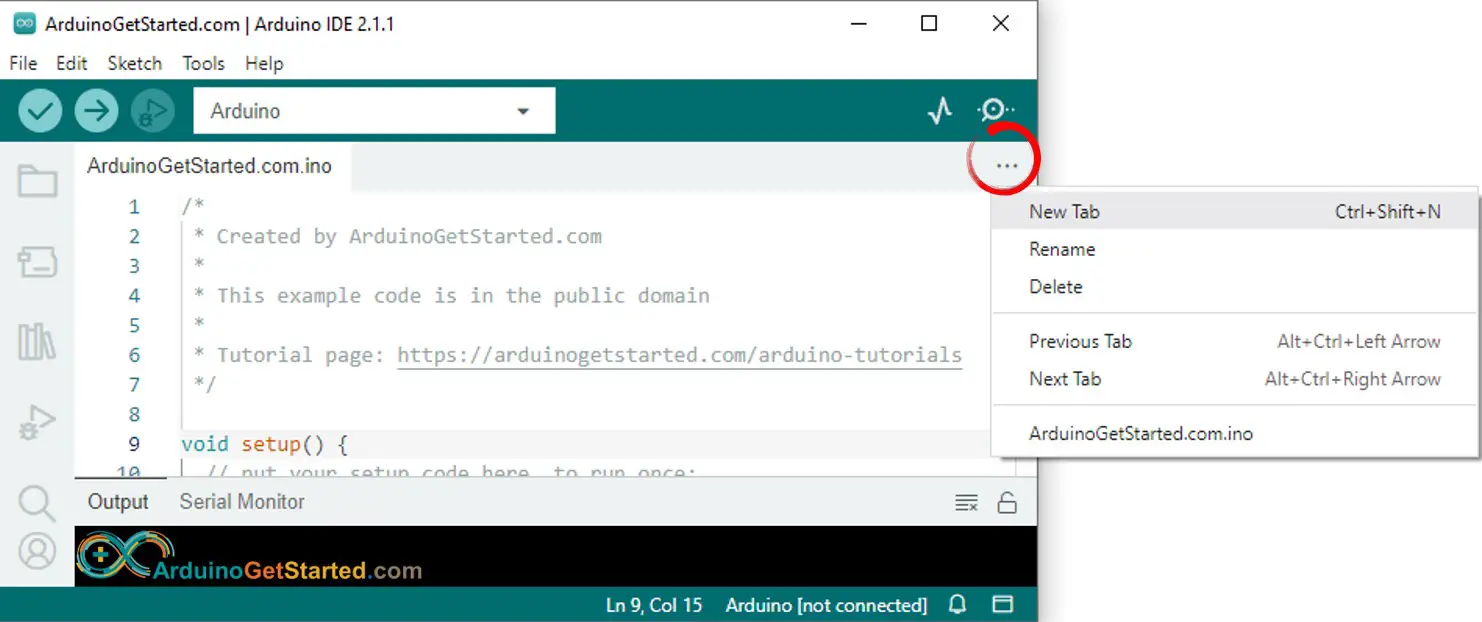
- Either click on the button just below the serial monitor icon and choose New Tab, or use Ctrl+Shift+N keys.
- Give file's name index.h and click OK button
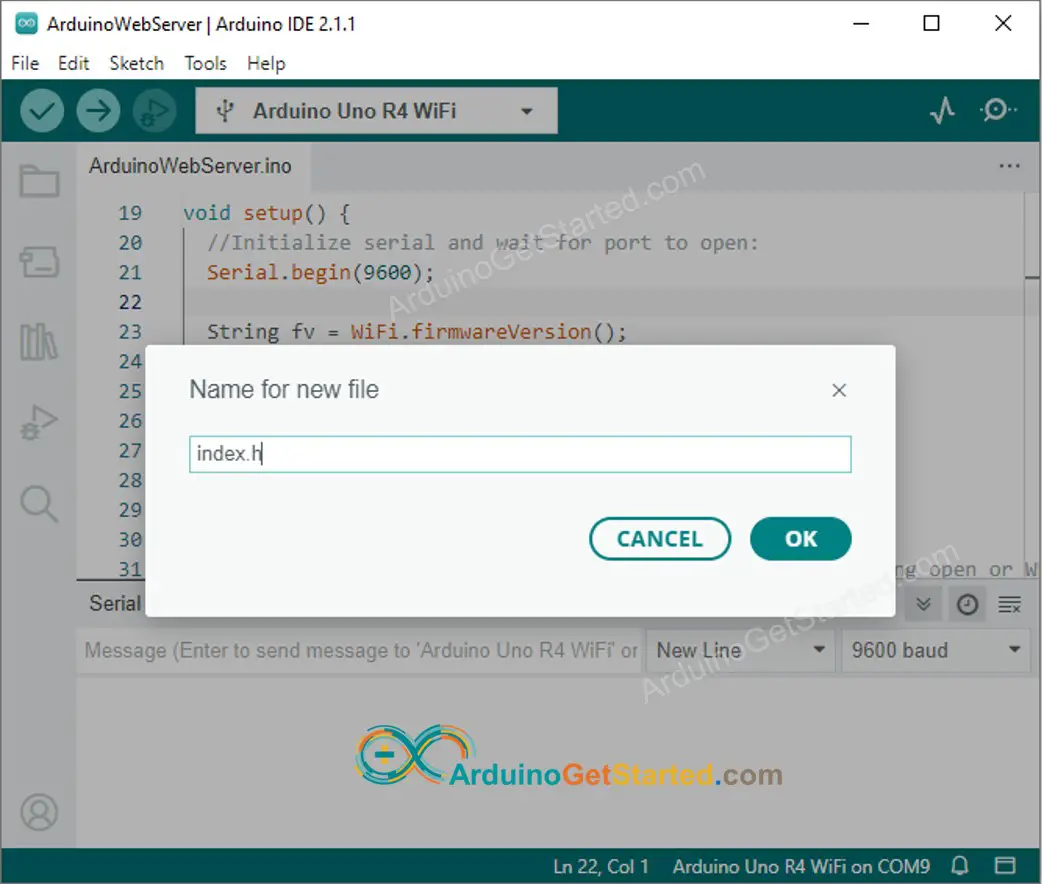
- Copy the below code and paste it to the index.h.
/*
* Created by ArduinoGetStarted.com
*
* This example code is in the public domain
*
* Tutorial page: https://arduinogetstarted.com/tutorials/arduino-led-matrix-via-web
*/
const char *HTML_CONTENT = R"=====(
<!DOCTYPE html>
<html>
<head>
<title>Arduino LED Matrix Web</title>
<meta name="viewport" content="width=device-width, initial-scale=0.7">
<link rel="icon" href="https://diyables.io/images/page/diyables.svg">
<style>
body {
font-size: 16px;
}
.user-input {
margin-bottom: 20px;
}
.user-input input {
flex: 1;
border: 1px solid #444;
padding: 5px;
}
.user-input input[type="submit"] {
margin-left: 5px;
background-color: #007bff;
color: #fff;
border: none;
padding: 5px 10px;
cursor: pointer;
}
</style>
</head>
<body>
<h2>Arduino - LED Matrix via Web</h2>
<form class="user-input" action="" method="GET">
<input type="text" id="message" name="message" placeholder="Message to LED Matrix...">
<input type="submit" value="Send">
</form>
<div class="sponsor">Sponsored by <a href="https://amazon.com/diyables">DIYables</a></div>
</body>
</html>
)=====";
- Now you have the code in two files: ArduinoGetStarted.com.ino and index.h
- Click Upload button on Arduino IDE to upload code to Arduino
- See the result on Serial Monitor.
8
Serial.println("Hello World!");
Message (Enter to send message to 'Arduino Uno' on 'COM15')
New Line
9600 baud
Arduino Uno R4 WiFi - LED Matrix Web Control
Connecting to YOUR_WIFI_SSID
connected!
IP address: 192.168.0.254
Starting web server on IP: 192.168.0.254
=== Web Server Ready! ===
Visit: http://192.168.0.254
- You will see an IP address, for example: 192.168.0.254. This is the IP address of the Arduino Web Server
- Open a web browser and enter one of the IP address into the address bar.
- Kindly be aware that the IP address might vary. Please verify the current value on the Serial Monitor.
- You will also see the below output on Serial Monitor
8
Serial.println("Hello World!");
Message (Enter to send message to 'Arduino Uno' on 'COM15')
New Line
9600 baud
Arduino Uno R4 WiFi - LED Matrix Web Control
Connecting to YOUR_WIFI_SSID
connected!
IP address: 192.168.0.254
Starting web server on IP: 192.168.0.254
=== Web Server Ready! ===
Visit: http://192.168.0.254
Method: GET
Requested path: /
Query param: message=Hello
message: Hello
Client disconnected
- You will see the web page of Arduino board on the web browser as below
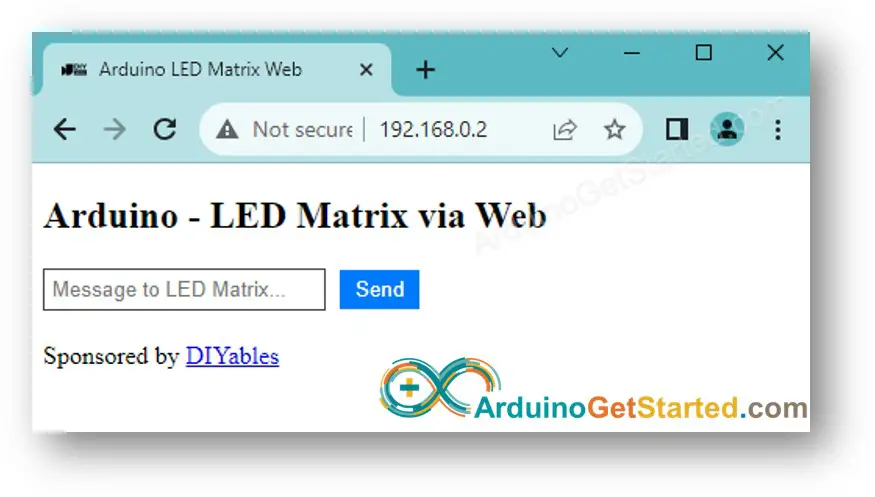
- Type a message and click the send button to send the message to Arduino.
- Check out the LED Matrix display.
※ NOTE THAT:
- If alterations are made to the HTML content within the index.h file without any modifications to the ArduinoGetStarted.com.ino file, the Arduino IDE will not automatically refresh or update the HTML content during the compilation and upload of the code to the ESP32.
- To compel the Arduino IDE to update the HTML content in such a scenario, it is necessary to make a modification in the ArduinoGetStarted.com.ino file. For instance, you can add an empty line or insert a comment. This action prompts the IDE to acknowledge the changes in the project, ensuring that the revised HTML content is included in the upload.