Arduino - LED - Fade
In this tutorial, we are going to learn:
- Arduino fades LED by using delay() function
- Arduino fades LED by using millis() function
- Arduino fades LED by using ezLED library
※ NOTE THAT:
This tutorial provides in-depth knowledge that helps you understand the working principle. To make it easy, you can use Arduino - LED library.
Hardware Required
Or you can buy the following kits:
| 1 | × | DIYables STEM V3 Starter Kit (Arduino included) | |
| 1 | × | DIYables Sensor Kit (30 sensors/displays) | |
| 1 | × | DIYables Sensor Kit (18 sensors/displays) |
Additionally, some links direct to products from our own brand, DIYables .
Buy Note: To simplify the wiring process, we recommend using the LED Module, which comes with a built-in resistor.
About LED
Pinout
LED includes two pins:
- Cathode(-) pin: needs to be connected to GND (0V)
- Anode(+) pin: is used to control LED's state

How It Works
After connecting the cathode(-) to GND:
- If connecting GND to the anode(+), LED is OFF.
- If connecting VCC to the anode(+), LED is ON.
- If generating a PWM signal to the anode(+), the brightness of LED is changed according to PWM value. PWM value varies from 0 to 255. The bigger PWM value is, the brighter LED is. The smaller PWM value is, the darker LED is.
- If PWM value is 0, it is equivalent to GND, therefore, LED is OFF
- If PWM value is 255, it is equivalent to VCC, therefore, LED is fully ON
※ NOTE THAT:
For most of LED, it needs to use a resistor between the anode(+) and VCC. The value of the resistor depends on the specification of LED.
Arduino - fade LED
Some of Arduino pins can be programmed to generate PWM signal. We can fade LED by connecting LED's anode(+) pin to an Arduino's pin, LED's cathode(-) to GND, and programming generate PWM on the Arduino's pin.
Wiring Diagram
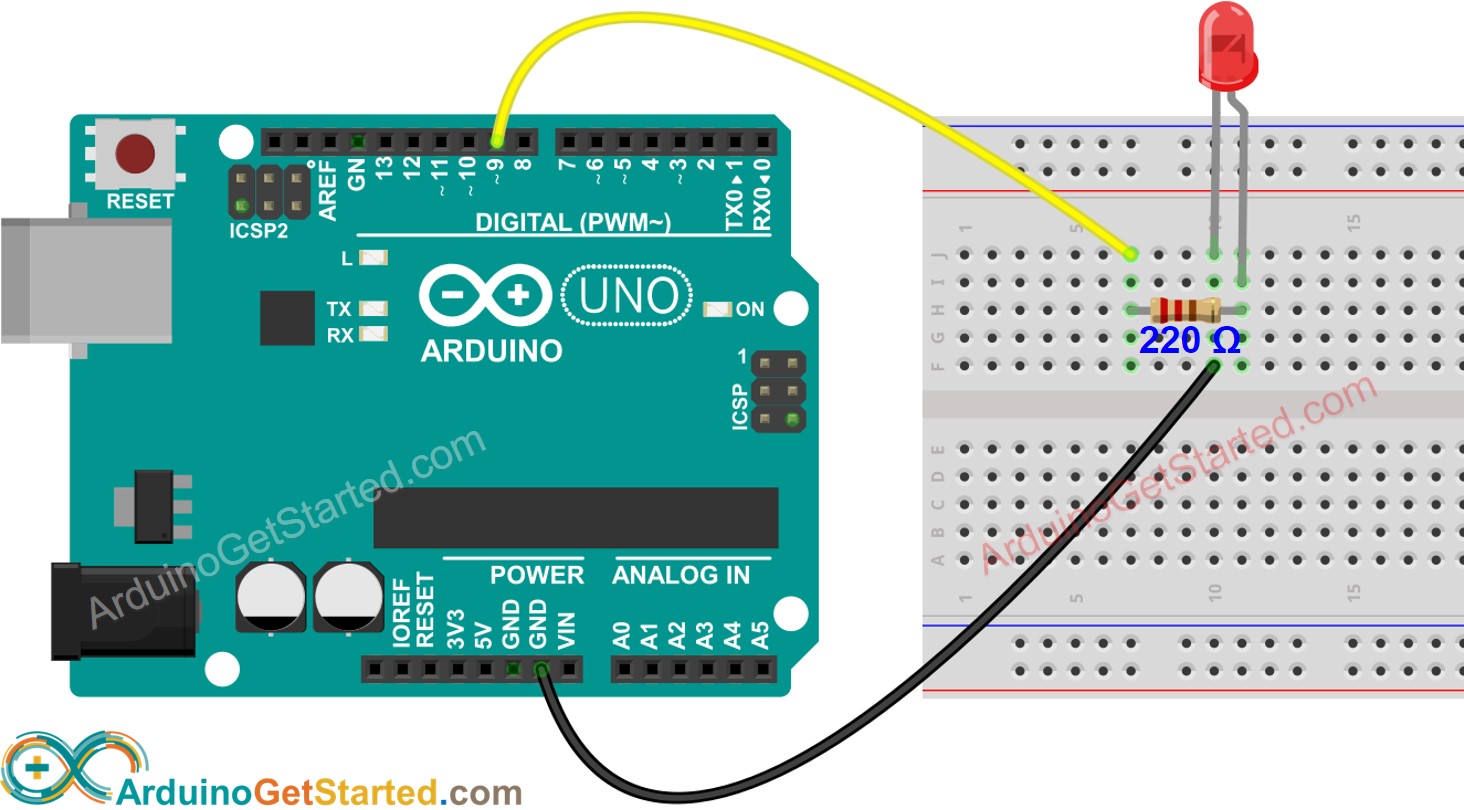
This image is created using Fritzing. Click to enlarge image
How To Program
- Configure an Arduino's pin to the digital output mode by using pinMode() function. For example, pin 9:
- Set brightness of LED by generating the corresponding PWM signal by using analogWrite() function:
Where the brightness is a value from 0 to 255.
Arduino Code - Fade Example from Arduino IDE
Quick Steps
- Connect Arduino to PC via USB cable
- Open Arduino IDE, select the right board and port
- Copy the below code and paste it to the Arduino IDE
- Click Upload button on Arduino IDE to upload code to Arduino

- See the brightness of LED
Code Explanation
Read the line-by-line explanation in comment lines of code!
How to fade-out LED in a period without using delay()
How to fade-in LED in a period without using delay()
Video Tutorial
We are considering to make the video tutorials. If you think the video tutorials are essential, please subscribe to our YouTube channel to give us motivation for making the videos.
Challenge Yourself
Change the brightness of LED using potentiometer . Hint: Refer to Arduino - Potentiometer.
Additional Knowledge
- PWM signal generated by analogWrite() function fades a LED. That is because it's high-frequency PWM. If we create a customized function (required advanced knowledge), which generates low-frequency PWM signal, LED will be blinked instead of faded.
- Summary: PWM signal can be used in Arduino to: control servo motor, control DC motor, make sound using a piezo buzzer, fade LED, blink LED ...