Arduino - MQ3 Alcohol Sensor
This tutorial demonstrates interfacing an MQ3 alcohol sensor with Arduino to monitor ethanol and alcohol vapor levels in your environment. The MQ3 sensor finds widespread use in DIY breathalyzer devices, alcohol detection alarms, and air quality monitoring projects.
You'll discover:
- Wiring the MQ3 alcohol sensor module to your Arduino board
- Writing Arduino code to measure and interpret alcohol concentration values
Hardware Required
Or you can buy the following kits:
| 1 | × | DIYables STEM V3 Starter Kit (Arduino included) | |
| 1 | × | DIYables Sensor Kit (18 sensors/displays) |
Additionally, some links direct to products from our own brand, DIYables .
About MQ3 Alcohol Sensor
Operating as a Chemiresistor, the MQ3 is a Metal Oxide Semiconductor (MOS) device that identifies alcohol presence through resistance changes in its sensing material. This module excels at detecting ethanol vapor with high sensitivity across a range of concentrations.
At its core, the sensor employs a Tin Dioxide (SnO2) layer deposited onto an Aluminum Oxide ceramic base. Heating activates the SnO2, making it responsive to alcohol molecules. A stainless steel protective mesh (anti-explosion screen) surrounds the sensor, shielding the heating element while permitting gas molecules to pass through to the detection chamber.
Popular uses for this sensor span breathalyzer construction, DUI detection equipment, alcohol warning systems, and environmental alcohol monitoring applications.
Technical Specifications
- Operating Voltage: 5V DC
- Load Resistance: 200 KΩ
- Heater Resistance: 33Ω ± 5%
- Heating Consumption: < 800mW
- Sensing Resistance: 1 MΩ – 8 MΩ
- Detection Range: 25 – 500 ppm (parts per million)
- Preheat Time: 24-48 hours for first use
Understanding ppm: The abbreviation ppm stands for parts-per-million, representing the ratio of target gas molecules to total molecules. In practical terms, a reading of 500 ppm indicates 500 alcohol molecules exist among every 1,000,000 total gas molecules, with the remaining 999,500 being other atmospheric gases.
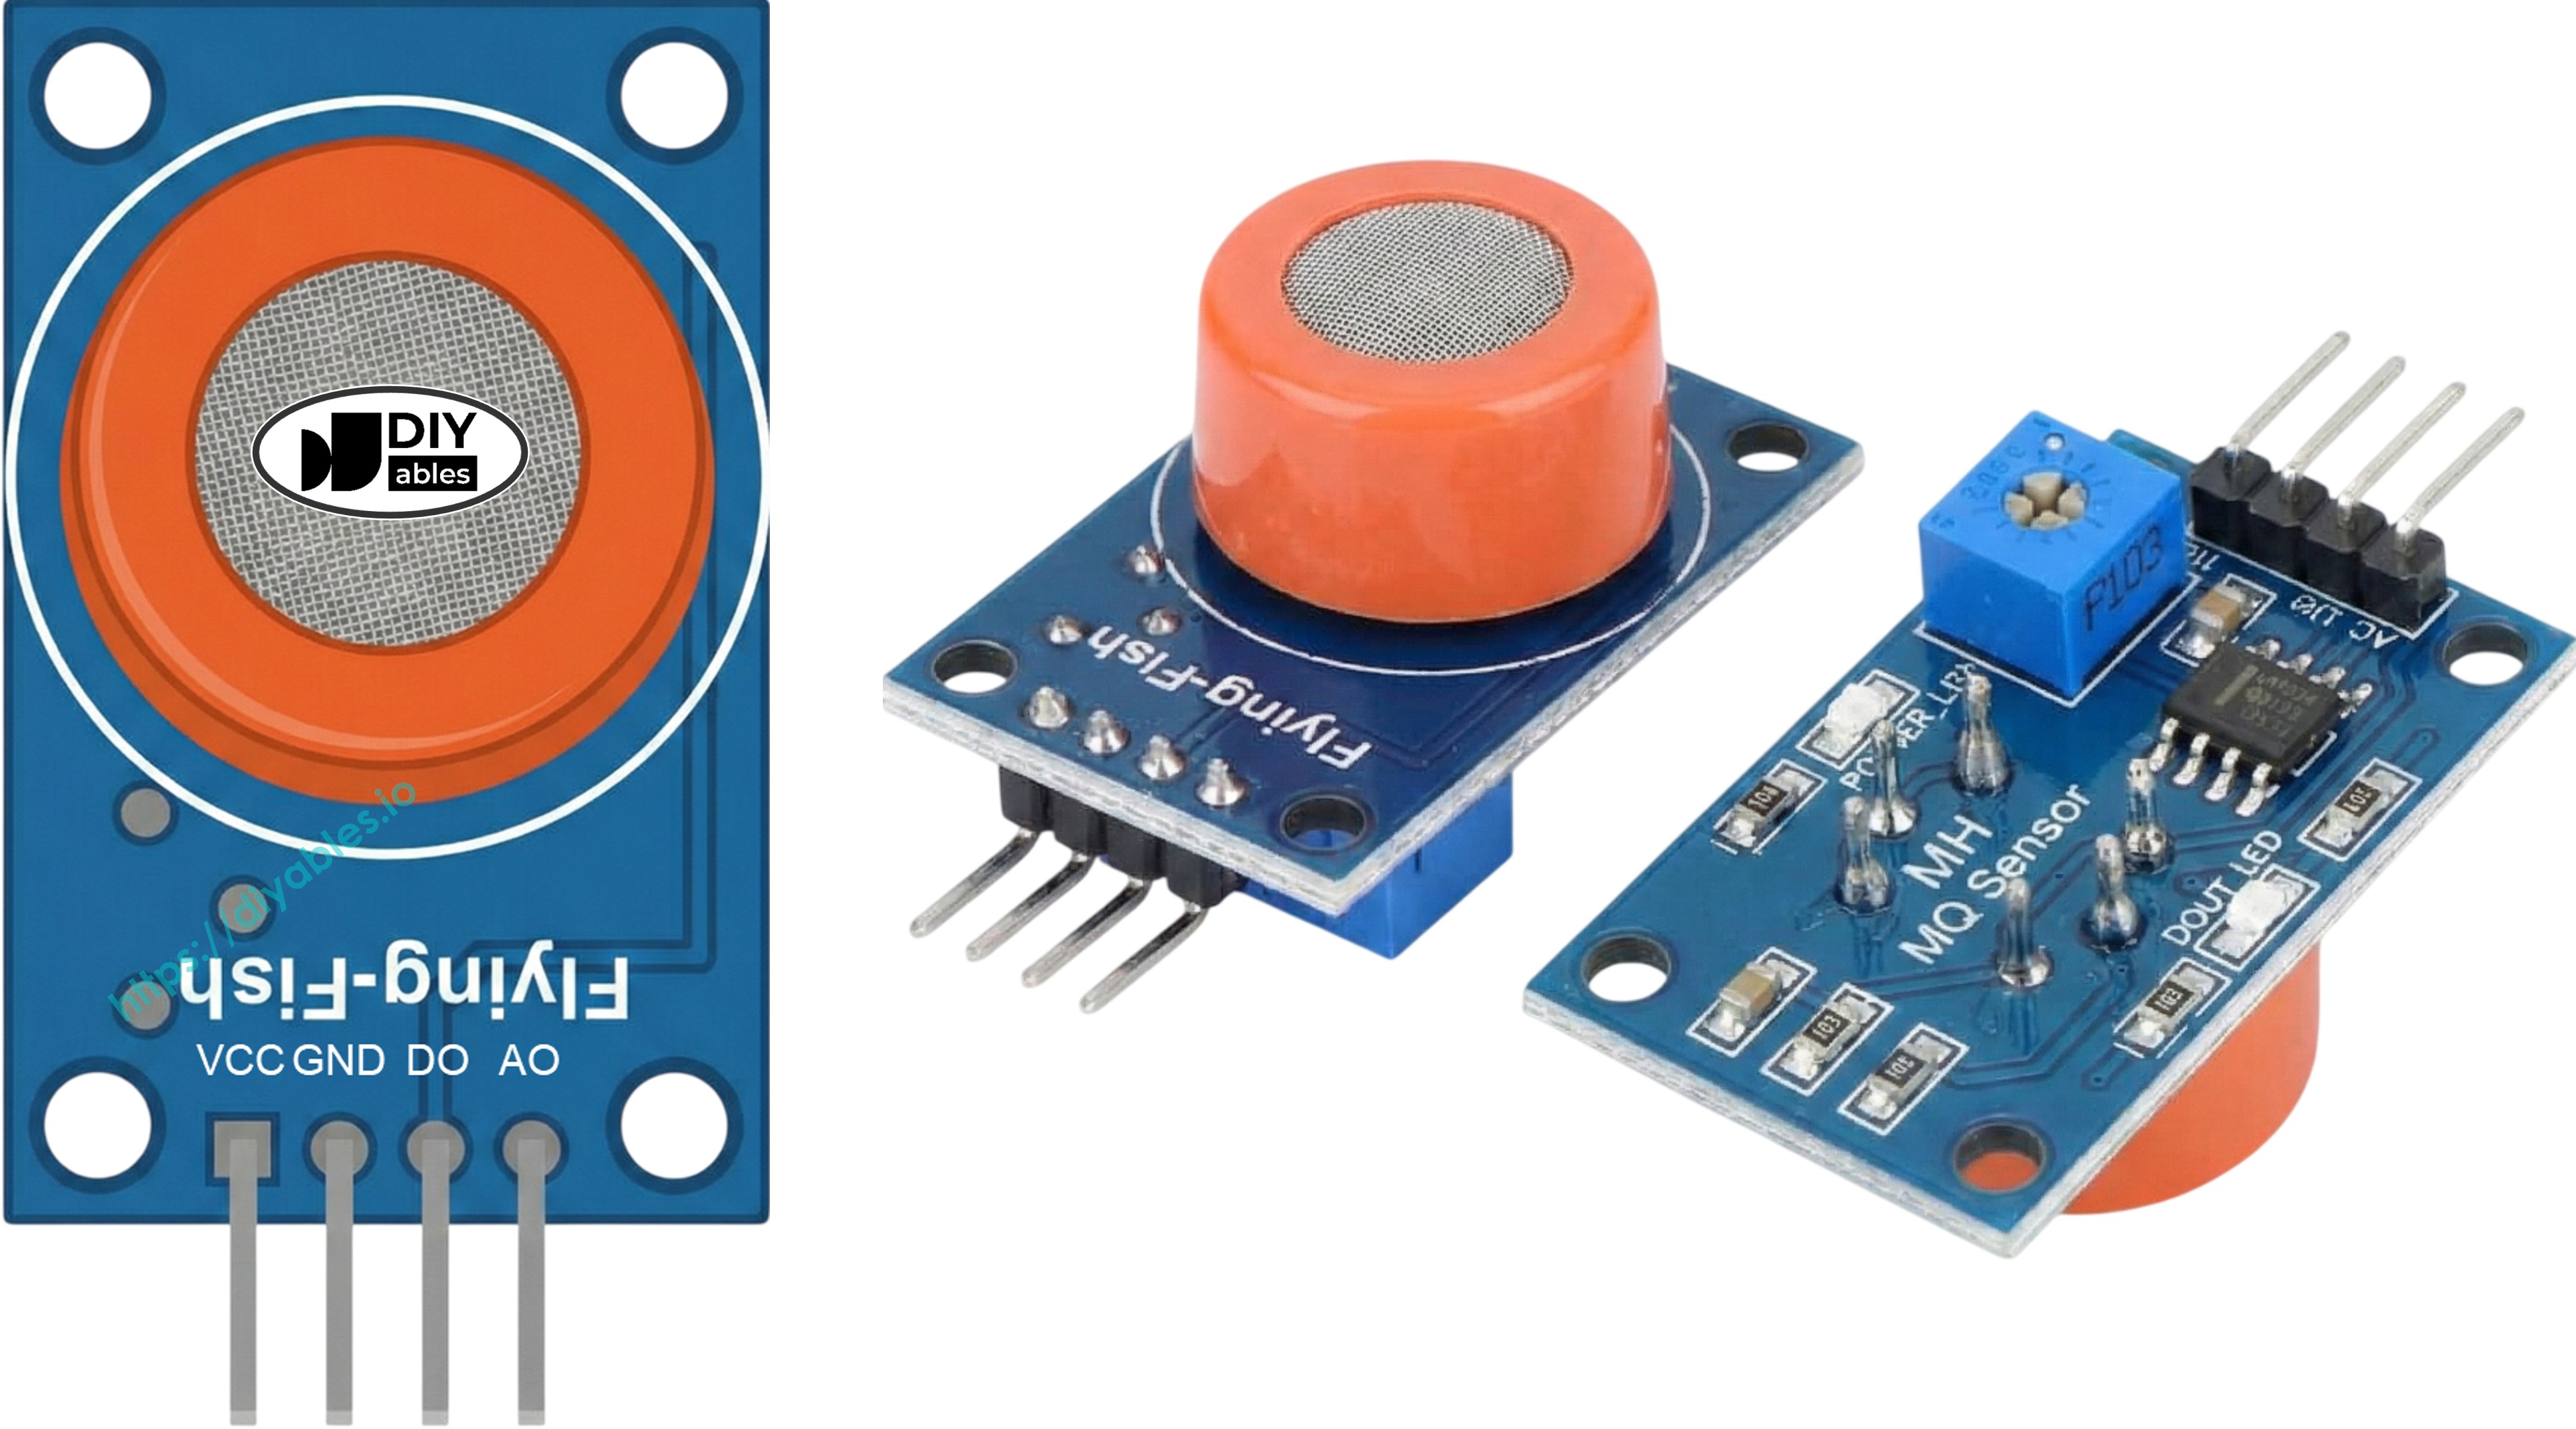
Pinout
Four connection pins are available on the MQ3 sensor module:
- VCC pin: Supply +5V power through this connection.
- GND pin: Connect to ground (0V).
- DO pin: Digital output that goes LOW upon detecting alcohol above the threshold, or HIGH when below. The onboard potentiometer allows threshold adjustment.
- AO pin: Analog output providing variable voltage corresponding to alcohol levels. Increased alcohol produces increased voltage output.
Two indicator LEDs provide visual feedback:
- PWR-LED: Illuminates when power is supplied to the module.
- DO-LED: Reflects the digital output state—lighting up during alcohol detection and remaining off otherwise.
How It Works
The MQ3's detection mechanism relies on resistance variations within its Tin Dioxide (SnO2) semiconductor element:
Clean air conditions: Heat applied to the SnO2 causes oxygen to bind to its surface, trapping electrons and creating a depletion layer. This electron trap generates a barrier that restricts electrical conductivity, keeping resistance high.
Alcohol exposure: Alcohol molecules interact with surface oxygen, breaking the oxygen bonds and liberating trapped electrons back into the tin dioxide structure. This increases conductivity significantly—greater alcohol concentration means lower electrical resistance.
Two output modes are available from this sensor:
Digital Output (DO pin):
- An adjustable potentiometer sets the detection threshold level.
- When detected alcohol surpasses the threshold setting, DO outputs LOW while the LED indicator illuminates.
- When alcohol remains below the threshold, DO stays HIGH and the LED stays dark.
Analog Output (AO pin):
- Voltage output correlates directly with detected alcohol levels.
- More alcohol vapor present = higher voltage reading.
- Less alcohol vapor present = lower voltage reading.
- Note: The potentiometer adjustment only affects the digital output, not the analog signal.
Warm-up and Calibration
Pre-heating Requirements
Accurate measurements from the MQ3 require proper heating before operation:
- Initial use or extended storage (30+ days): Allow 24-48 hours of continuous heating for sensor stabilization and reliable measurements.
- Regular use: A brief 5-10 minute warm-up suffices. Initial readings may appear elevated but will normalize quickly.
To warm the sensor, simply connect VCC and GND to a 5V power supply or directly to your Arduino's power pins, maintaining the connection throughout the warm-up duration.
Finding Your Threshold Values
Extended storage can cause calibration drift in heater-based sensors like the MQ3. Establish accurate threshold values for breathalyzer applications by following this procedure:
- Establish clean air baseline: Operate the sensor in fresh air and note the analog output (expect values near 100-150).
- Introduce alcohol vapor: Hold isopropyl alcohol or hand sanitizer near (not on) the sensor, allowing only vapors to reach it. Record the elevated readings (commonly 400-900 based on vapor density).
- Define detection zones: Use your recorded values to establish ranges:
- No intoxication: Readings under baseline + 20 (example: < 120)
- Moderate consumption: Mid-range values (example: 120-400)
- High intoxication: Readings exceeding moderate threshold (example: > 400)
Important: Sensor characteristics vary between units and environments. Always perform calibration with your specific hardware before deployment.
Setting the Digital Threshold
Configure the DO pin's trigger point via the onboard trim potentiometer:
- Position alcohol vapor near the sensor.
- Rotate the potentiometer clockwise until you see the LED activate.
- Slowly turn counterclockwise until the LED just deactivates.
- The trigger threshold is now properly calibrated.
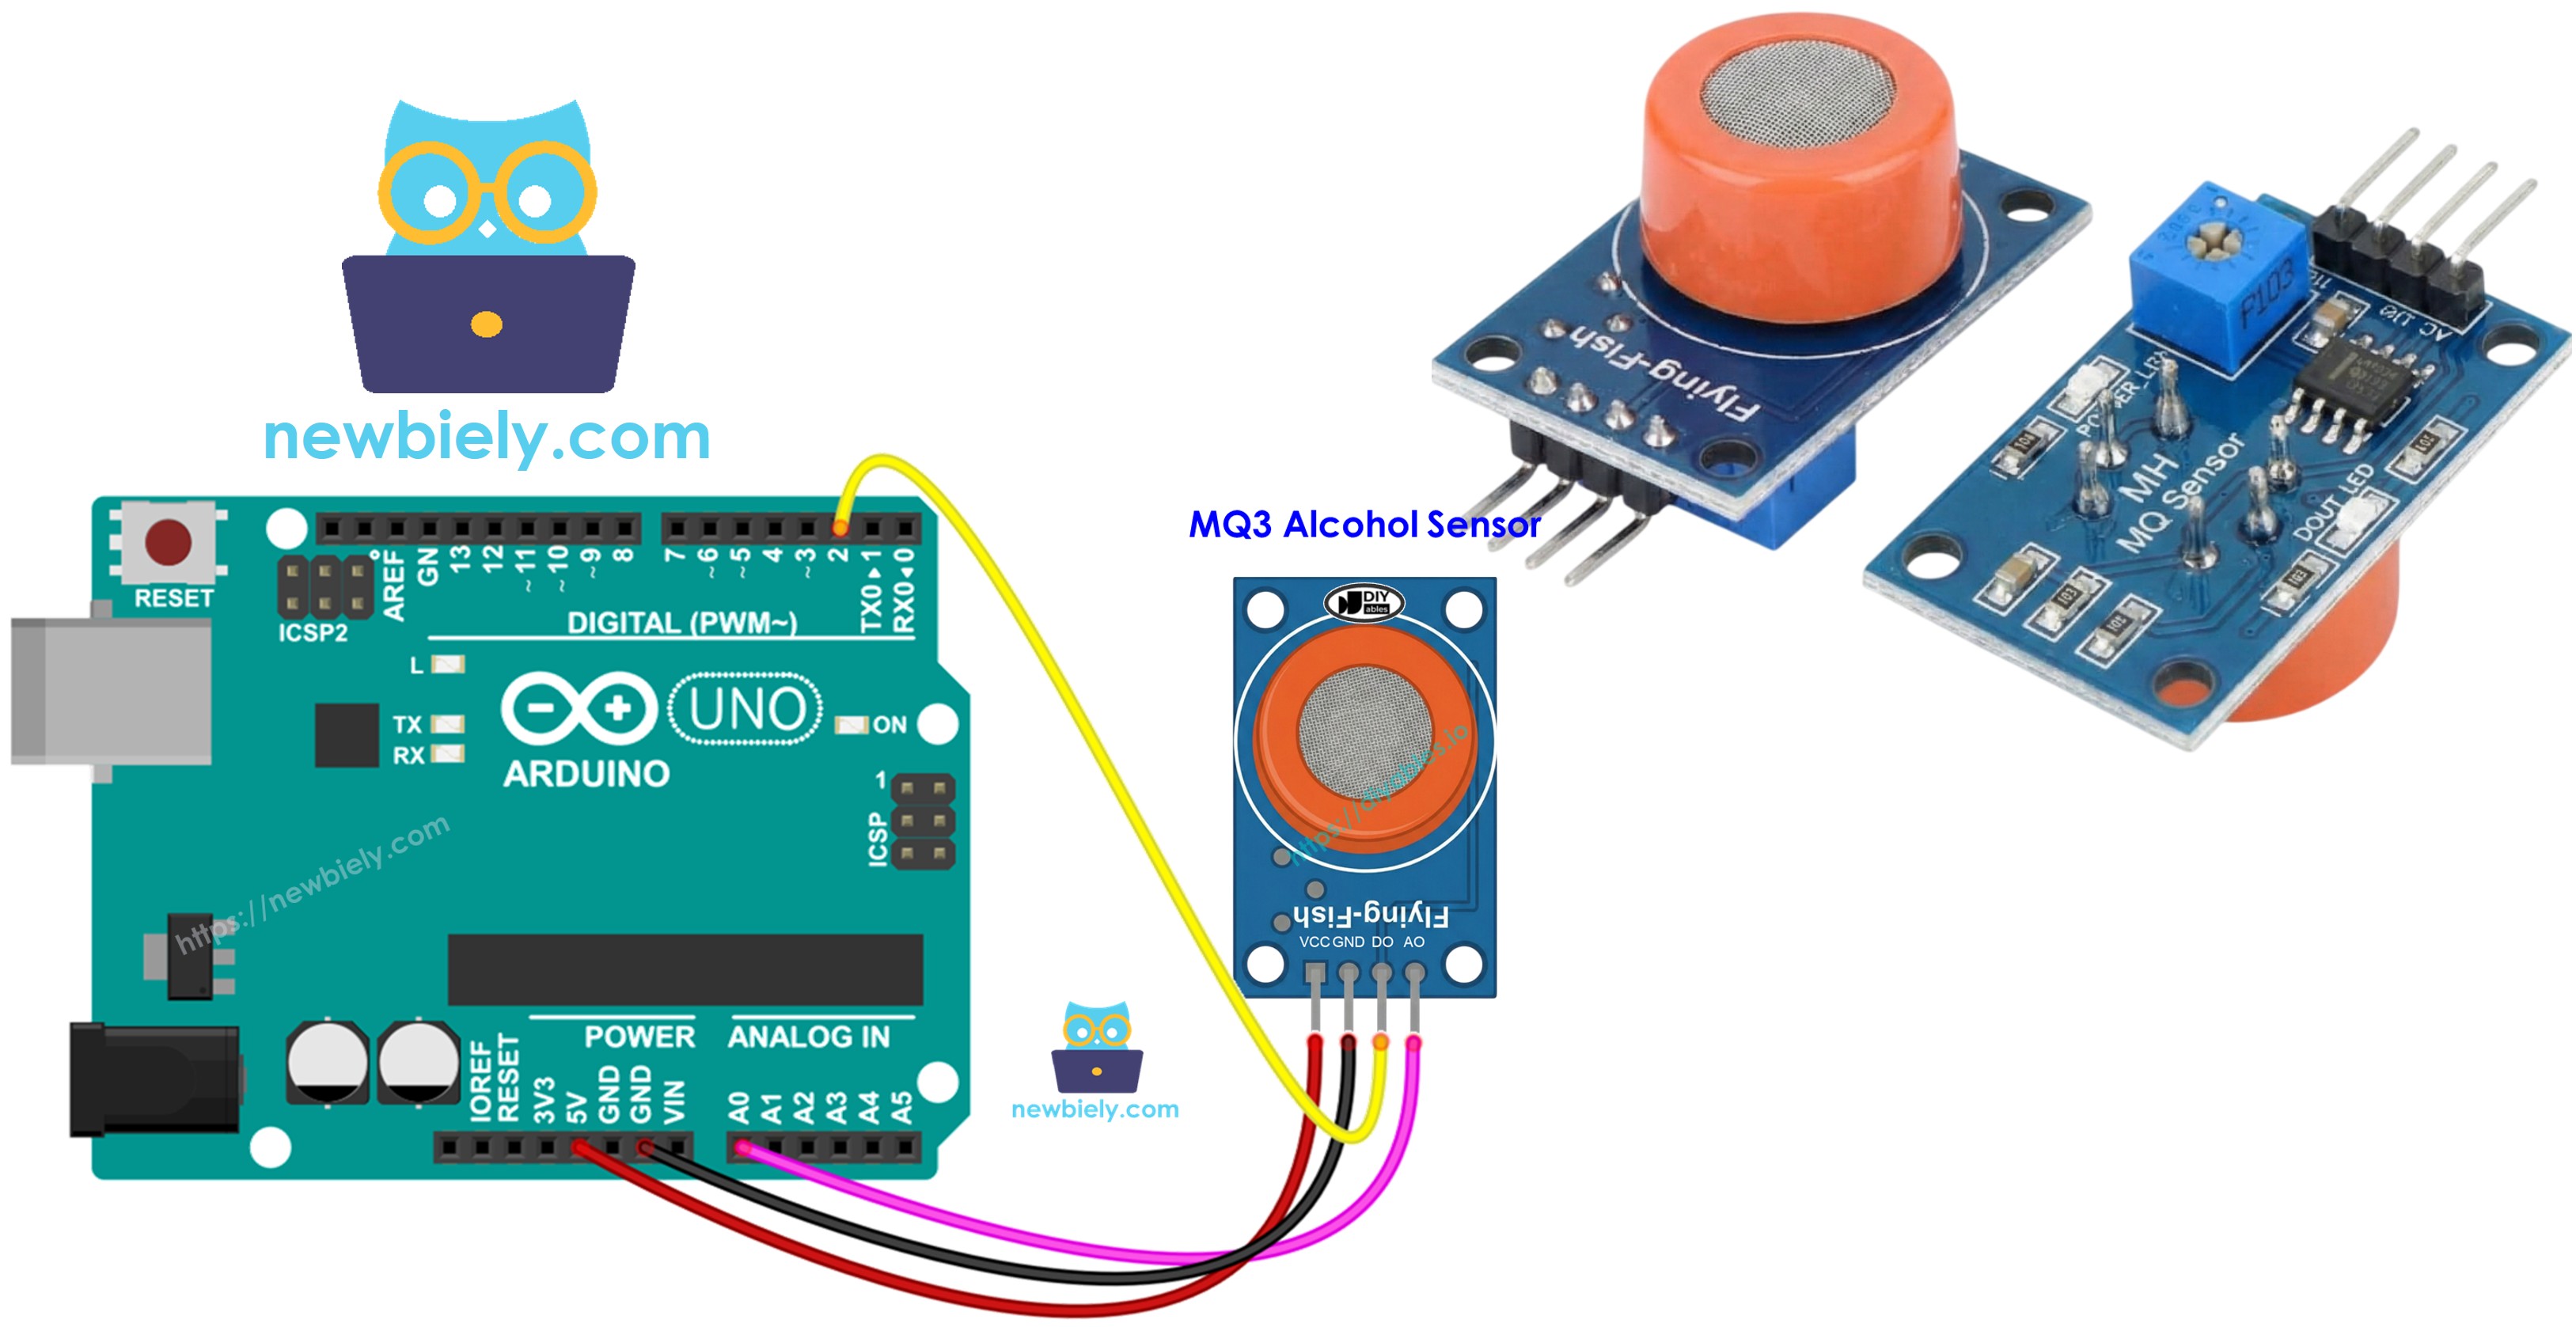
Wiring Diagram
Both output pins are available on the MQ3 module. Select either one or use both simultaneously based on your project requirements.
| MQ3 Alcohol Sensor | Arduino |
|---|---|
| VCC | 5V |
| GND | GND |
| DO | Pin 2 |
| AO | A0 |
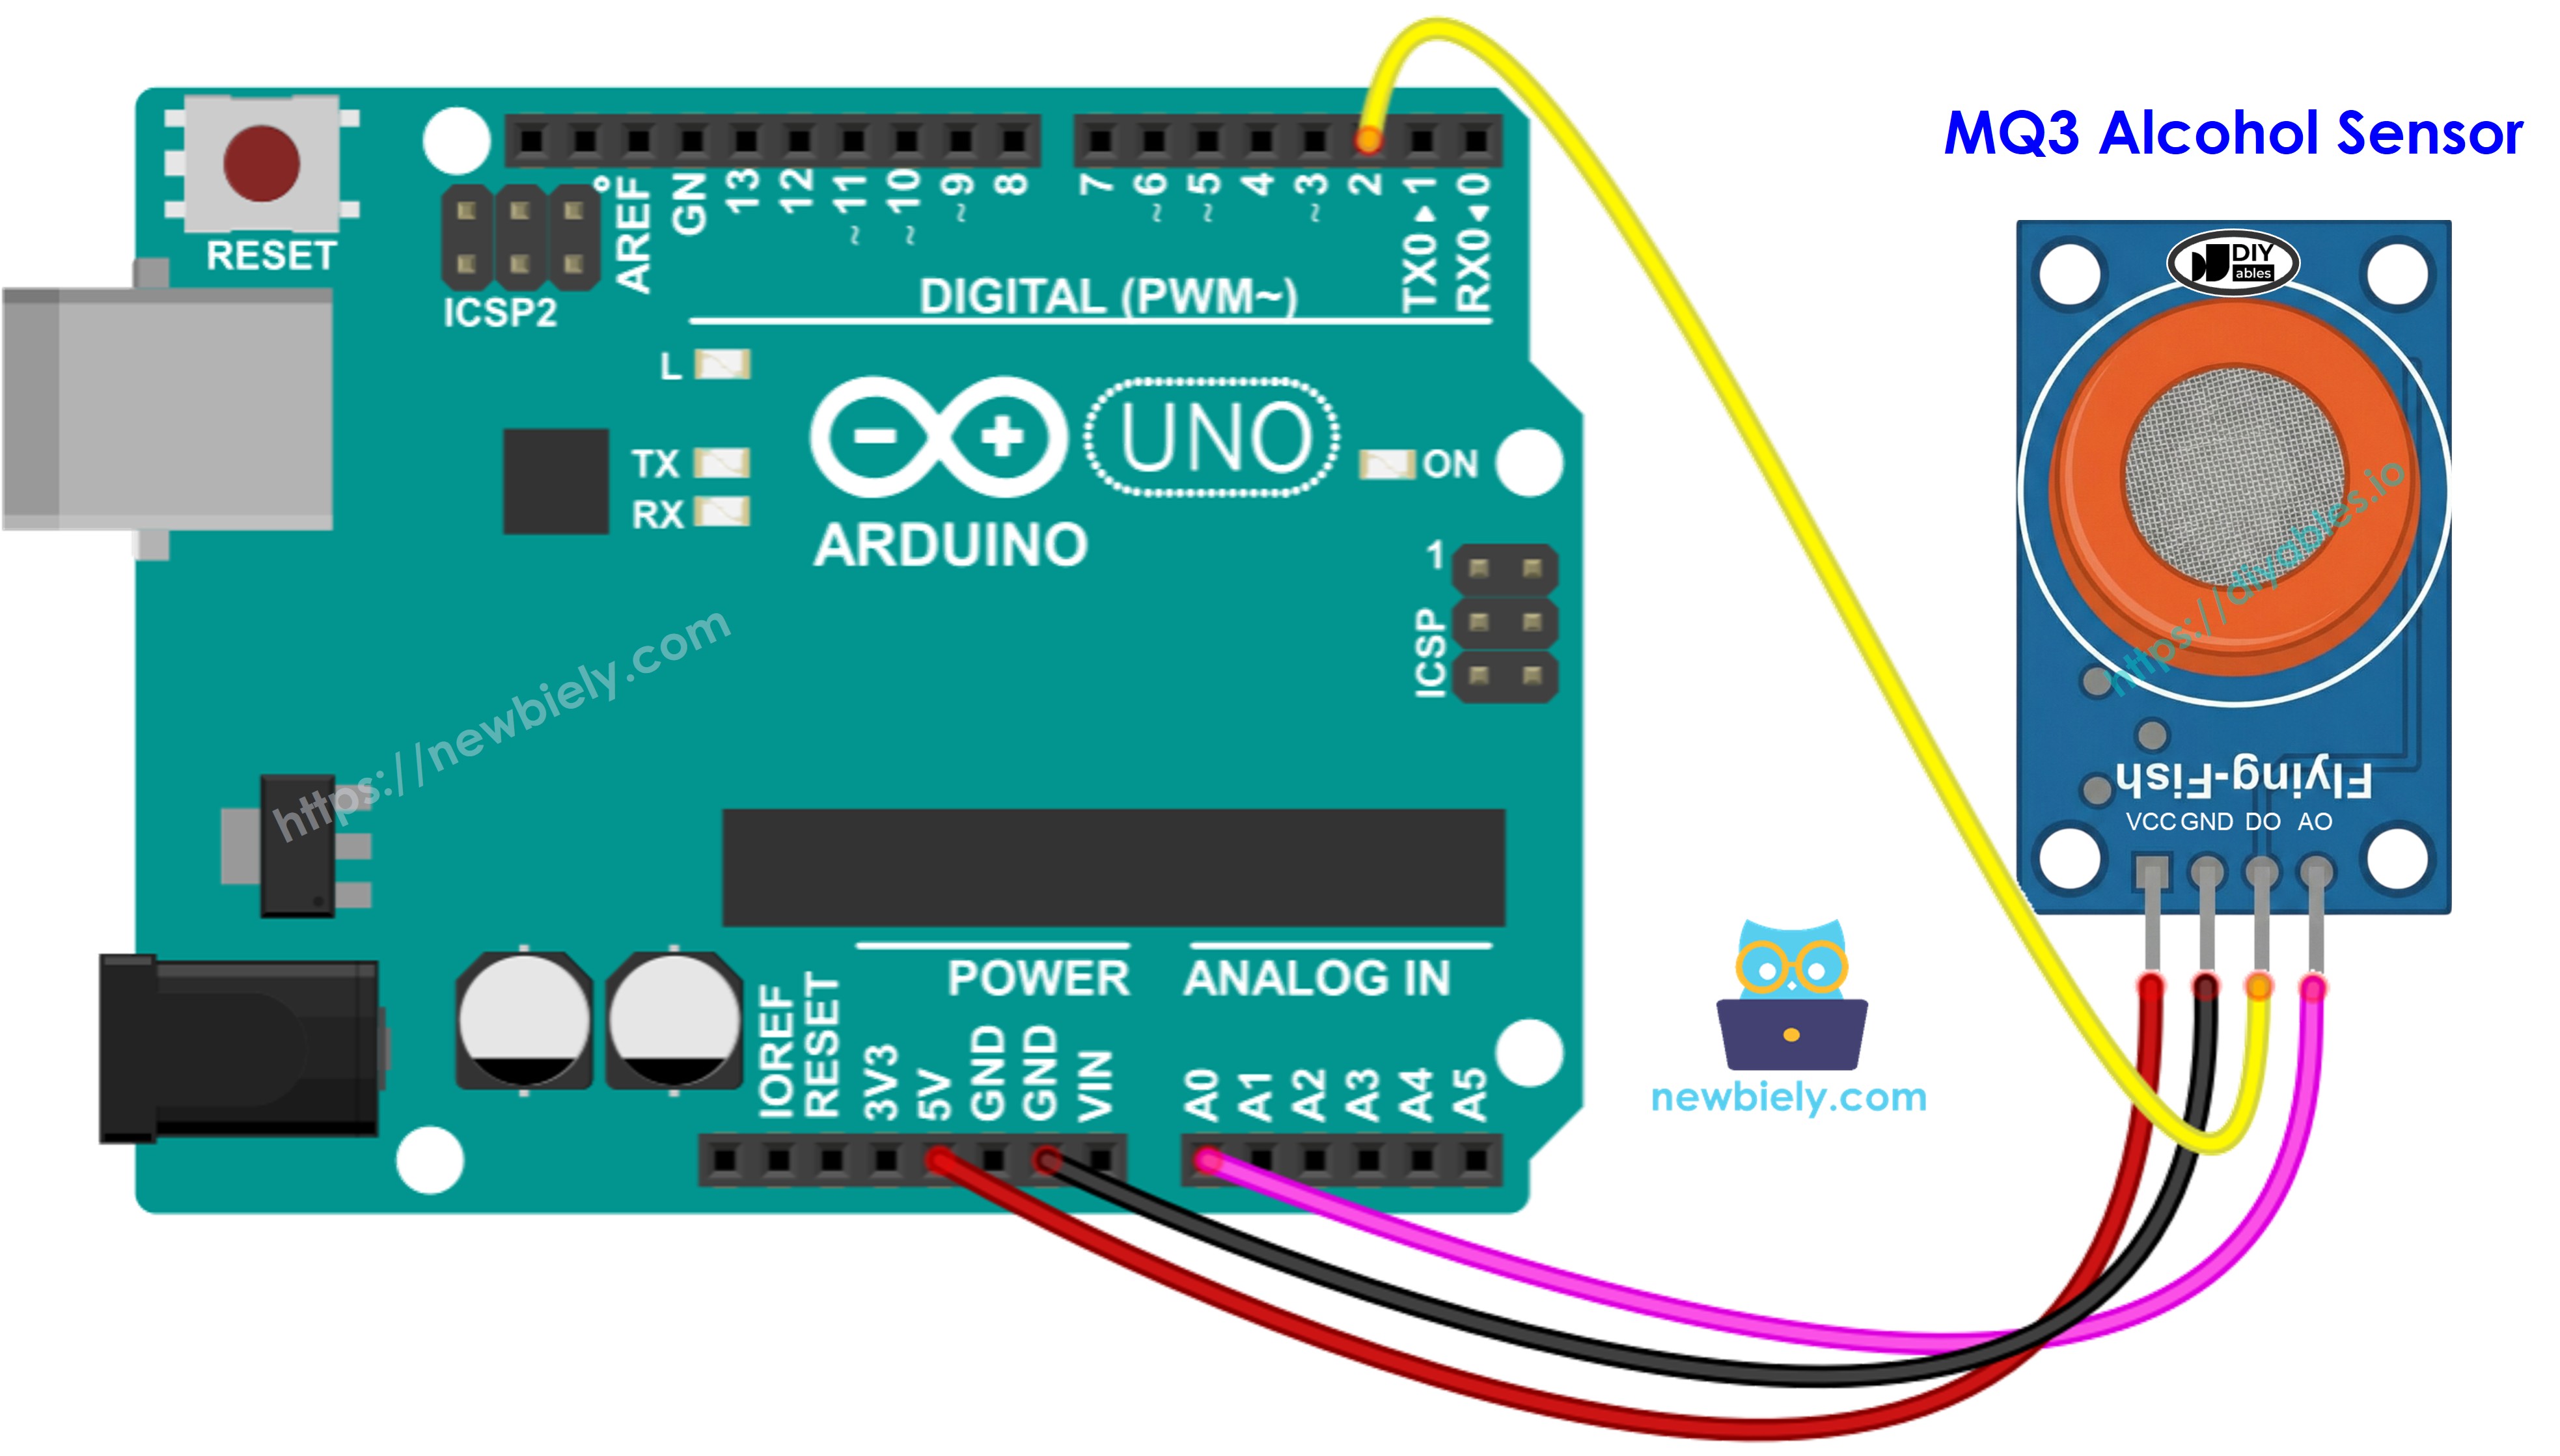
This image is created using Fritzing. Click to enlarge image
Arduino Code - Digital Output Reading
Quick Steps
- Open the code above in Arduino IDE
- Upload to your Arduino board via the Upload button
- Position alcohol vapor source near the MQ3 sensor (hand sanitizer or rubbing alcohol on cotton works well)
- Monitor the output in Serial Monitor
Note: When readings don't match actual conditions (false positives or missed detections), fine-tune the detection threshold using the module's potentiometer. Clockwise rotation raises sensitivity; counterclockwise lowers it. Adjust until detection accuracy improves.
Arduino Code - Analog Output Reading
Quick Steps
- Load the code into Arduino IDE
- Upload via the Upload button
- Introduce alcohol vapor to the sensor (hand sanitizer or isopropyl alcohol)
- Observe readings in Serial Monitor
Using either digital or analog outputs, you can implement threshold-based decisions to activate alarms, control warning indicators, or record data for breathalyzer functionality.
Arduino Code - Breathalyzer with Threshold Detection
This example demonstrates analog output interpretation through calibrated thresholds to estimate intoxication levels.
Quick Steps
- Critical: First calibrate your sensor using the analog reading example to determine appropriate threshold values for your environment.
- Update SOBER_THRESHOLD and DRUNK_THRESHOLD constants in the code with your calibrated numbers.
- Load and upload the modified code to Arduino
- Test with alcohol vapor (isopropyl alcohol or hand sanitizer vapor)
- Review status messages in Serial Monitor
Disclaimer: This project serves educational purposes exclusively. Never rely on this device for legal breathalyzer functions or driving safety assessments.
Video Tutorial
We are considering to make the video tutorials. If you think the video tutorials are essential, please subscribe to our YouTube channel to give us motivation for making the videos.