Arduino - Mini Mp3 Player Module
This tutorial instructs you how to use Arduino with the DIYables Mini Mp3 Player module. In detail, we will learn:
- How to connect the Mini Mp3 Player module to Arduino.
- How to program Arduino to play mp3 tracks from an SD card.
- How to program Arduino to control volume (up, down, set level).
- How to program Arduino to pause, resume, and stop playback.
- How to program Arduino to play next and previous tracks.
- How to program Arduino to loop a track, loop all, and shuffle.
- How to program Arduino to play tracks from folders.
- How to program Arduino to read playback status.
Hardware Required
Or you can buy the following kits:
| 1 | × | DIYables STEM V3 Starter Kit (Arduino included) | |
| 1 | × | DIYables Sensor Kit (18 sensors/displays) |
Additionally, some links direct to products from our own brand, DIYables .
About Mini Mp3 Player Module
The DIYables Mini Mp3 Player module is a small, low-cost mp3 player module based on the YX5200-24SS chip. It reads mp3 files from a micro SD card and outputs audio through a built-in amplifier (max 3W speaker) or DAC output pins for an external amplifier.
The module communicates with Arduino via UART (serial) at 9600 baud. It supports:
- Playing, pausing, resuming, and stopping tracks
- Volume control (0 to 30)
- 6 equalizer modes (Normal, Pop, Rock, Jazz, Classic, Bass)
- Loop track, loop folder, loop all, shuffle
- Playing tracks from numbered folders
- Advertisement playback (interrupt and resume)
- Status queries (current track, volume, playing state, etc.)
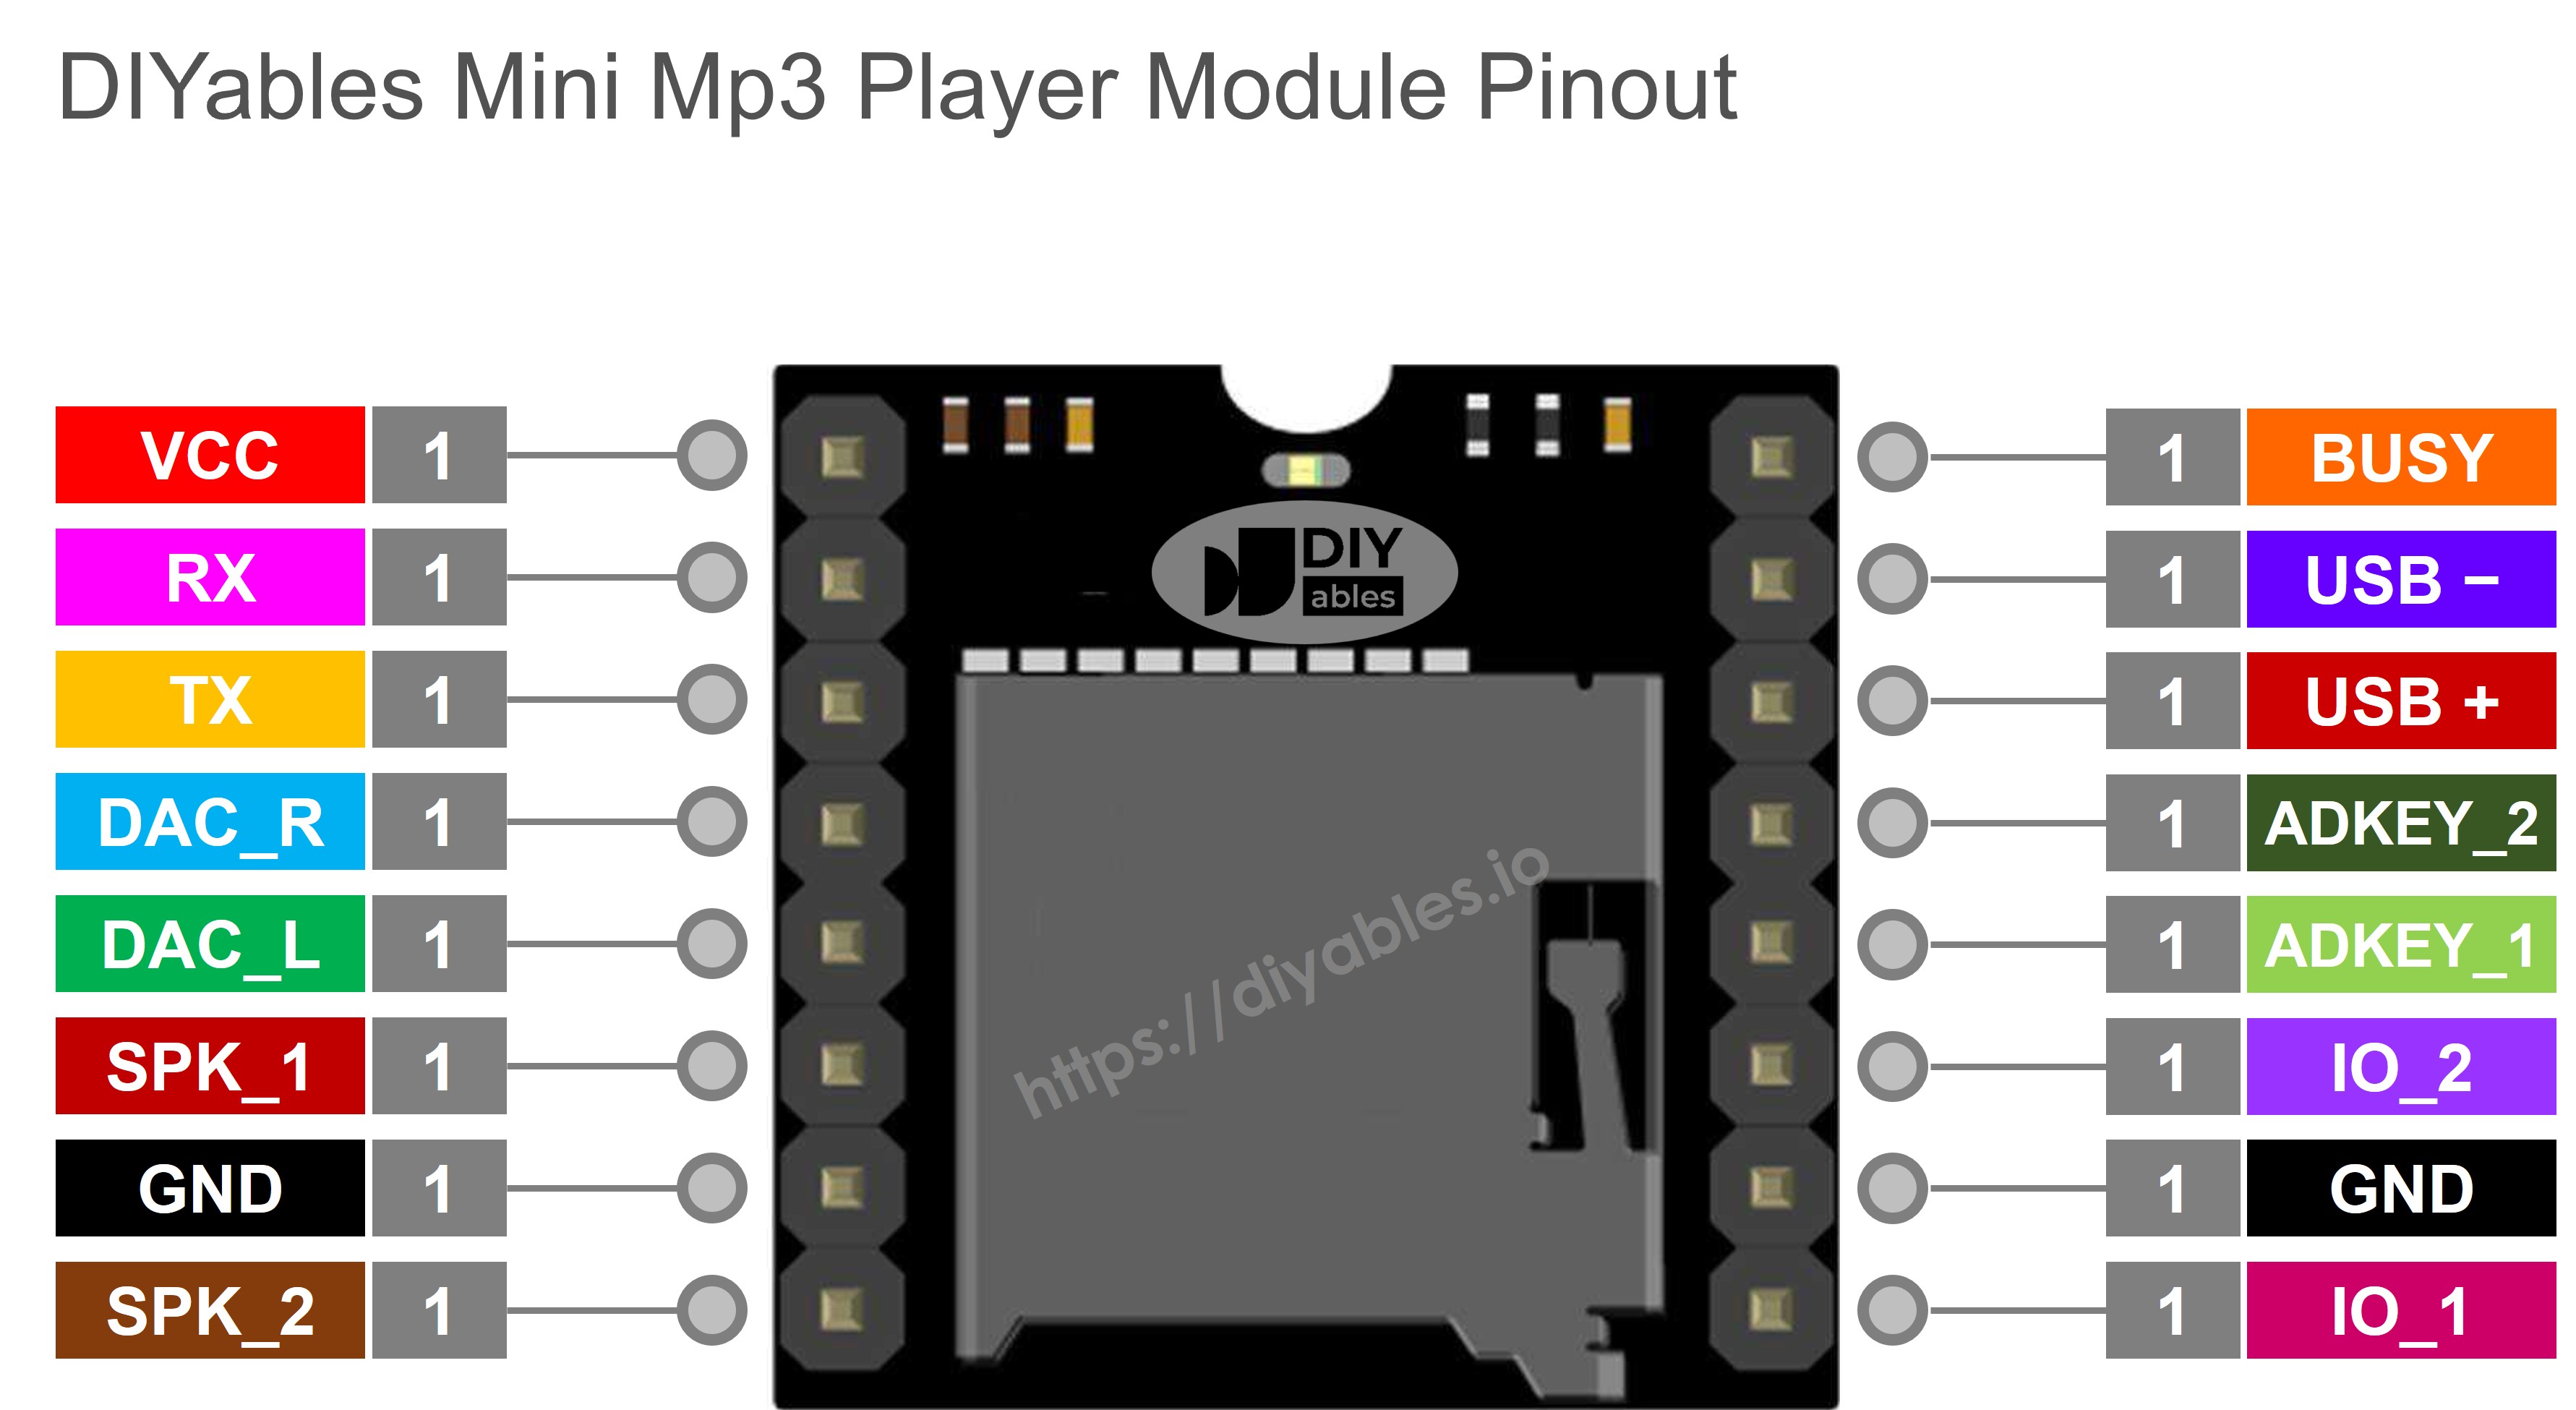
Module Pinout
| Pin | Description | ||
|---|---|---|---|
| VCC | Power supply (3.2V ~ 5.0V) | ||
| GND | Ground | ||
| RX | UART receive (connect to Arduino TX via 1K resistor) | ||
| TX | UART transmit (connect to Arduino RX) | ||
| SPK_1 | Speaker+ (direct speaker connection, max 3W) | ||
| SPK_2 | Speaker- (direct speaker connection, max 3W) | ||
| DAC_R | Right audio output (for external amplifier) | ||
| DAC_L | Left audio output (for external amplifier) | ||
| BUSY | Low when playing, high when idle (optional) | ||
| IO_1 | Short press | previous track, long press | volume down |
| IO_2 | Short press | next track, long press | volume up |
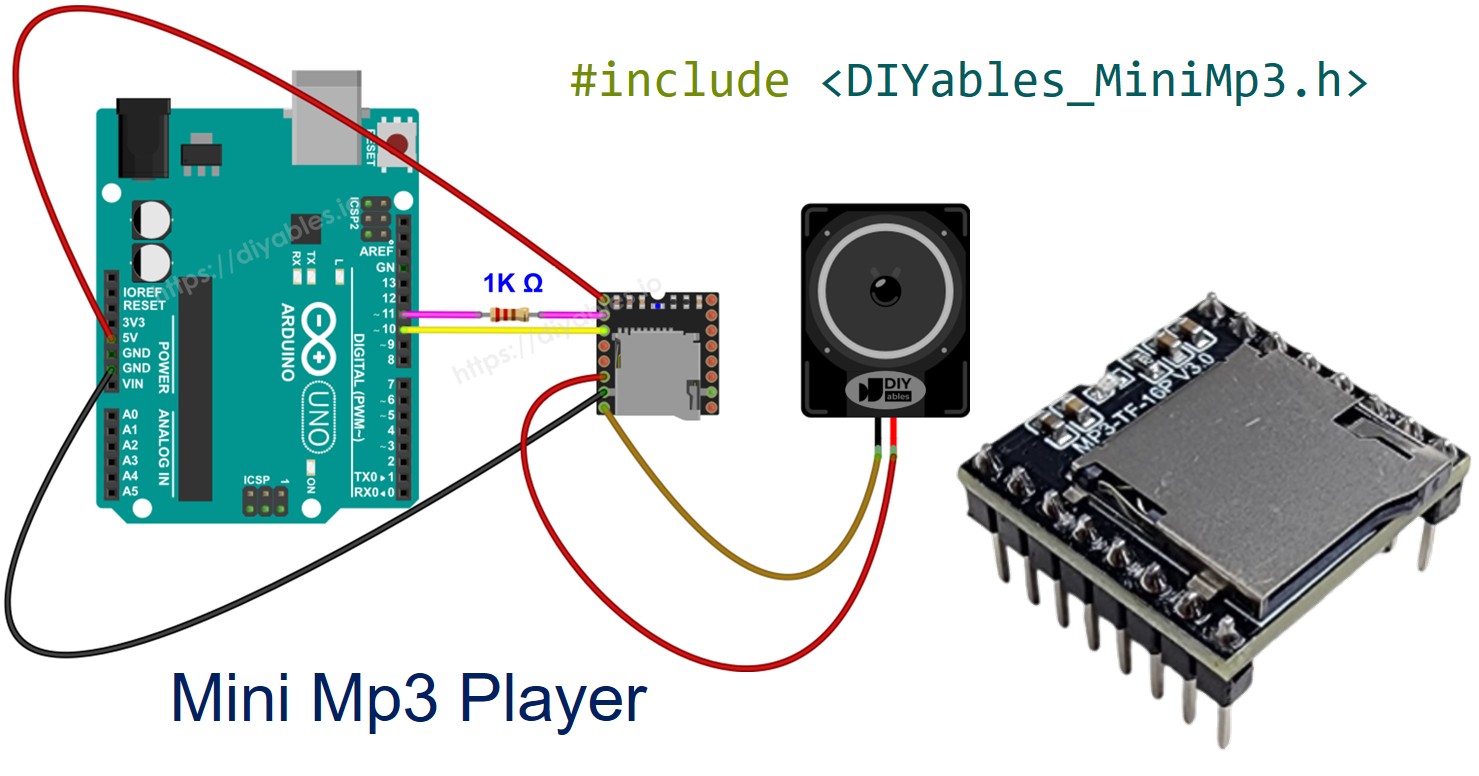
Wiring Diagram
Connect the Mini Mp3 Player module to the Arduino Uno as follows:
| Mini Mp3 Pin | Arduino Pin | Note |
|---|---|---|
| VCC | 5V | |
| GND | GND | |
| RX | Pin 11 | Must use a 1K resistor in series (module is 3.3V logic) |
| TX | Pin 10 | |
| SPK_1 | Speaker+ | Direct speaker connection (max 3W) |
| SPK_2 | Speaker- | Direct speaker connection (max 3W) |
Important: The 1K resistor on the RX pin is required when using 5V Arduino boards. It protects the module's 3.3V logic input. Without it, the module may not work or could be damaged.
This image is created using Fritzing. Click to enlarge image
SD Card Preparation
Format your micro SD card as FAT16 or FAT32 before use. Copy mp3 files to the root of the SD card with zero-padded numbers:
Important: Track numbers start from 1 (not 0). The module assigns track numbers based on the order files were copied to the SD card, NOT by filename. Format the SD card first, then copy files one by one in order.
For folder playback, create numbered folders with numbered files:
Folder names must be 2-digit zero-padded (01-99). Track names inside folders must be 3-digit zero-padded (001-255).
Library Installation
- Connect the Arduino board to your computer with a USB cable.
- Open Arduino IDE, select the right board and port.
- Navigate to the Libraries icon on the left bar of the Arduino IDE.
- Search "DIYables_MiniMp3", then find the DIYables_MiniMp3 library by DIYables.
- Click Install button to install the latest version of the library.
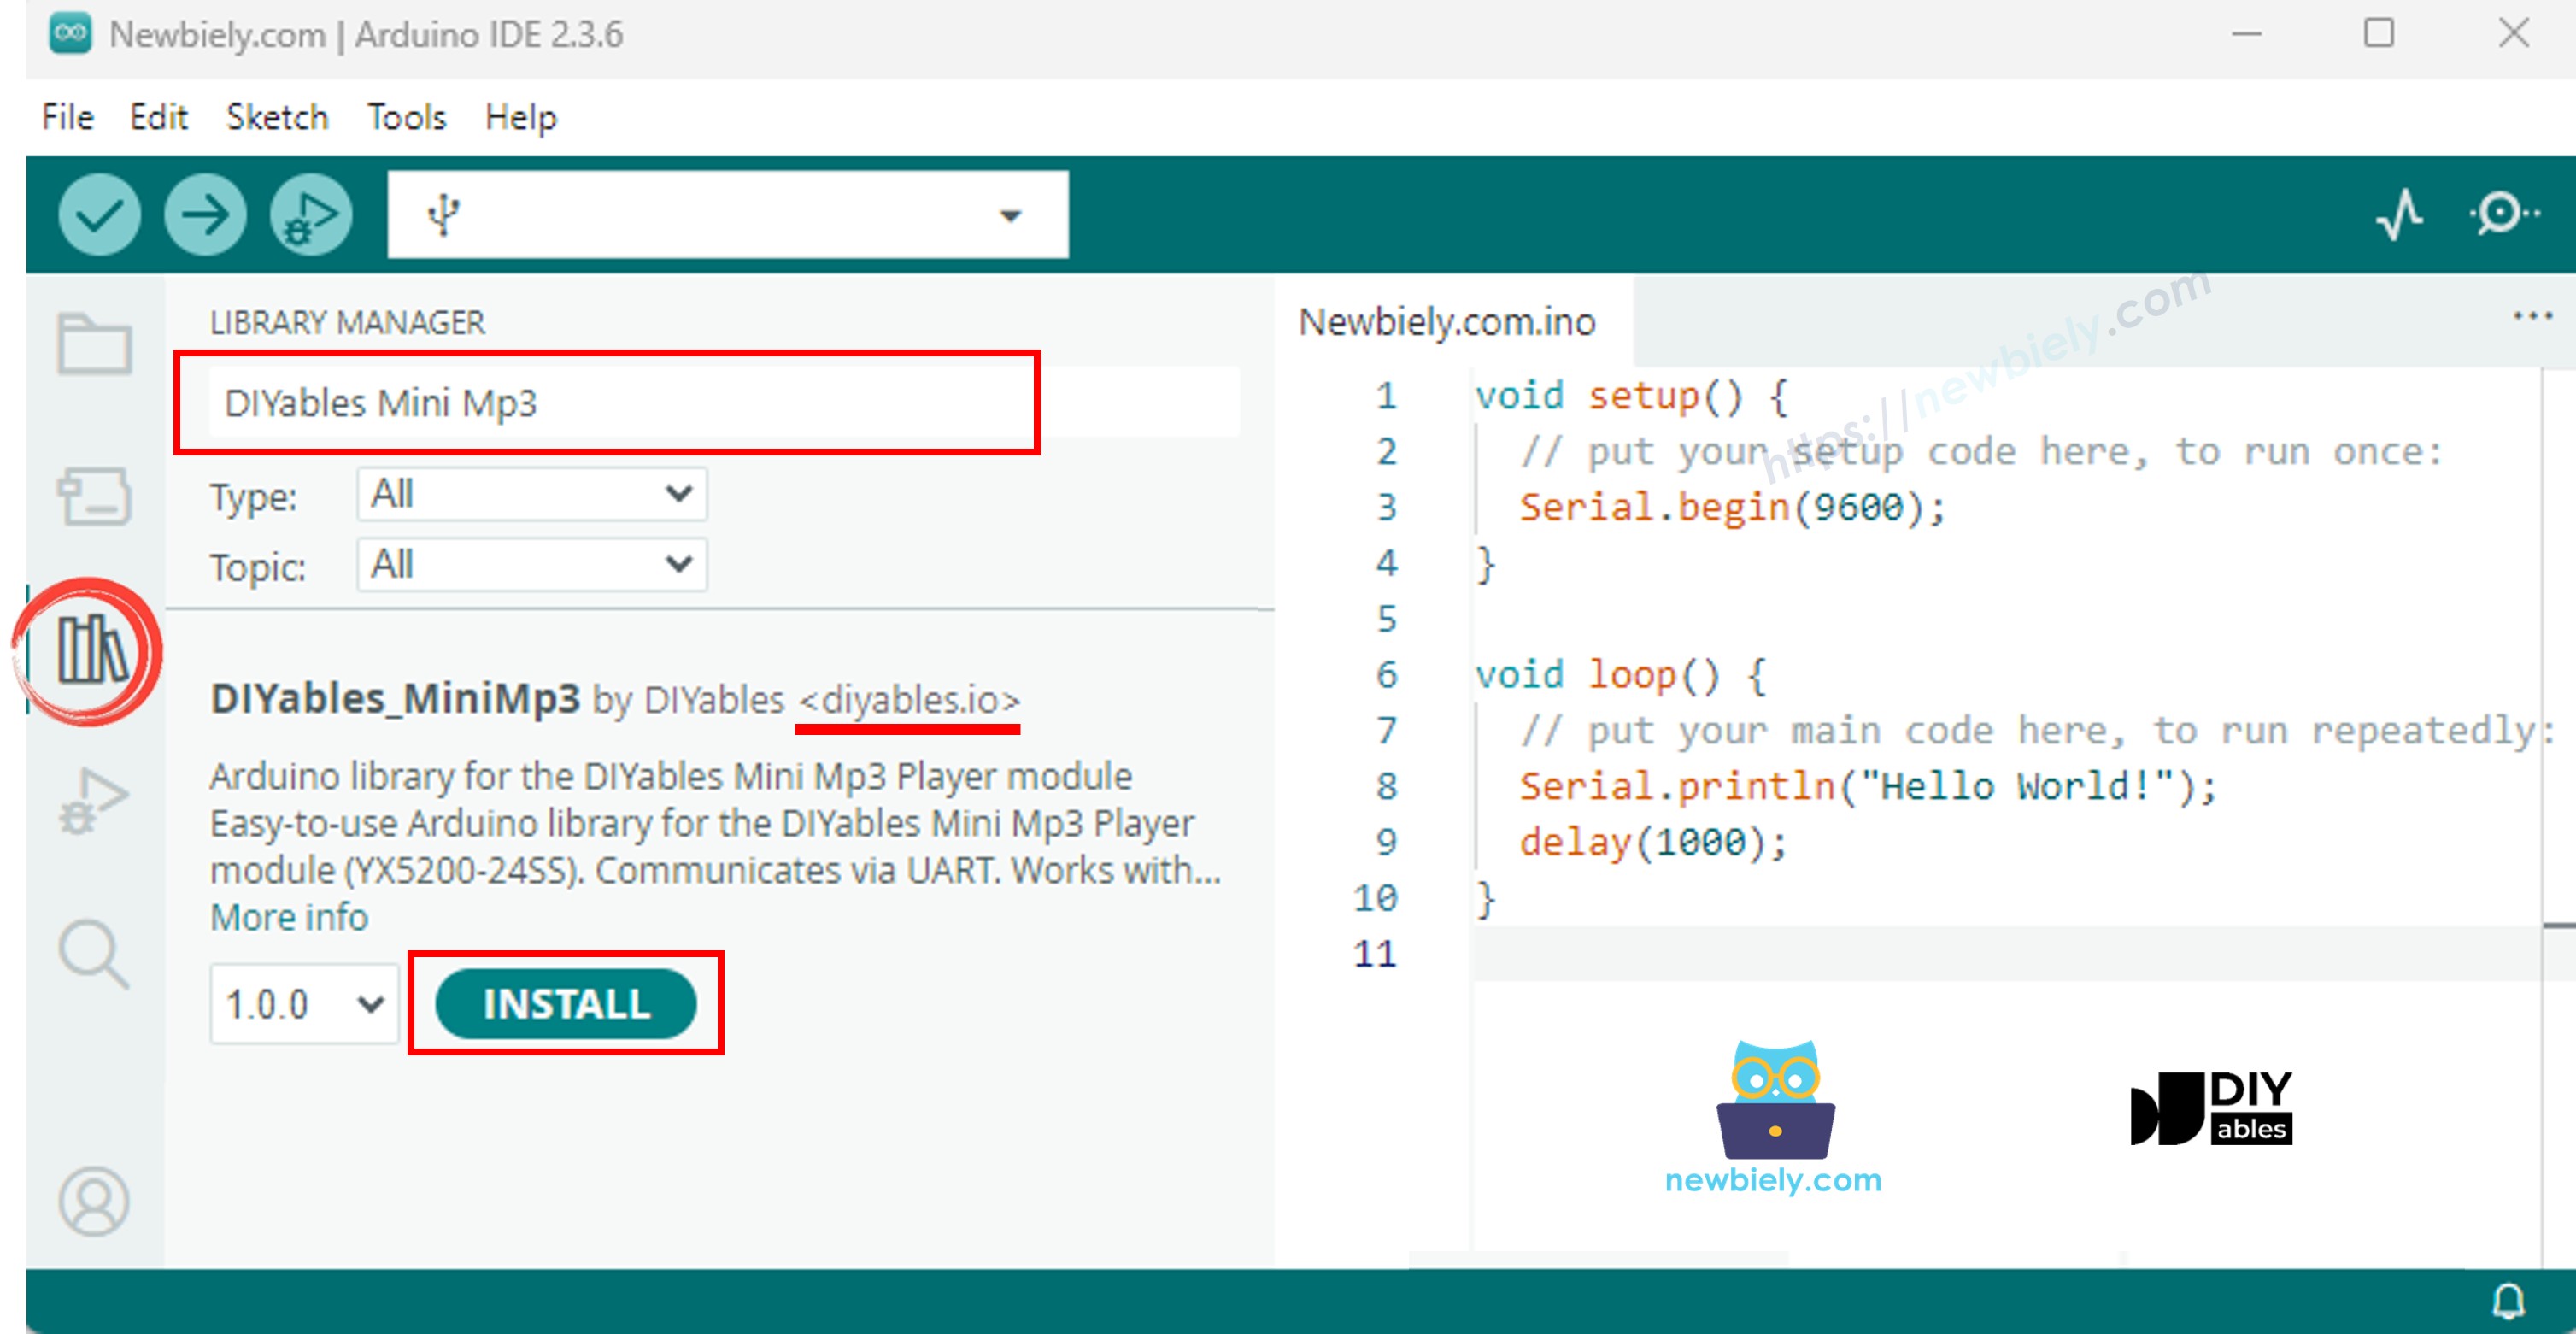
Note: This library is self-contained with no external dependencies.
Basic Structure
Every sketch using the Mini Mp3 Player follows this basic structure:
mp3.begin(mp3Serial) initializes the communication with the module. The delay(1000) gives the module time to boot up. You must set the volume before playing, as the default volume may be 0.
Arduino Code - Play a Track
The following code plays a single track from the SD card.
Quick Steps
- Prepare the SD card with mp3 files (001.mp3, 002.mp3, etc.).
- Insert the SD card into the Mini Mp3 Player module.
- Wire the module to the Arduino as shown in the wiring diagram.
- Connect the Arduino board to your computer with a USB cable.
- Open Arduino IDE, select the right board and port.
- Copy the above code and paste it to the editor of Arduino IDE.
- Click Upload button on Arduino IDE to upload code to Arduino.
You will hear track 001.mp3 play through the speaker.
Playback API Summary
| Method | Description | Example |
|---|---|---|
| play(trackNum) | Play a track by number | mp3.play(1) |
| playNext() | Play the next track | mp3.playNext() |
| playPrevious() | Play the previous track | mp3.playPrevious() |
| pause() | Pause playback | mp3.pause() |
| resume() | Resume playback | mp3.resume() |
| stop() | Stop playback | mp3.stop() |
Arduino Code - Play Multiple Tracks
The following code plays multiple tracks sequentially with a delay between each.
Quick Steps
- Ensure the SD card has at least 3 mp3 tracks (001.mp3, 002.mp3, 003.mp3).
- Copy the above code and paste it to the editor of Arduino IDE.
- Click Upload button on Arduino IDE to upload code to Arduino.
You will hear three tracks play one after another with a 5-second delay between them.
Arduino Code - Volume Control
The following code uses two buttons to increase and decrease the volume.
Quick Steps
- Wire the module and two buttons to the Arduino as shown in the code comments.
- Copy the above code and paste it to the editor of Arduino IDE.
- Click Upload button on Arduino IDE to upload code to Arduino.
- Press the buttons to adjust the volume. Open the Serial Monitor to see the current volume.
Volume API Summary
| Method | Description | Example |
|---|---|---|
| setVolume(vol) | Set volume (0-30) | mp3.setVolume(25) |
| volumeUp() | Increase volume by 1 | mp3.volumeUp() |
| volumeDown() | Decrease volume by 1 | mp3.volumeDown() |
| getVolume() | Get current volume | mp3.getVolume() |
Arduino Code - Pause and Resume
The following code uses a single button to toggle between pause and resume.
Quick Steps
- Copy the above code and paste it to the editor of Arduino IDE.
- Click Upload button on Arduino IDE to upload code to Arduino.
- Press the button to pause and resume playback.
Arduino Code - Loop a Track
The following code loops (repeats) a track continuously.
Quick Steps
- Copy the above code and paste it to the editor of Arduino IDE.
- Click Upload button on Arduino IDE to upload code to Arduino.
Track 001.mp3 will repeat continuously until you stop it.
Repeat & Shuffle API Summary
| Method | Description | Example |
|---|---|---|
| loopTrack(trackNum) | Loop a specific track | mp3.loopTrack(1) |
| loopFolder(folder) | Loop all tracks in a folder | mp3.loopFolder(1) |
| loopAll() | Loop all tracks | mp3.loopAll() |
| stopLoop() | Stop looping | mp3.stopLoop() |
| shuffle() | Play all tracks randomly | mp3.shuffle() |
Arduino Code - Play from Folder
The following code plays tracks from specific numbered folders on the SD card.
Quick Steps
- Prepare the SD card with folders (01, 02) containing numbered mp3 files (001.mp3, 002.mp3).
- Copy the above code and paste it to the editor of Arduino IDE.
- Click Upload button on Arduino IDE to upload code to Arduino.
The code plays tracks from folder 01 and folder 02 sequentially.
Folder Playback API Summary
| Method | Description | Example |
|---|---|---|
| playFolder(folder, track) | Play track from folder (max 99 folders, 255 tracks) | mp3.playFolder(1, 1) |
| playLargeFolder(folder, track) | Play from folder (max 15 folders, 3000 tracks) | mp3.playLargeFolder(1, 1500) |
| playFromMP3Folder(trackNum) | Play from /mp3 folder | mp3.playFromMP3Folder(1) |
Arduino Code - Serial Monitor Control
The following code lets you control the Mp3 player by typing commands in the Serial Monitor. This is great for testing all functions without extra hardware.
Quick Steps
- Copy the above code and paste it to the editor of Arduino IDE.
- Click Upload button on Arduino IDE to upload code to Arduino.
- Open the Serial Monitor (baud rate 9600).
- Type a command and press Enter:
| Command | Action |
|---|---|
| 1-9 | Play track 1 to 9 |
| + | Volume up |
| * | Volume down |
| p | Pause |
| r | Resume |
| s | Stop |
| n | Next track |
| b | Previous track (back) |
| ? | Show current status |
Arduino Code - Hardware Serial
The following code demonstrates using hardware serial instead of SoftwareSerial. This works on boards with extra serial ports like Arduino Mega, ESP32, and Arduino Due.
Quick Steps
- Wire the module to the board's hardware serial port (e.g., Serial2 pins).
- Copy the above code and paste it to the editor of Arduino IDE.
- Select the correct board (e.g., Arduino Mega or ESP32).
- Click Upload button on Arduino IDE to upload code to the board.
Note: For 5V boards, use a 1K resistor on the RX pin. For 3.3V boards (ESP32, Due), no resistor is needed.
Equalizer Settings
The module supports 6 EQ modes:
| Constant | Value | Description |
|---|---|---|
| DIYables_MiniMp3::EQ_NORMAL | 0 | Normal (flat) |
| DIYables_MiniMp3::EQ_POP | 1 | Pop |
| DIYables_MiniMp3::EQ_ROCK | 2 | Rock |
| DIYables_MiniMp3::EQ_JAZZ | 3 | Jazz |
| DIYables_MiniMp3::EQ_CLASSIC | 4 | Classic |
| DIYables_MiniMp3::EQ_BASS | 5 | Bass boost |
Example:
Status Queries
You can query the module for its current state. Note: These functions are blocking and may take up to 100ms (configurable via setTimeout()). They return -1 on error.
| Method | Returns | Description |
|---|---|---|
| isPlaying() | bool | true if a track is currently playing |
| getVolume() | int16_t | Current volume (0-30) |
| getEQ() | int16_t | Current EQ setting (0-5) |
| getTrackCount() | int16_t | Total tracks on SD card |
| getCurrentTrack() | int16_t | Currently playing track number |
| getFolderCount() | int16_t | Number of folders on SD card |
| getTrackCountInFolder(folder) | int16_t | Number of tracks in a folder |
Platform Support
The library supports all Arduino platforms (architectures=*). It works with any board that provides a Stream-compatible serial port, including:
- Arduino Uno, Nano, Mega, Leonardo
- ESP32, ESP8266
- Arduino Due
- STM32
- Raspberry Pi Pico (RP2040)
For boards with extra hardware serial ports (Mega, ESP32, Due), you can use hardware serial instead of SoftwareSerial for better reliability.