
Arduino - Slide Switch
You have seen slide switches on toys, small speakers and battery boxes: push the handle one way for ON, the other way for OFF. In this tutorial, we are going to learn:
- What the SS12D10 slide switch is and what each of its three pins does
- How to connect the slide switch to Arduino Uno with three wires and no resistor
- How to program Arduino to print the switch position and catch every move of the handle
- How to drop one wire with INPUT_PULLUP, and why ON and OFF then swap
Hardware Required
Or you can buy the following kits:
| 1 | × | DIYables STEM V3 Starter Kit (Arduino included) | |
| 1 | × | DIYables Sensor Kit (18 sensors/displays) |
Additionally, some links direct to products from our own brand, DIYables .
About Slide Switch
The SS12D10 is a tiny switch with a sliding handle on top and three metal pins in a row below. Move the handle to one side and it stays there. This is the big difference from a push button. A button jumps back as soon as you let go. A slide switch keeps its position until you move it again. So it fits settings that should stay put, like a power switch, a "sound on/off" option or a "test mode" selector.
Its contact type is SPDT (Single Pole, Double Throw), also written as 1P2T. In plain words: the middle pin is joined to one of the two outer pins, never to both.
| SS12D10 | |
|---|---|
| Contact Type | SPDT (1P2T), 2 positions |
| Pins | 3, 4.7mm pitch |
| Terminal Length | 6.9mm |
| Handle Length | 5mm |
| Body Size | about 12.8 x 6.7 x 18.2mm |
| Mounting | vertical, through-hole |
| Contacts | silver-plated brass |
| Contact Rating | AC 125V 2A |
| Life | more than 100,000 switching cycles |
| Operating Temperature | -25°C to 80°C |
Do not worry about the 125V 2A rating. It is the most the contacts can handle. In this project, only a very small signal goes through the switch into pin 7.
Pinout
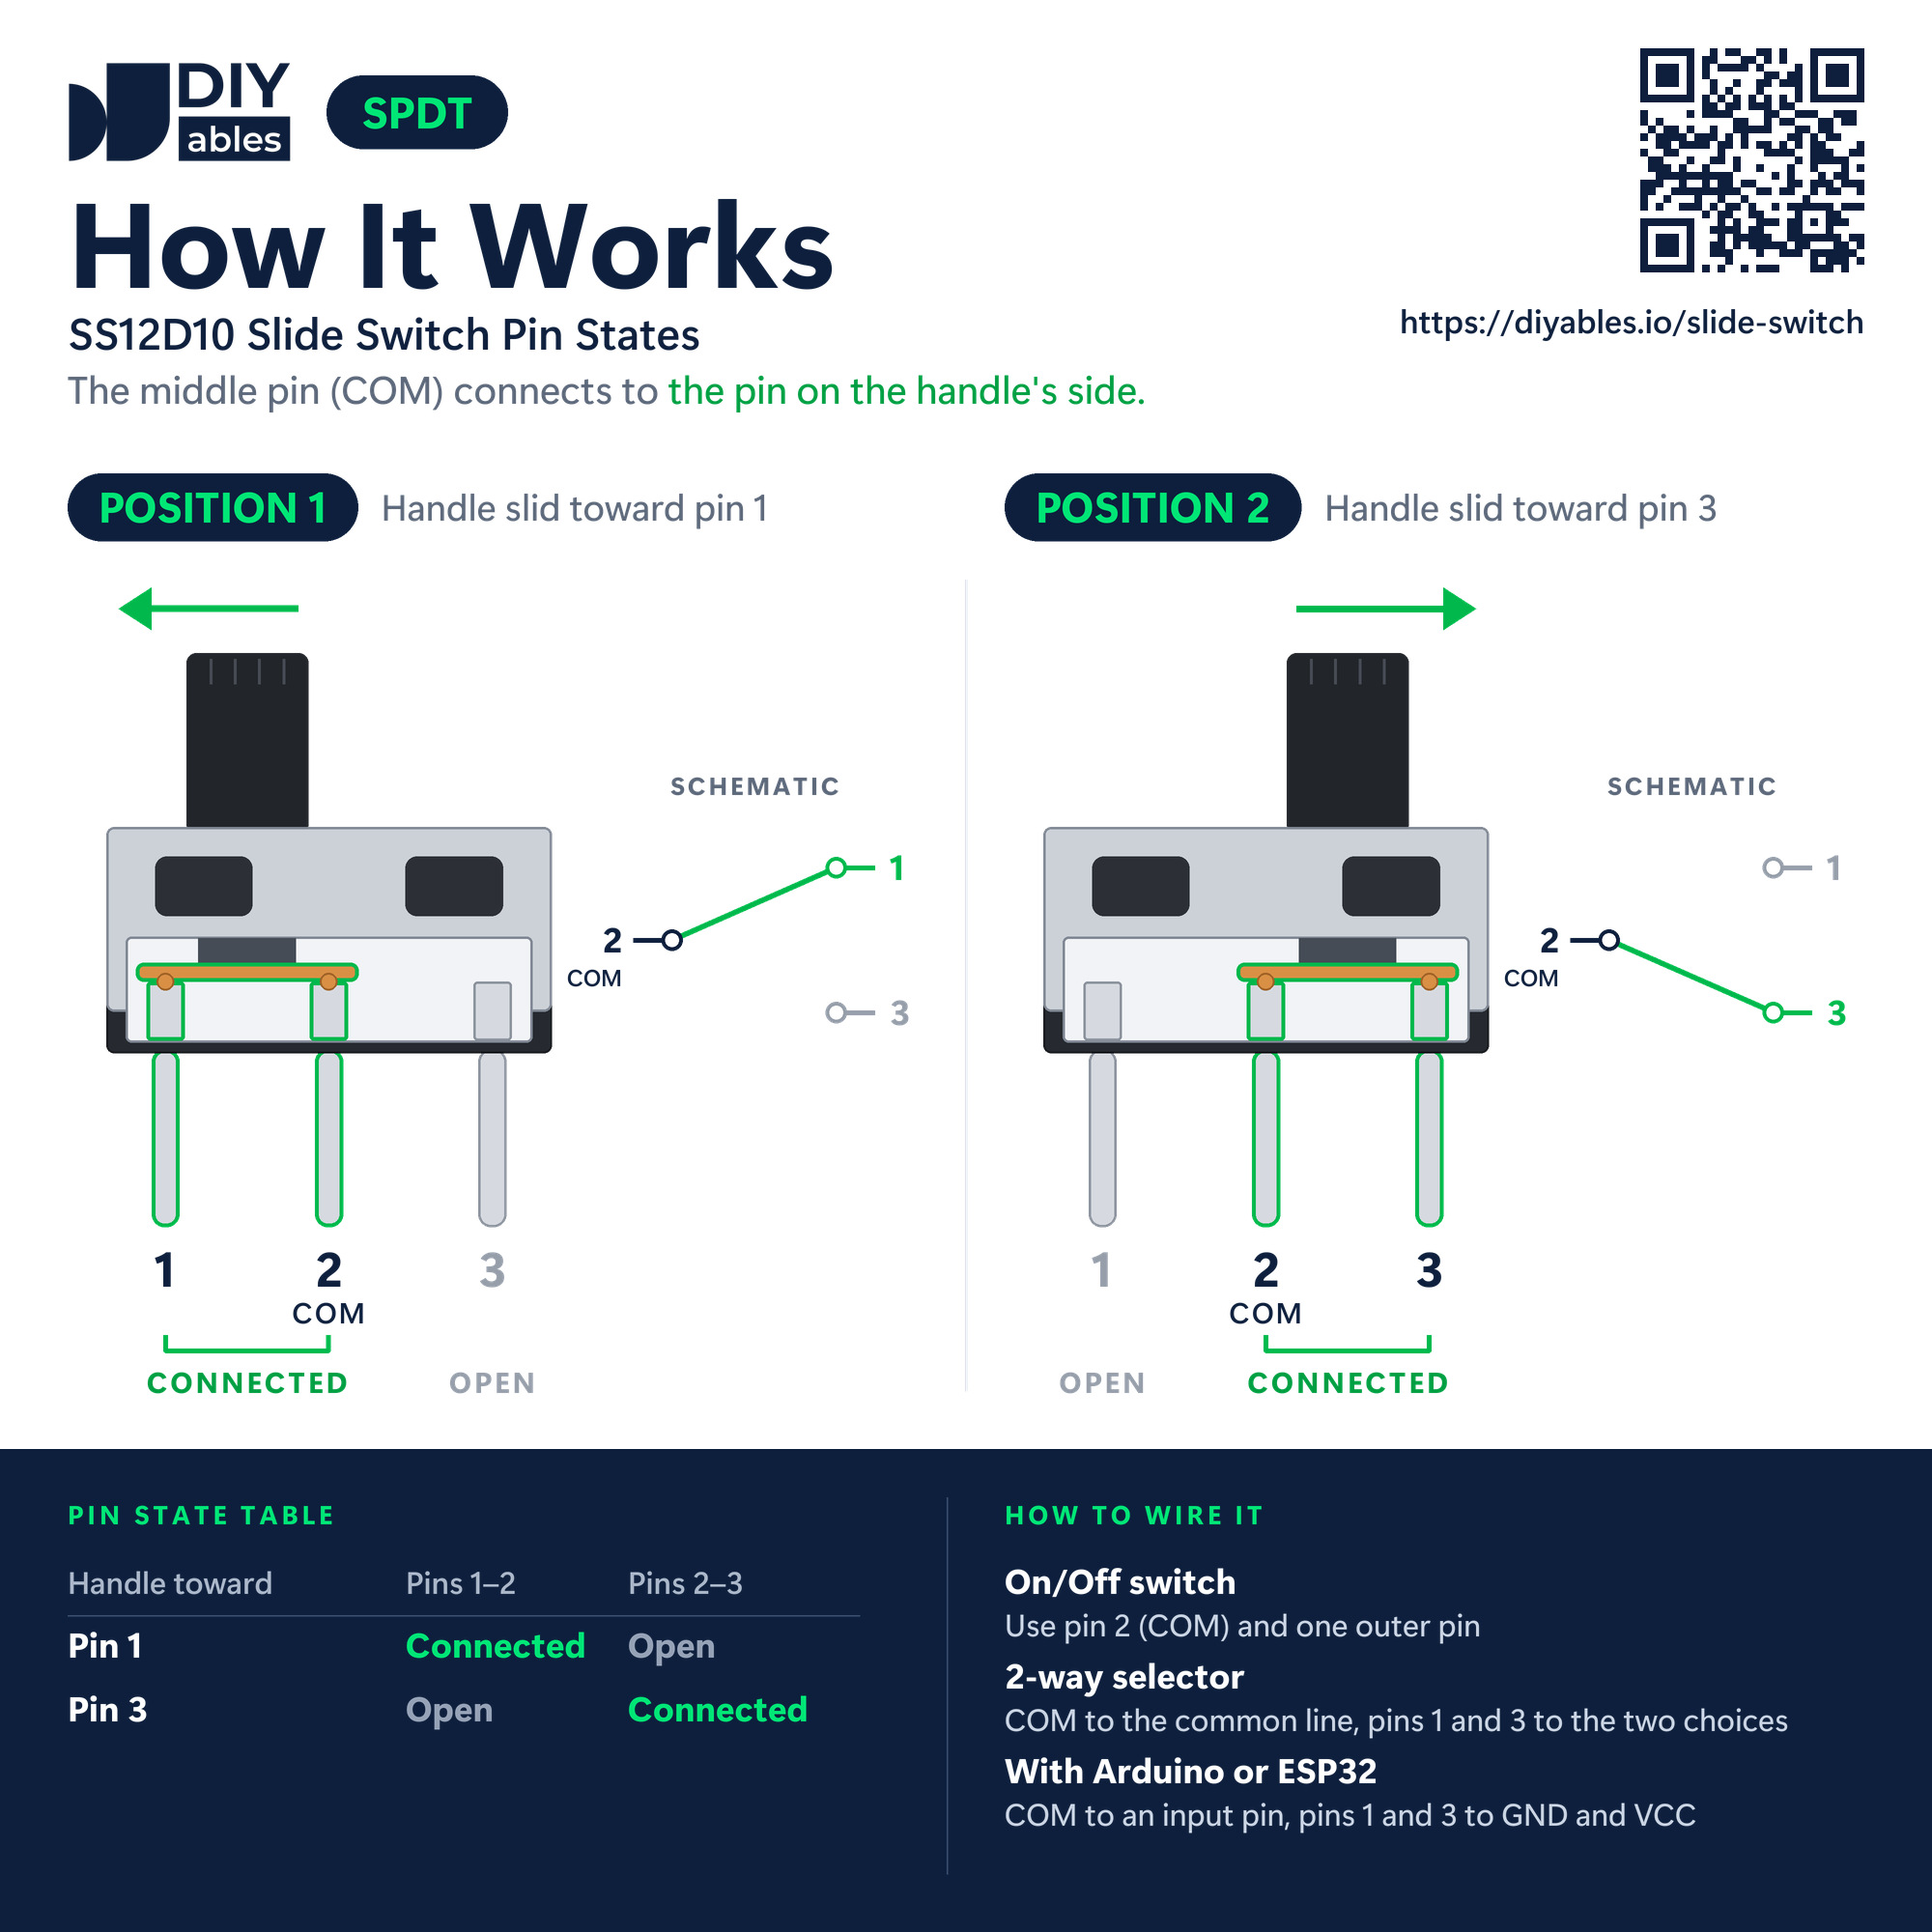
Nothing is printed next to the pins. Just remember: the middle one is always the common pin.
- Pin 1: an outer pin. In this tutorial, it needs to be connected to GND (0V)
- Pin 2 (COM): the middle pin. It needs to be connected to an Arduino digital input pin
- Pin 3: the other outer pin. In this tutorial, it needs to be connected to 5V
How it works: a tiny metal slider moves with the handle. It links the middle pin with the outer pin at the handle's end.
- Handle toward pin 1: pin 1 and COM are connected, pin 3 is open
- Handle toward pin 3: COM and pin 3 are connected, pin 1 is open
With pin 1 on GND and pin 3 on 5V, COM is always tied to one of them. Arduino reads LOW in one position and HIGH in the other.
Wiring Diagram
The middle pin goes to Arduino pin 7, and the two outer pins go to GND and 5V.
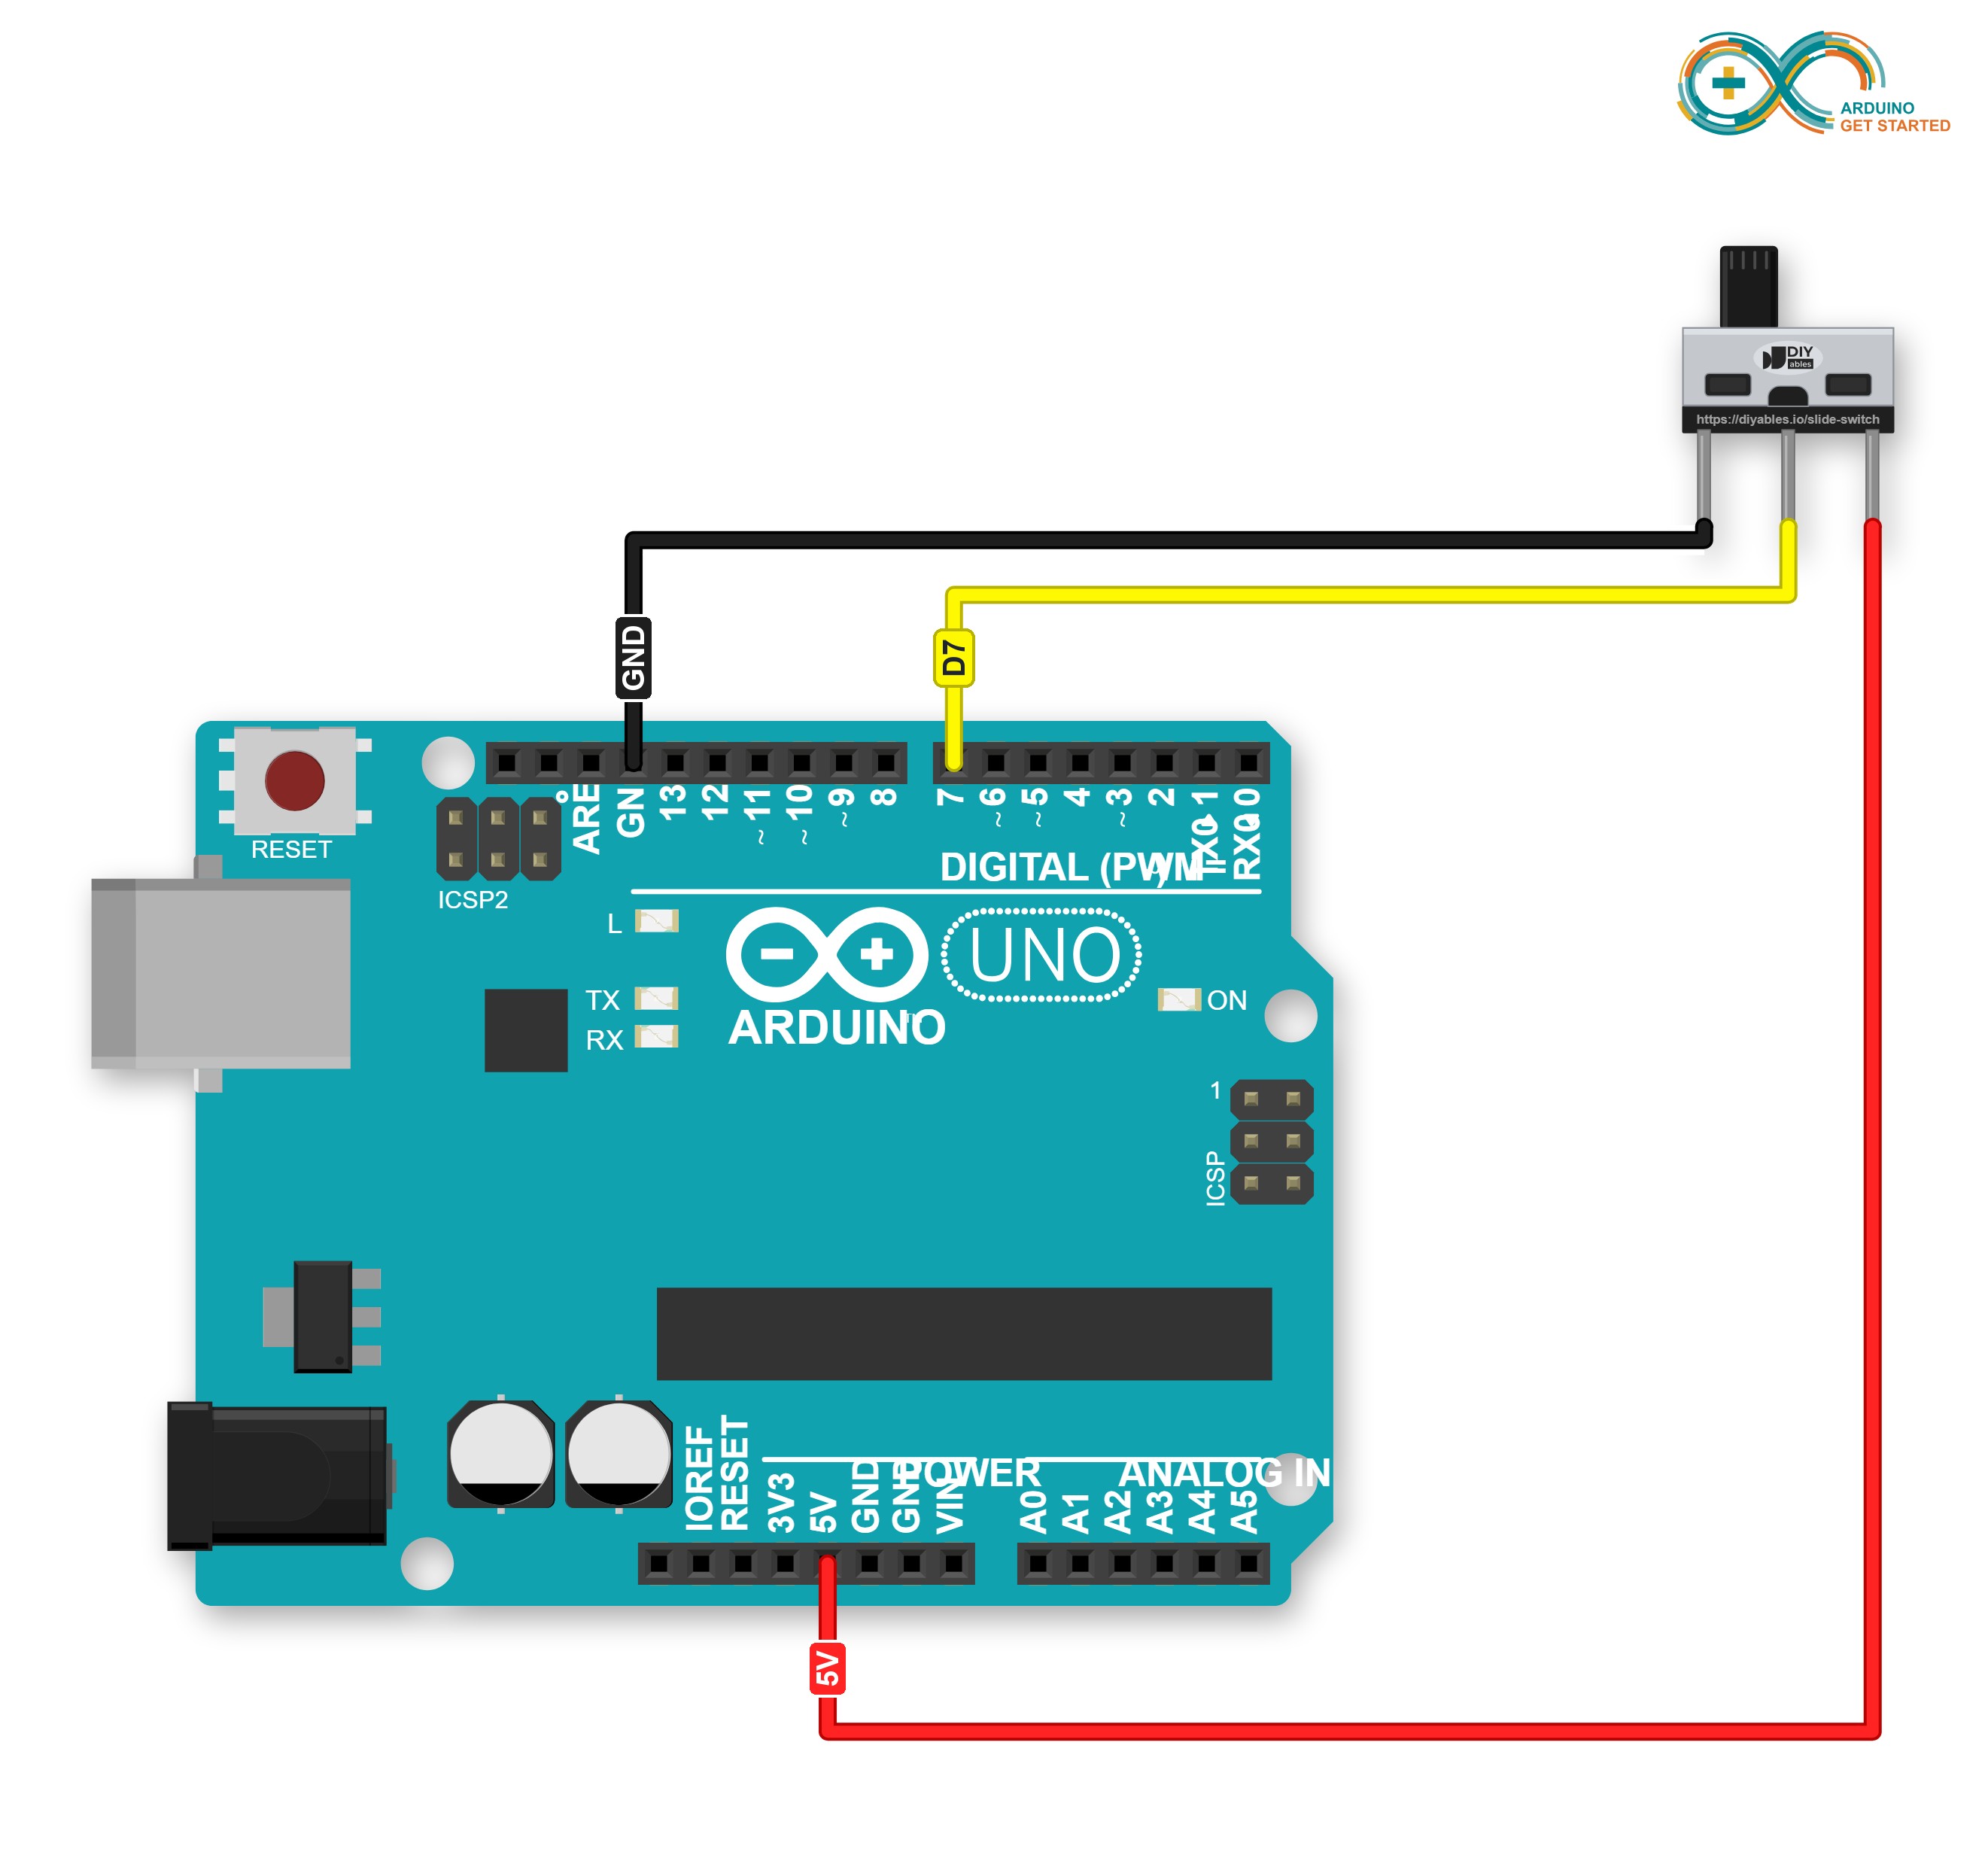
This image is created using Fritzing. Click to enlarge image
| Slide Switch Pin | Arduino Uno Pin |
|---|---|
| Pin 1 | GND |
| Pin 2 (COM) | Pin 7 |
| Pin 3 | 5V |
Loose wires are a common cause of strange bugs. Try a Screw Shield V2 or a Proto Screw Terminal Block Shield: it sits on the Arduino Uno, and each pin gets its own screw terminal. The diagram below shows the same wiring with the Screw Shield V2.
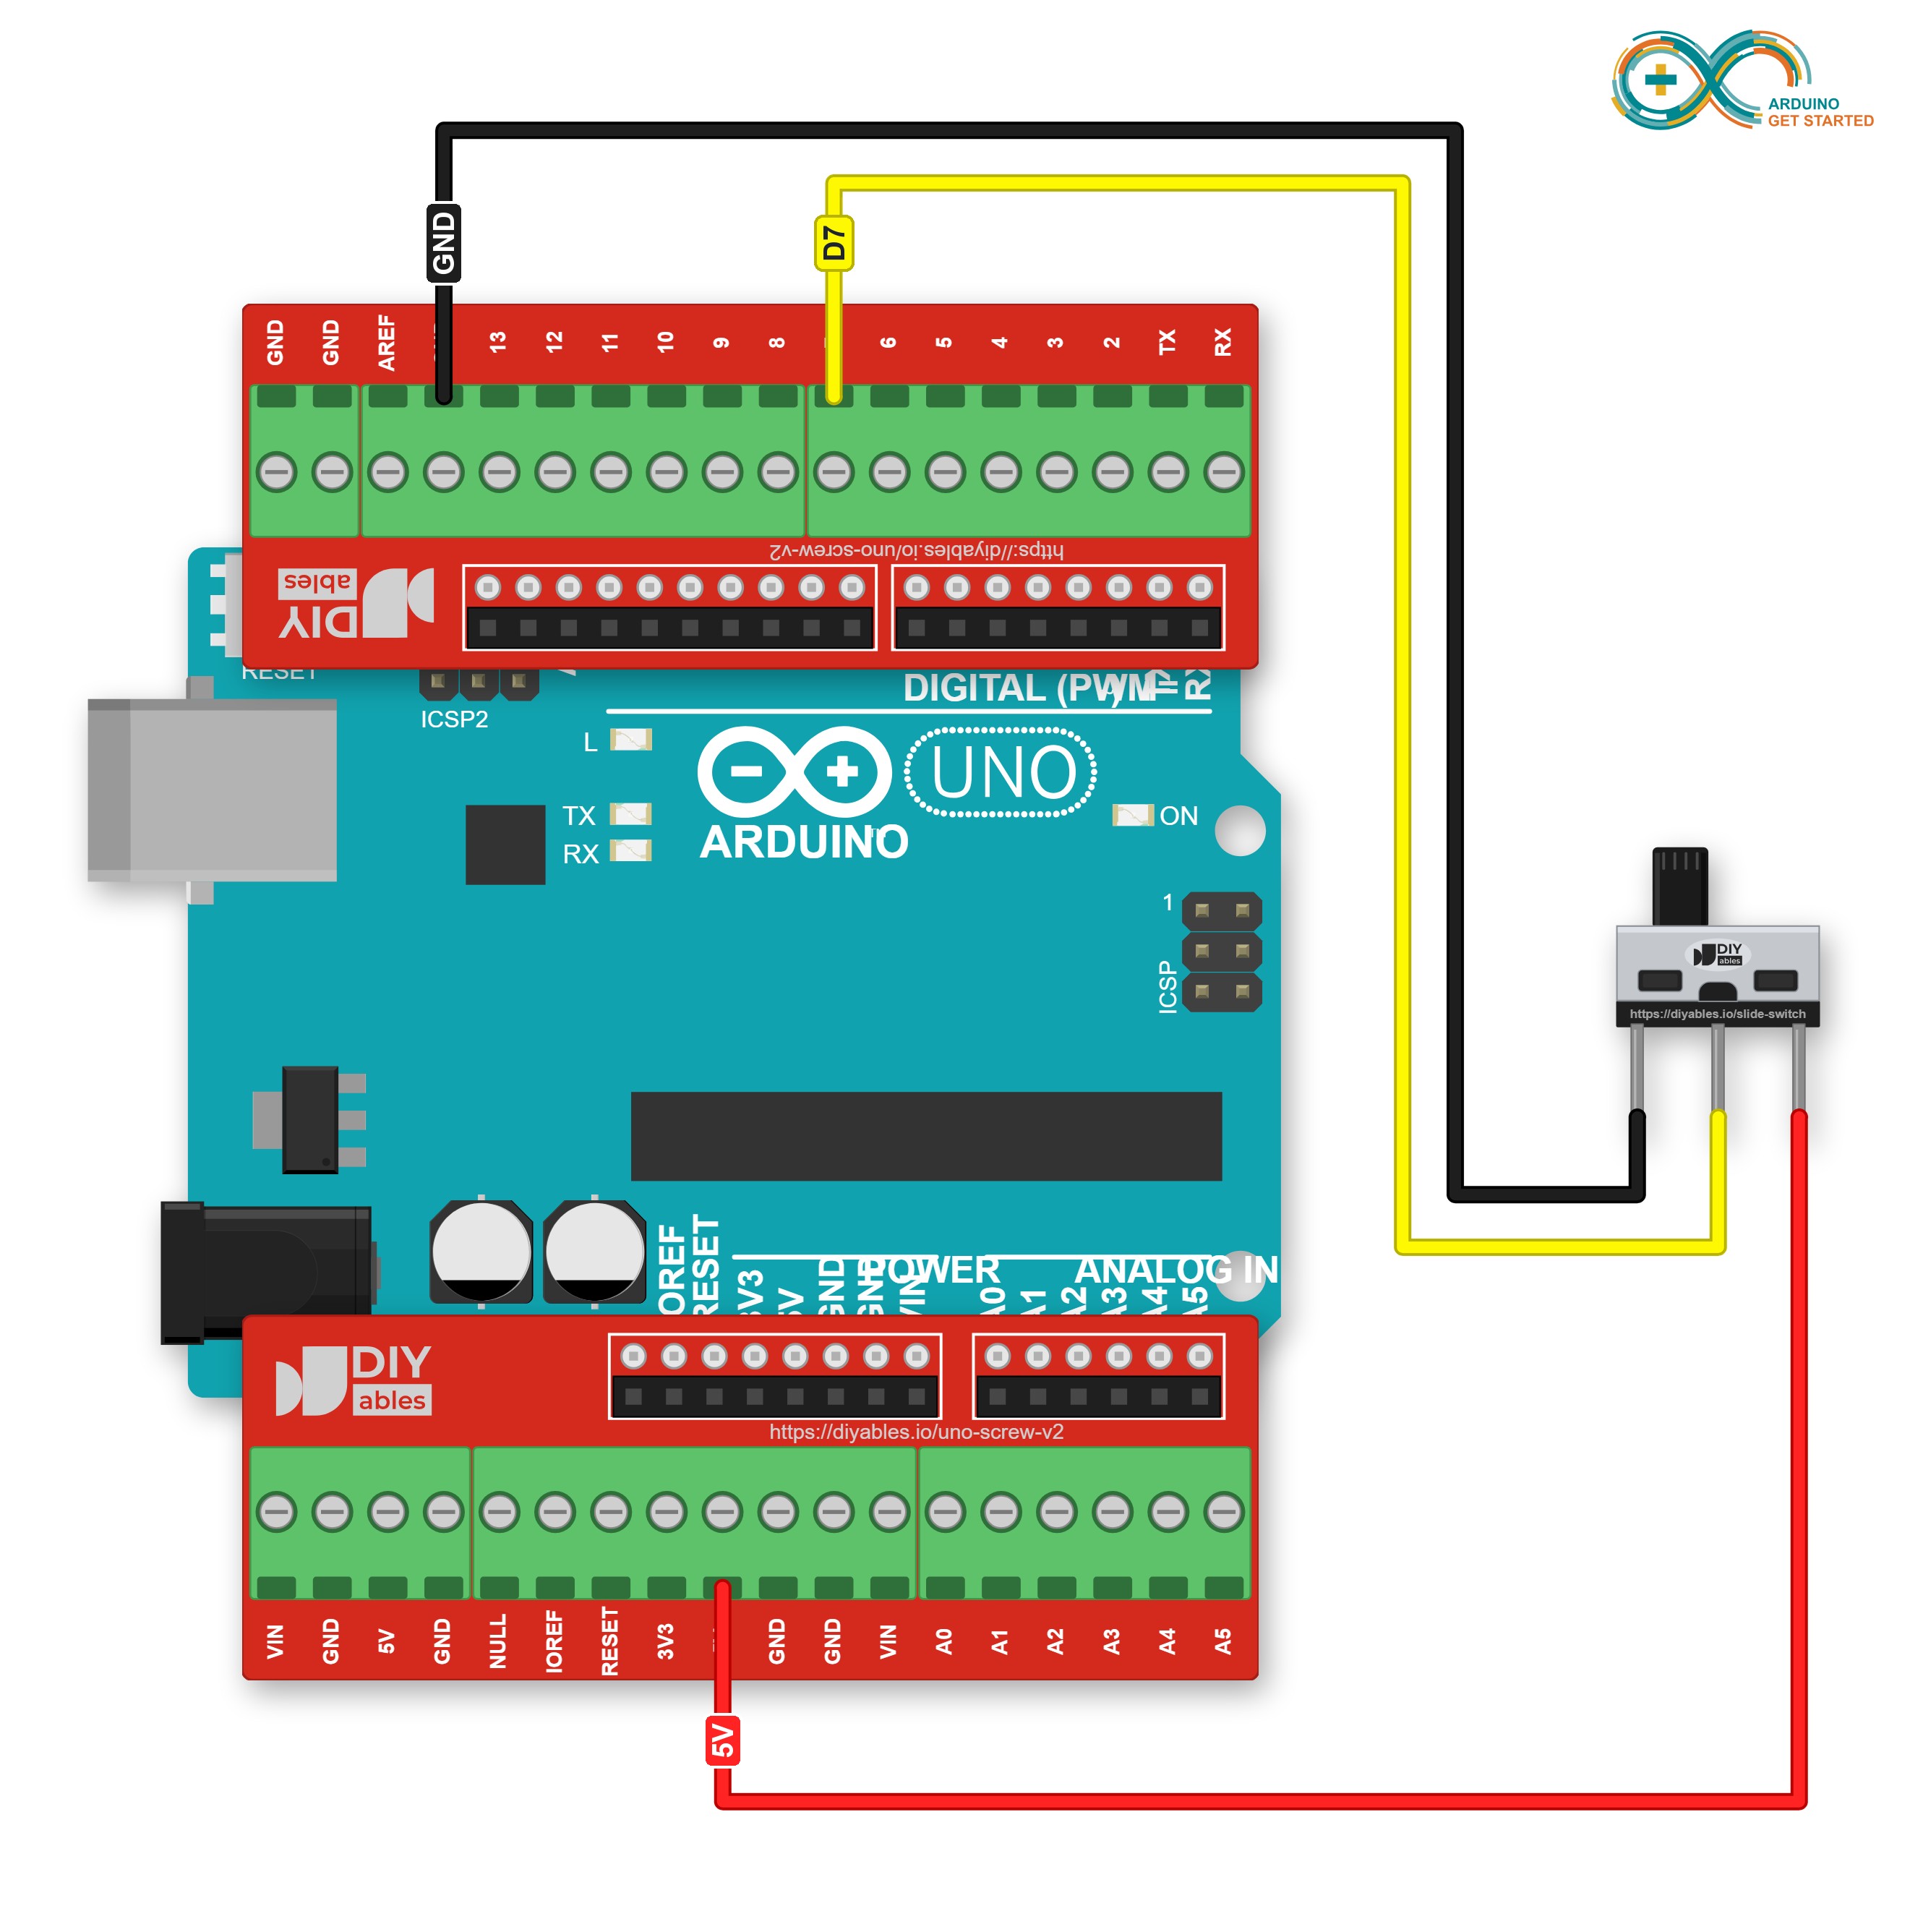
This image is created using Fritzing. Click to enlarge image
※ NOTE THAT:
- No resistor is needed. Through the switch, pin 7 is always tied to 5V or GND, so it cannot pick up random values.
- Pin 3 goes to 5V because 5V is the logic level of the Arduino Uno. The 3.3V pin is not used in this wiring.
- Keep pin 7 as an INPUT. Never make it an OUTPUT in your code: the switch ties it straight to 5V or GND, and an output fighting that can damage the pin.
How To Program For Slide Switch
- Define the Arduino pin that the COM wire goes to:
- Set that pin as a plain input with pinMode(). The switch drives the pin HIGH or LOW by itself, so no pull-up is needed:
- Read the position with digitalRead():
- Handle the bounce. When the handle moves, the metal contacts bounce for a few milliseconds. So when the reading changes, wait 50 ms and read once more before you trust it.
Arduino Code - Slide Switch
The sketch prints the switch position once when Arduino starts. After that, it stays quiet and prints a new line only when you move the handle.
Quick Steps
- Connect Arduino to PC via USB cable.
- Wire the slide switch to Arduino as shown in the wiring diagram.
- Open Arduino IDE, select the right board and port.
- Copy the above code and paste it to Arduino IDE.
- Click Upload button on Arduino IDE to upload code to Arduino.
- Open the Serial Monitor and set the baud rate to 9600.
- Slide the handle to the pin 3 side, then back to the pin 1 side. Do it one more time.
The first line shows where the handle was when the sketch started. Every line after it is one move of the handle. Want ON and OFF the other way round? Swap the GND and 5V wires on pin 1 and pin 3, or swap the two messages in the code.
If the output never changes, check that the pin 7 wire is on the middle pin of the switch, not on an outer one.
Arduino Code - 2-Wire Slide Switch with INPUT_PULLUP
Want fewer wires? Each digital pin of the Arduino Uno has a built-in pull-up resistor. Turn it on with INPUT_PULLUP, and pin 3 needs no wire at all. This helps when the switch is far from the board, or when the 5V pin is already busy.
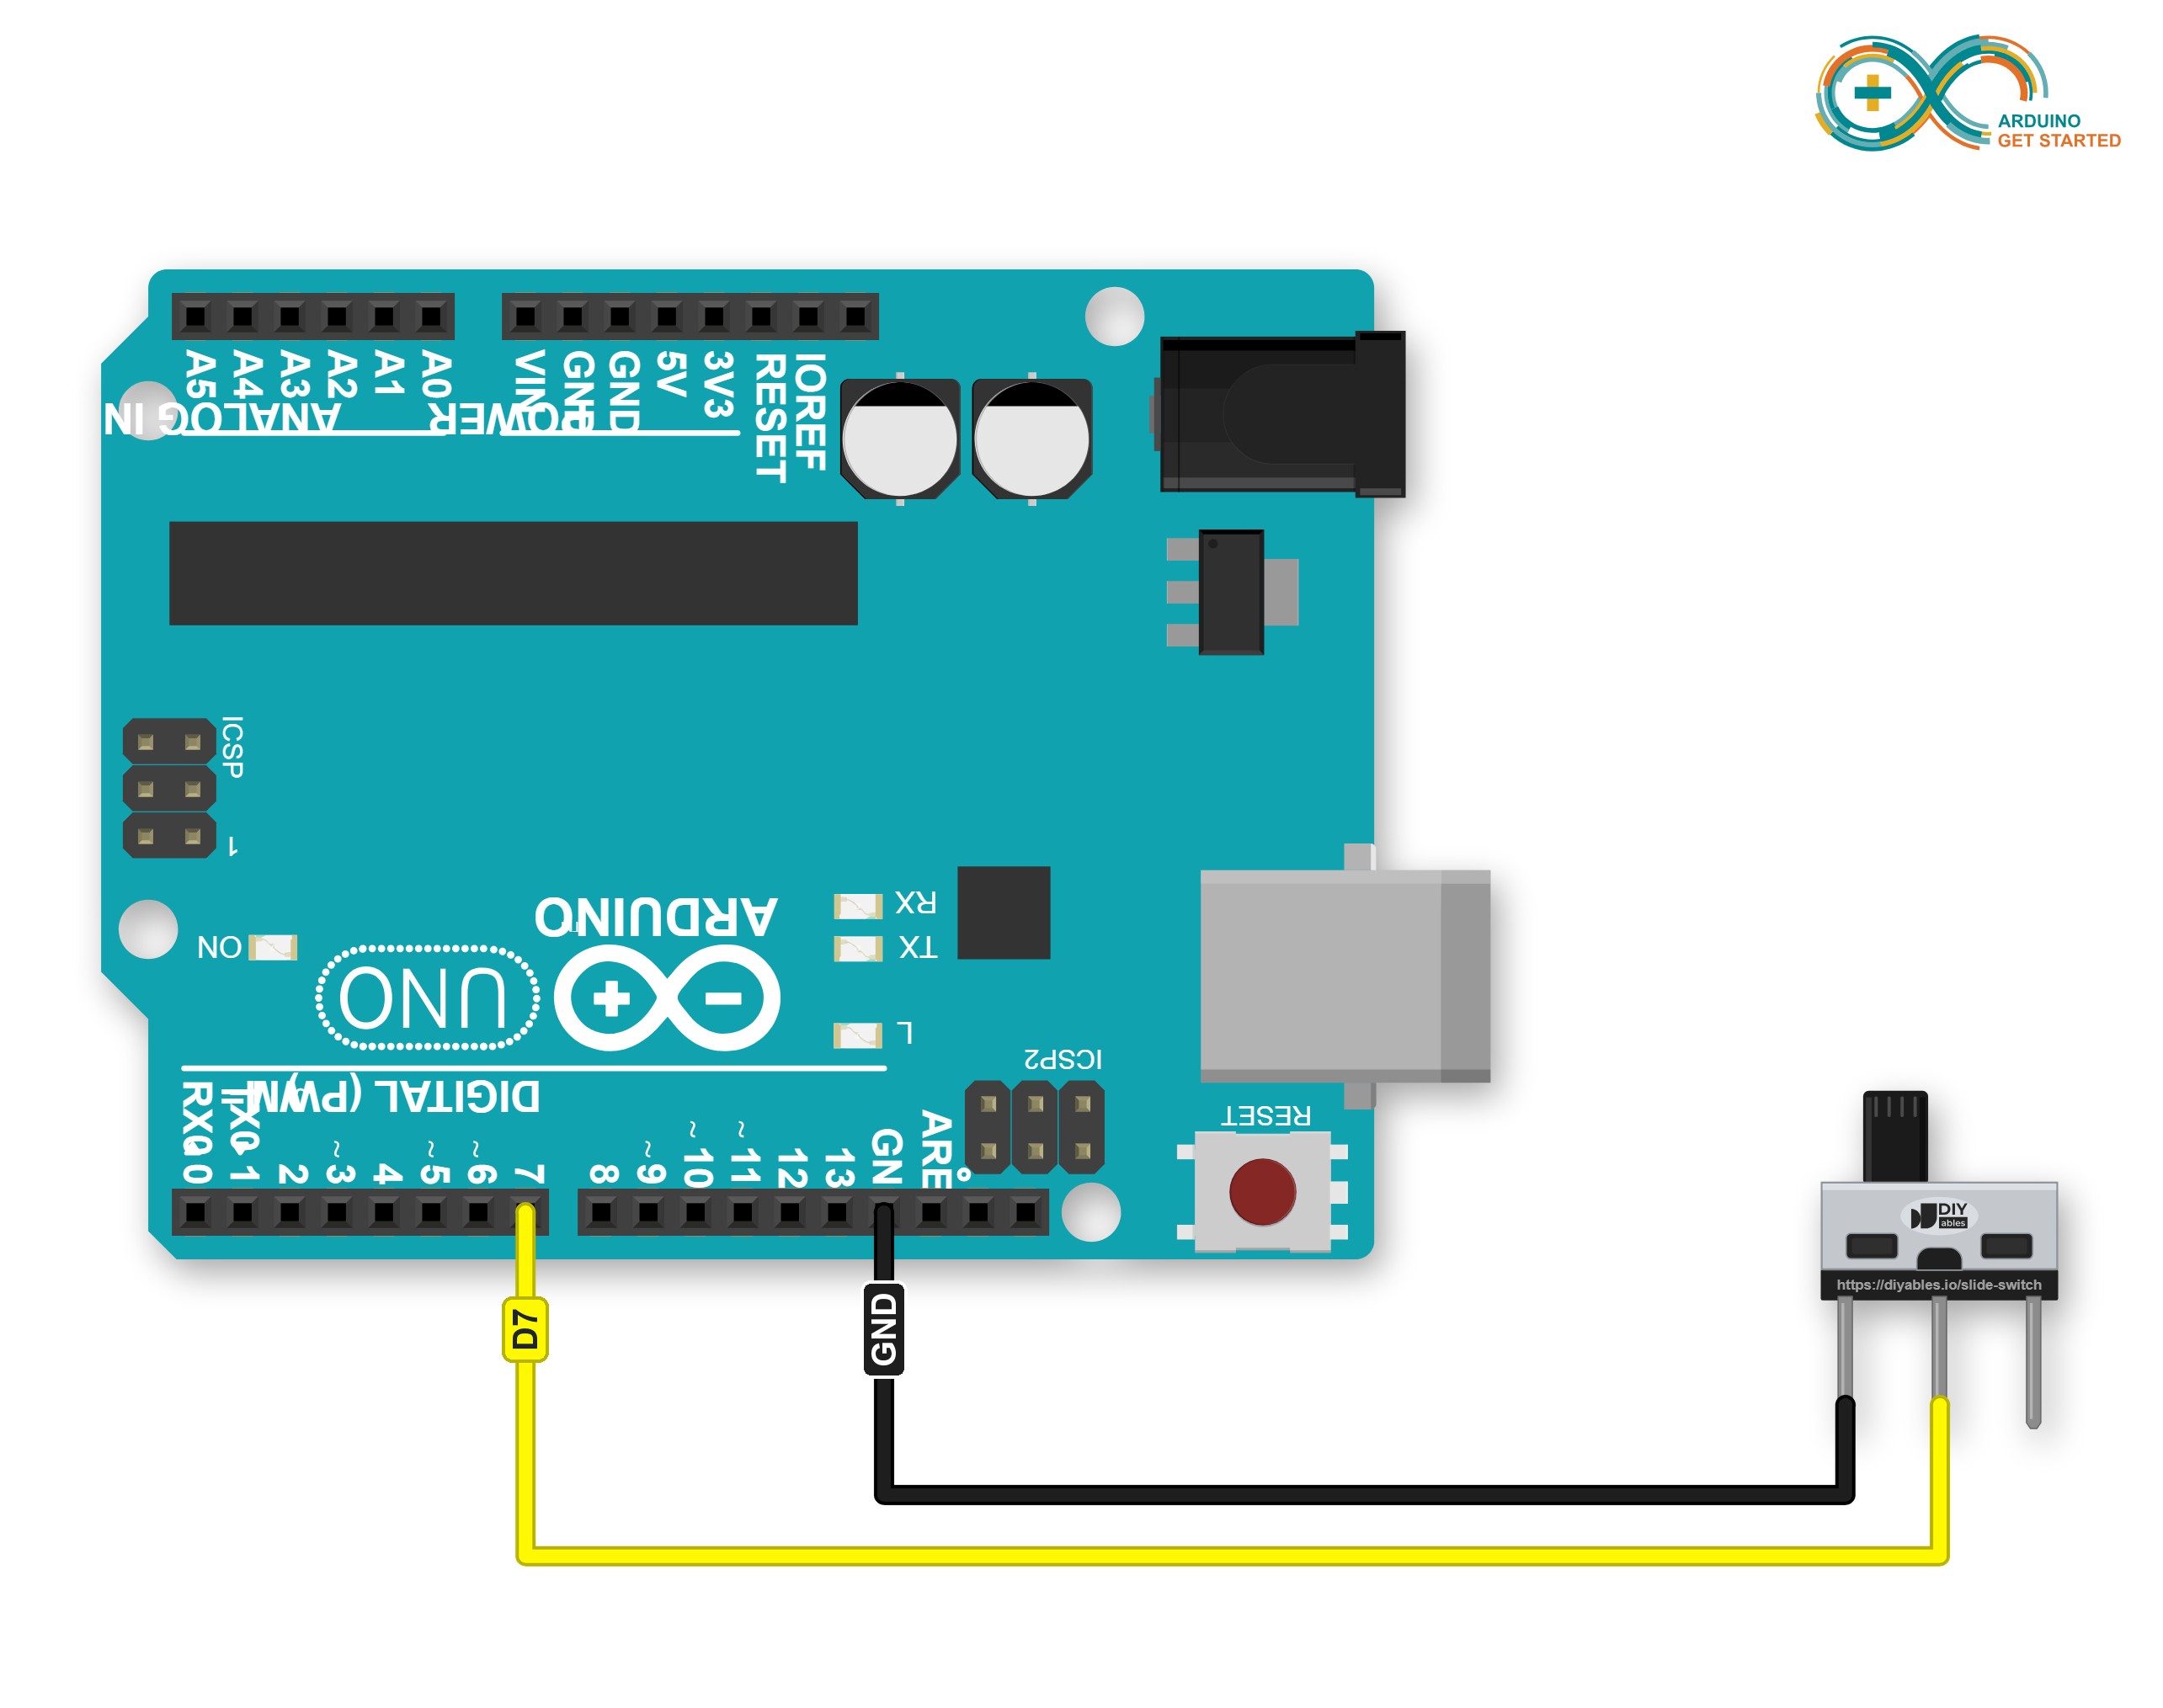
This image is created using Fritzing. Click to enlarge image
| Slide Switch Pin | Arduino Uno Pin |
|---|---|
| Pin 1 | GND |
| Pin 2 (COM) | Pin 7 |
| Pin 3 | not connected |
Note that ON and OFF now swap places:
- Handle toward pin 1: COM is joined to GND, so pin 7 reads LOW. The code calls this ON.
- Handle toward pin 3: COM is connected to nothing. The pull-up resistor pulls pin 7 up, so it reads HIGH. The code calls this OFF.
Quick Steps
- Keep the wiring from the first example, and just remove the wire on pin 3.
- Copy the above code and paste it to Arduino IDE.
- Click Upload button on Arduino IDE to upload code to Arduino.
- Open the Serial Monitor (baud rate 9600).
- Move the handle to the pin 3 side, then back to the pin 1 side.
Need a bigger switch for a panel? See Arduino - Switch. For a row of tiny switches in one package, see Arduino - DIP Switch. For a key that returns by itself after each press, see Arduino - Button or Arduino - Button Module.
Video Tutorial
We are considering to make the video tutorials. If you think the video tutorials are essential, please subscribe to our YouTube channel to give us motivation for making the videos.